How to use a template in the graphic design tool

This page provides information on how to use templates in the graphic design tool. This example uses the A4 sheet template, “A4-blad”.

General settings

  1. Choose the A4-blad template under document templates on the start page of the graphic design tool.
  2. Once you have opened the template, you will find a form on the left-hand side next to the preview pane.
    1. Under “Layout”, you can choose to use a colour plate or an image.
      Layout
    2. “Document language” means that you choose what language setting the document should have. Based upon your choice, the logo will switch between English or Swedish. If you choose “Swedish”, you can select the Ume Sami logo.
  3. By clicking “Colour plate”, you can choose the colour of the headline background and fact box.
  4. As background colour, you can choose between the paper colour or the University’s light beige colour.
  5. If you wish to have a double-sided A4, select “2 pages”.
    2 pages – Grafiskt mallverktyg

Select image

If you have chosen an image layout, the image settings will appear next. Find more details on selecting an image.

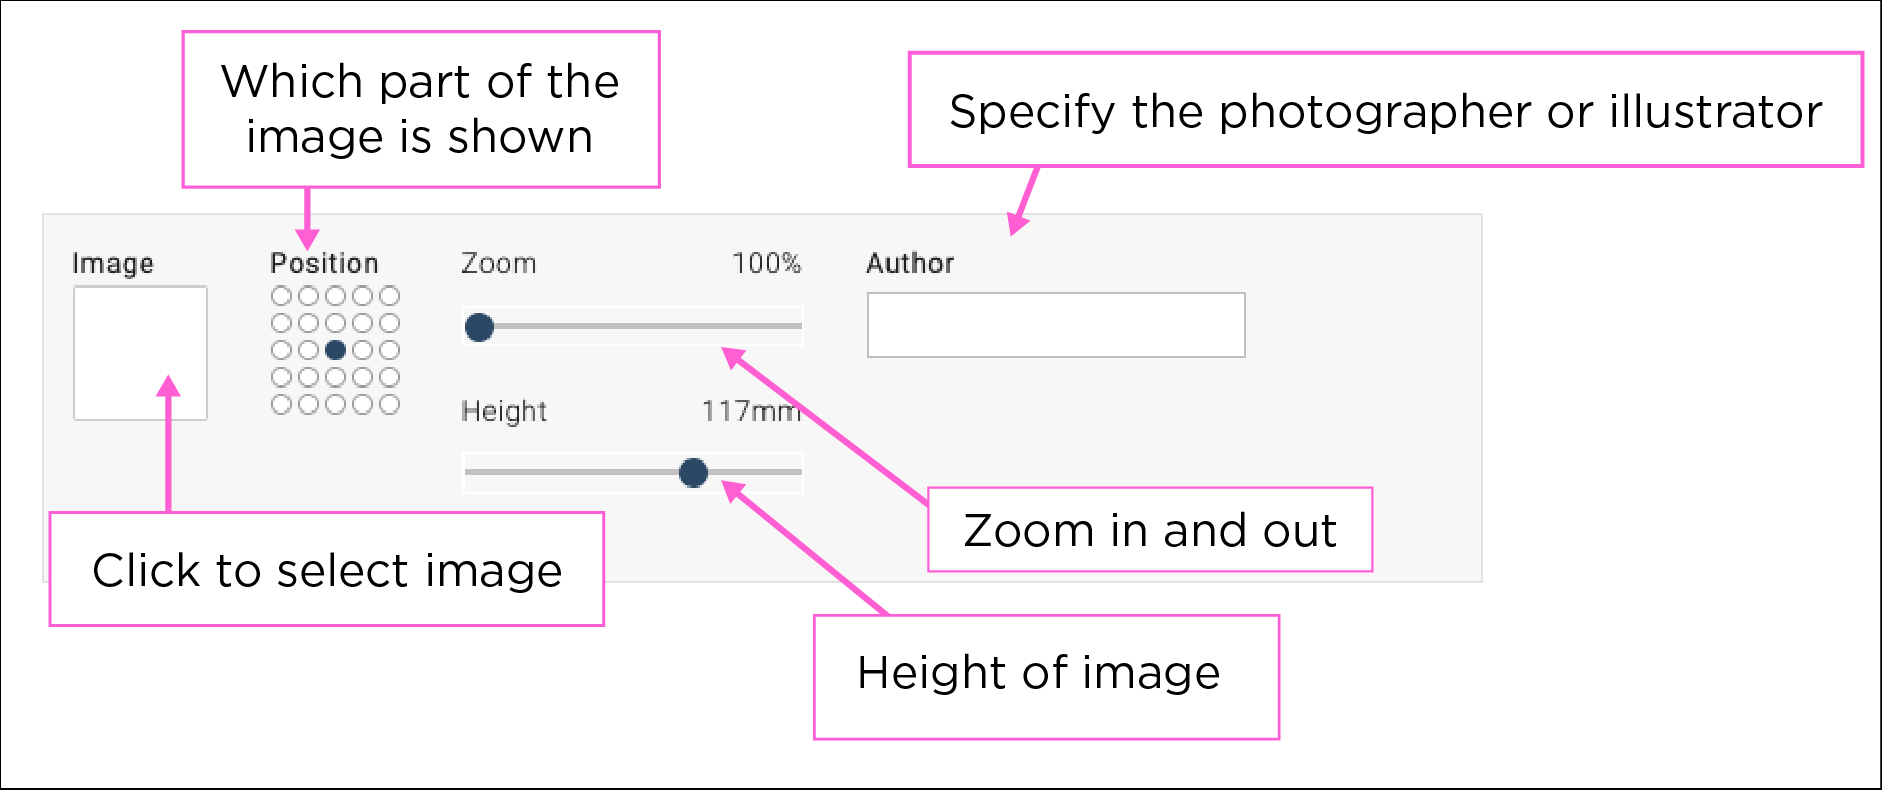
  1. Click the box under “Image” to select an image. You can choose to search for an image in the University’s image database, Mediabanken, or download your own image. Always check that you have the right to use the image. Go to Mediabanken to find information about right to use. Search for the image’s ID number in Mediabanken if you know what image you wish to use.
  2. To select which part of the image should be visible, use the grid under “Position”. You can also zoom in on the image and alter the height of the image.
  3. Always give credit to the photographer or illustrator under “Author”.

Add text

  1. Next up is adding text in the text boxes. The text boxes allow you to:
    1. emphasise text using bold or italics;
    2. create ordered and unordered lists;
    3. use subheadings.
  2. This template (A4-blad) also allows you to alter the size of the heading.
  3. If you add content under “Fact box”, a fact box will appear on the page. You can select the positioning of the fact box in relation to the main text through the grid. The border colour of the fact box is determined by the colour set under “Colour plate” at the top of the form.

Further settings

  1. The next part of the form is intended to be used to present lecturers, authors or similar. You can add an image in a circle accompanied by a headline and a short text.
  2. Click “QR code” if you wish to use a QR code to guide viewers to further reading, or to a registration page for an event, for instance. Paste a functioning web address in the field “Generate QR code, enter web address”. Write a descriptive text of where the link in the QR code leads to.

Download, print or order press

  1. Save the page by clicking “Save” and choose Umeå University. Name the document so you know which one it is. Specifying the template format in the name could be a good idea. Click “Close”.
  2. Once you have closed the document, you will access the document properties. From this page, you can choose to further edit the document or take other actions.
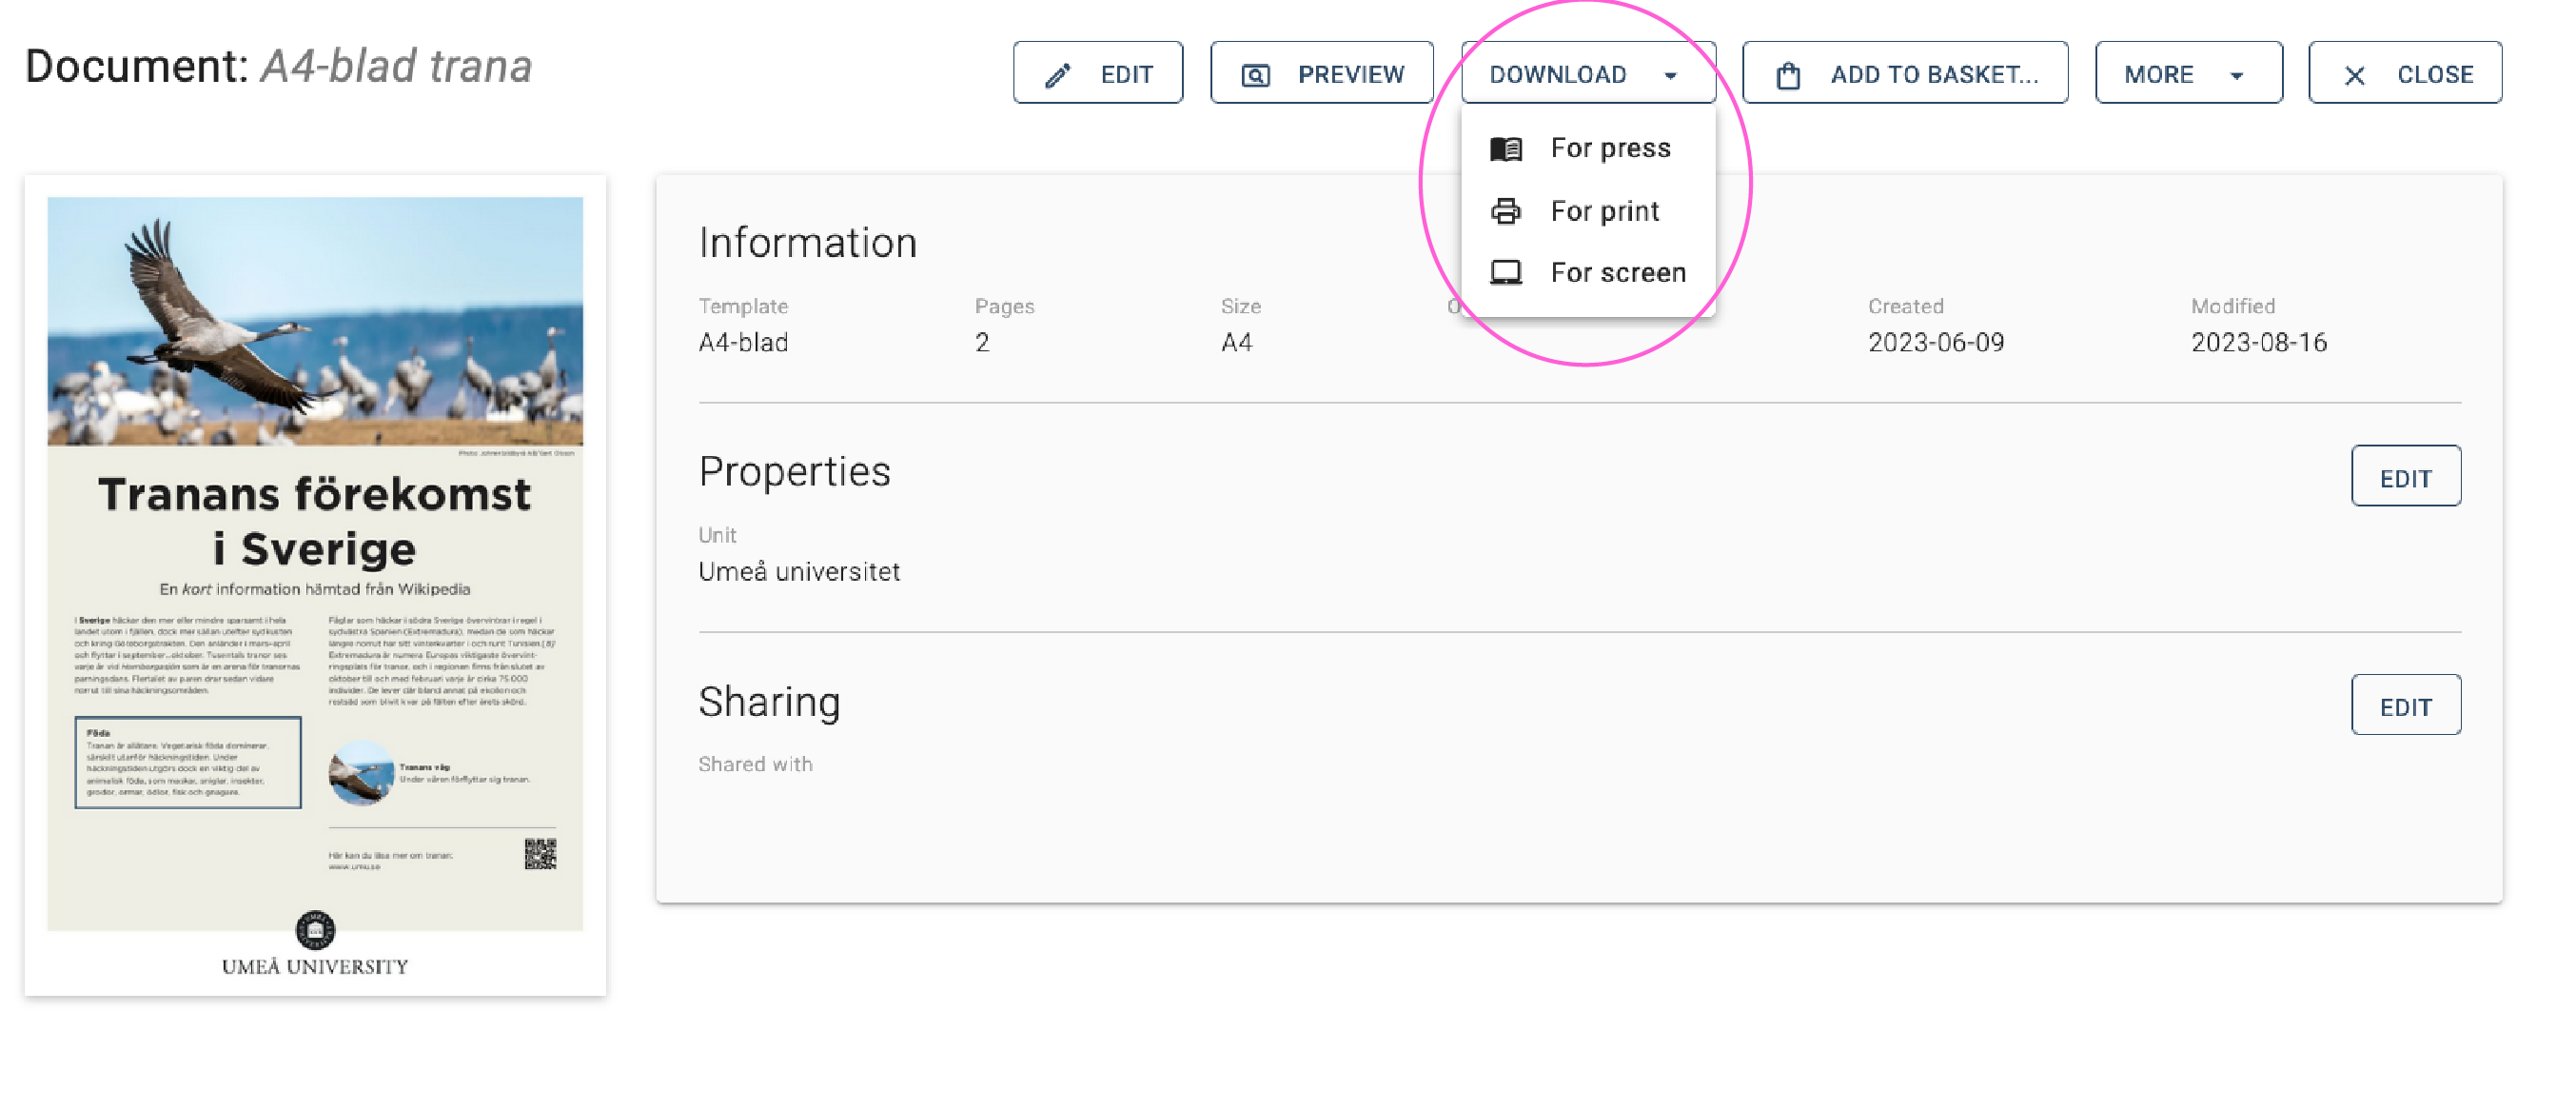
  3. Under “Download”, you can choose between three options. All options generate a PDF, but with varying properties. Learn more about downloading and printing a document.
  4. “For press” generates a PDF with crop marks that is larger than the final format. This is a good choice if you are sending your PDF to a printing office.
  5. “For print” generates a high-resolution PDF to be printed on your own printer. This provides that any images added to the document are in high-resolution formats.
  6. “For screen” generates a low-resolution PDF for digital use. If you plan to upload the file to a web page, you must first make the document accessible.
  7. Add the document to the media basket if you want to order professional printing.
  8. Under “More”, you can do the following:
    1. “Send proof” means that you will send a link to a PDF copy of the document.
    2. “Send document by email” means you send a PDF via email. You can choose which PDF version to send – for press, for print or for screen.
    3. “View document history” allows you to see when the document was saved, downloaded or sent.
    4. “Save copy” allows you to produce a similar document but with slight modification. You are asked to choose a new name.
    5. “Delete document” removes the document.

See a video of the content presented above

English subtitles can be enabled under CC in the bottom-right corner. Although the tool interface is Swedish in the film, the tool can be set to English under My user account.

How to download and print using the graphic design tool

When you have finalised a document by filling one of the document templates with content, you must save and close the document. This will take you to the properties view from which you can: continue to edit, preview, download, order print, share documents, among other things.

To print a document, you can choose to preview and print straight from the tab that pops up in your web browser. Or you can choose to download a PDF. There are three different types of PDFs to download that all have different characteristics:

  1. “For press” generates a PDF with crop marks that is larger than the final format. This is a good choice if you are sending your PDF to a printing office.
  2. “For print” generates a high-resolution PDF to be printed on your own printer. This provides that any images added to the document are high-resolution images.
  3. “For screen” generates a low-resolution PDF for digital use.  If you plan to upload the file to a web page, you must first make the document accessible.

Download a PDF – Grafiskt mallverktyg

Graphic design tool – introduction

The graphic design tool has been developed to simplify for staff to produce products for print and press with the help of templates following Umeå University’s visual identity. This page provides an overview of the functionalities available in the tool.

You can choose to learn more by watching the video or by reading the text below.

Introductory video

English subtitles can be enabled under CC in the bottom-right corner. Although the tool interface is Swedish in the film, the tool can be set to English under My user account.


Logging in

To use the graphic design tool, you need to log in using your Umu-id.

  1. Go to the login page for the graphic design tool.
  2. Click Log in.
    Grafiskt mallverktyg -log in

Start page

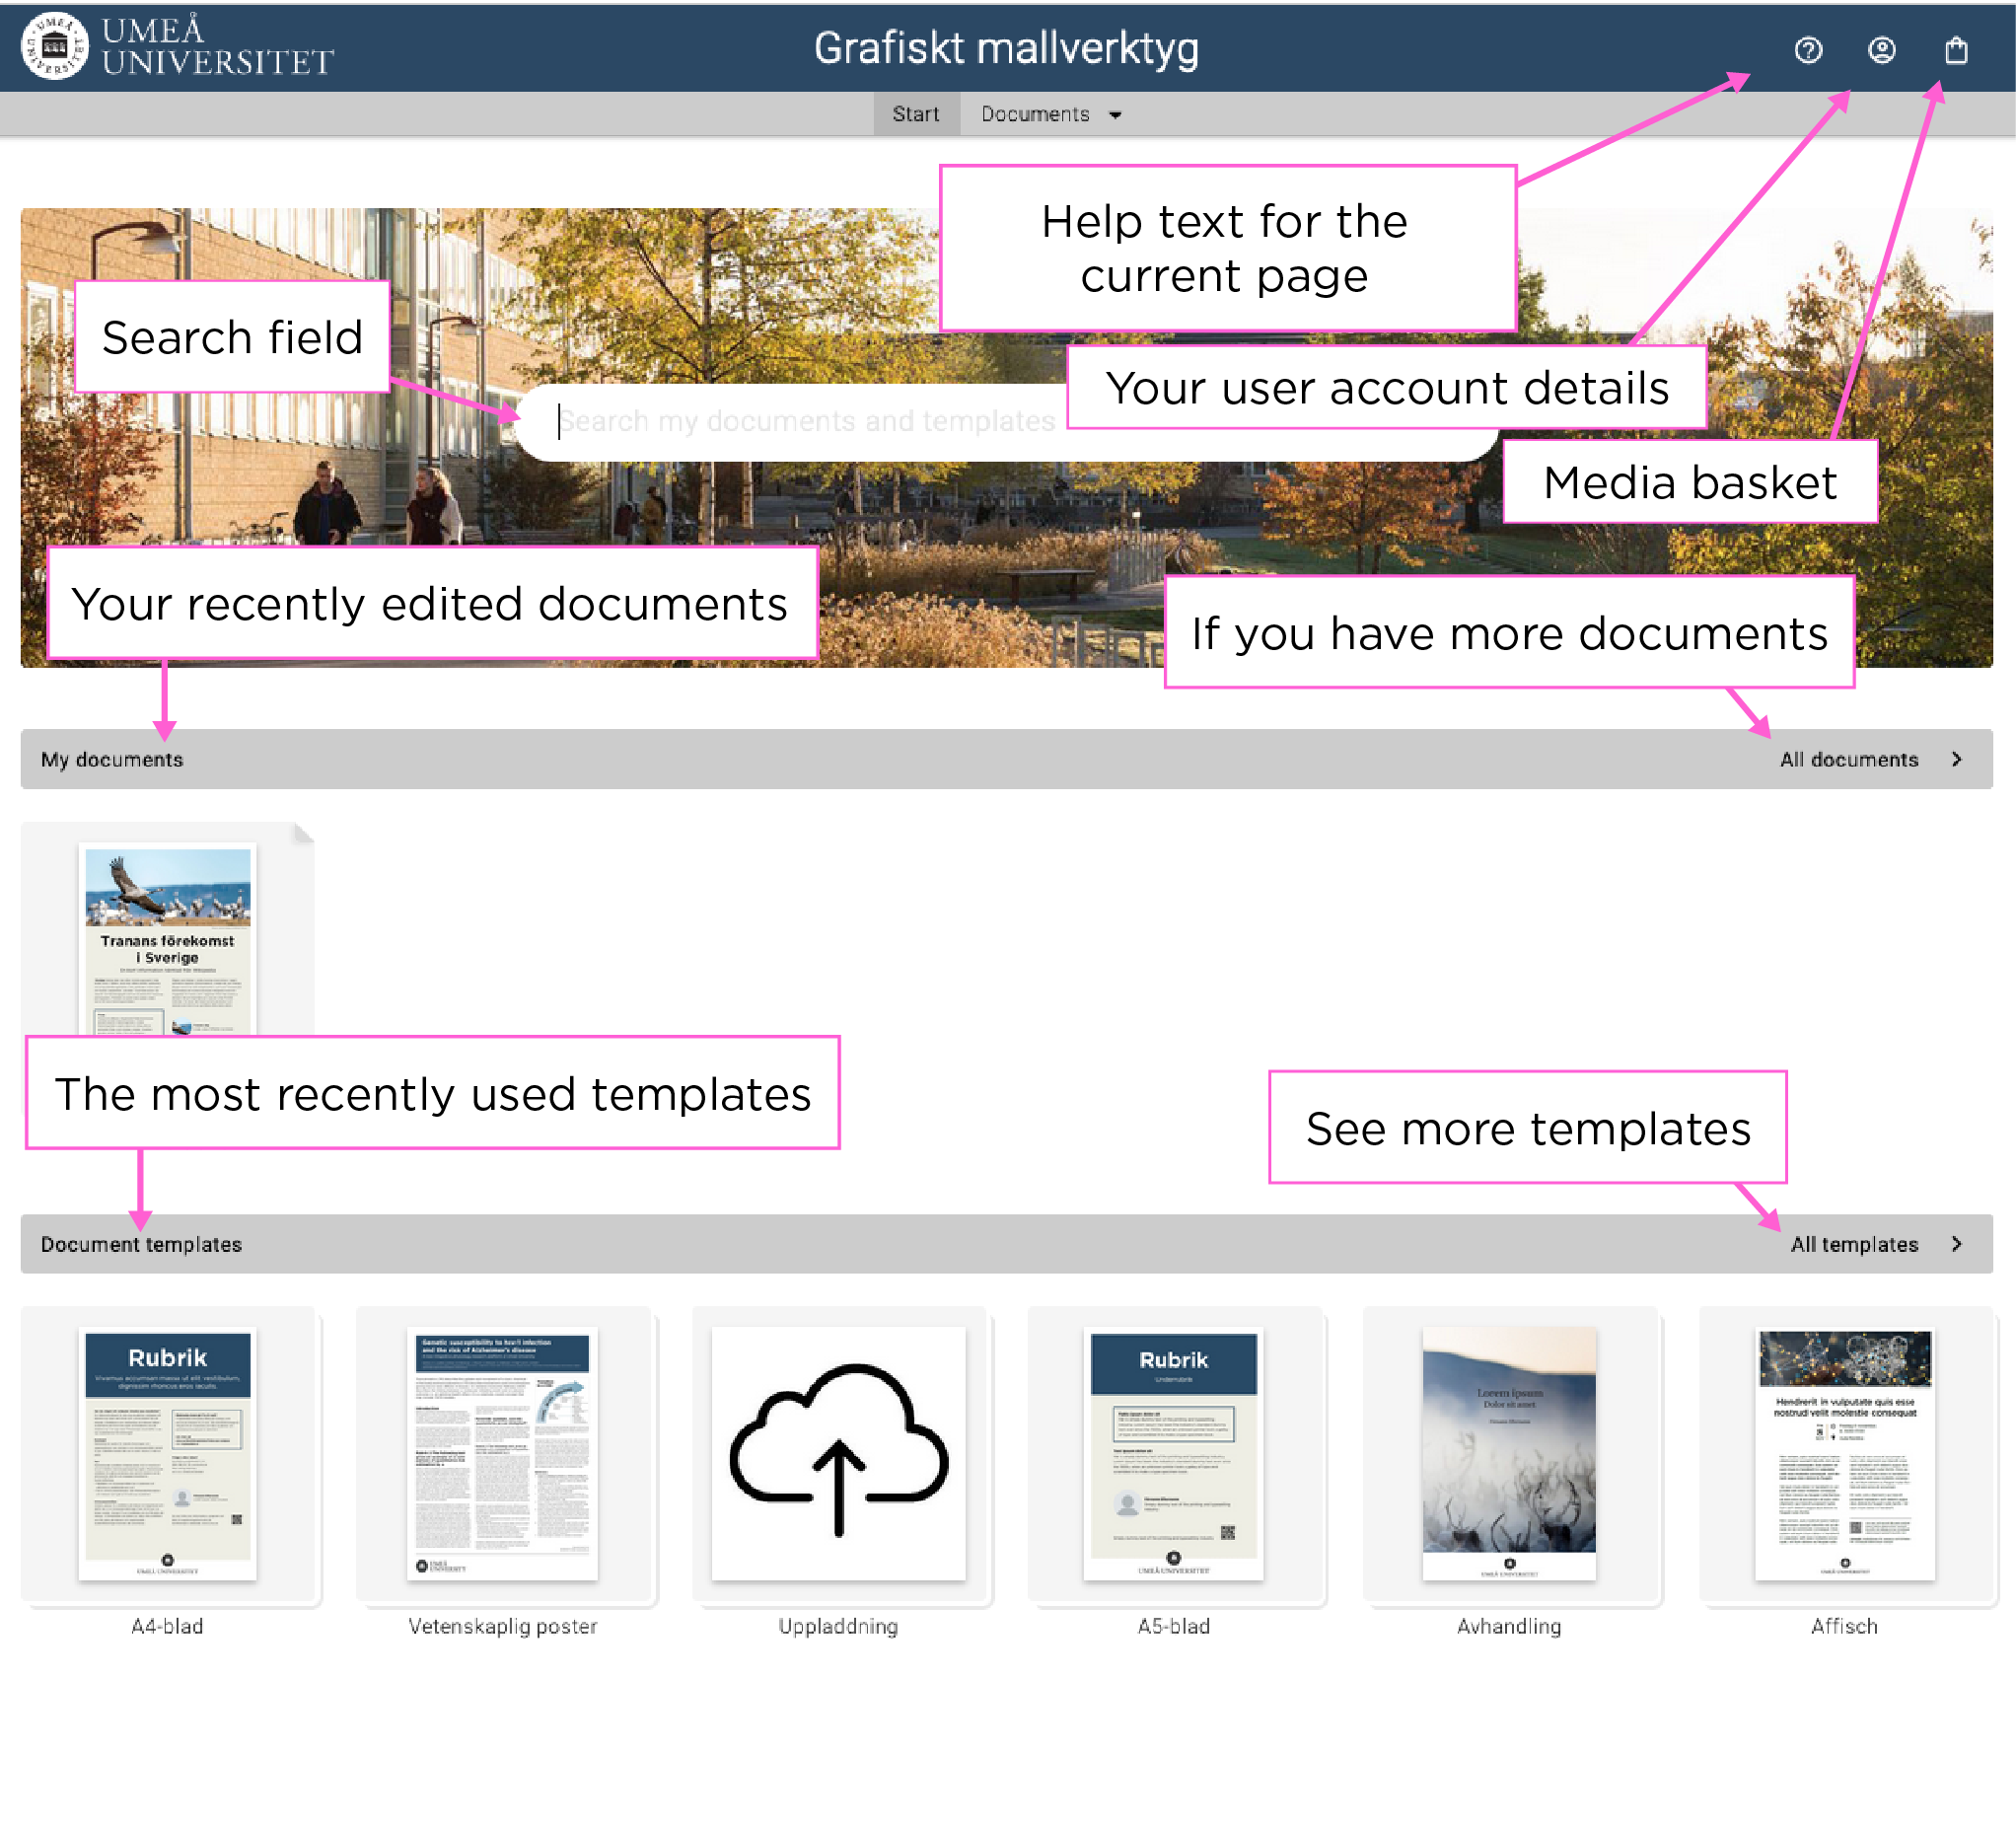
On the start page, you will find a search field where you can search among templates or documents. You can also see your recently edited documents and available document templates.

Start page – grafiskt mallverktyg

Under the icon “My user account” in the top-right corner, you can:

  • change your account details;
  • set up and manage user groups;
  • overview your orders;
  • set system language; and
  • log out.

The checkout icon is your media basket, which contains all documents you have added. Press the icon to proceed with placing an order.


Insert an image in the graphic design tool

Settings may differ slightly between the different templates in the tool.

The form for the document template looks like this:

Document template for images.

  1. Click the empty white box to select image and the following field will pop up:
    Image field
  2. Under “Search”, you can search and select an image from the University’s image database, Mediabanken. The easiest way to search among available images is to go to Mediabanken, find the ID number and paste it in the graphic design tool search field.  Always check that you have the right to use the image. You can also choose to upload your own image.
  3. After selecting an image, there are some settings you can make.
    Image settings

    • “Position” determines what part of the image is shown. Try your way forward.
    • “Zoom” allows you to zoom in and out of the image within the available area.
    • “Height” is available in some templates and allows you to alter the height of the image.
    • In the field labelled “Author”, you must specify the photographer or illustrator of the photo or illustration.

Record meetings in Teams

In this manual, we describe how to record digital meetings in Teams, and where to find the recording when the meeting is over. Please note that it is important that you notify the participants in the meeting beforehand so they can decide whether it is okay to be recorded.  

Think before you record a meeting 

Ideally, avoid recording meetings unless you absolutely have to. Rather, write memos to document the meeting. If you still want to record a meeting, you should: 

  • Inform the participants in the meeting before so they can decide whether it is okay to be recorded. 
  • Ensure that the information recorded does not contain sensitive data. 

Join a Teams meeting

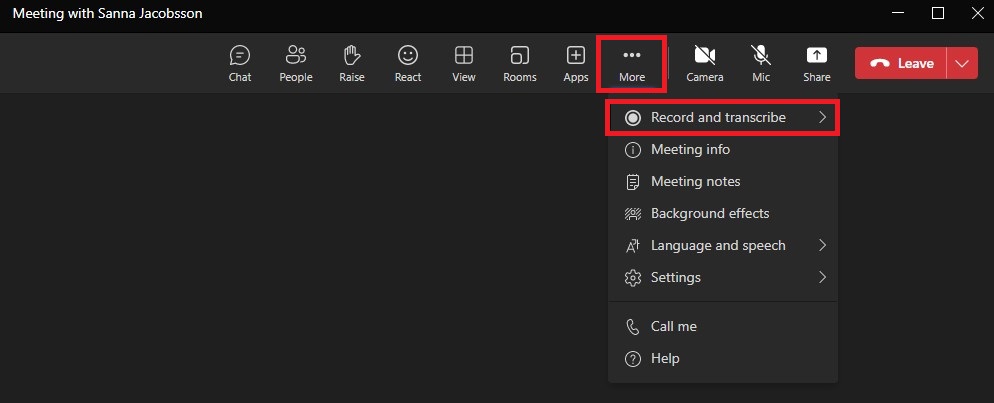
  1. After you start or join a teams meeting, click More, and then  click Record and Transcribe.
    Image showing how to record you meeting
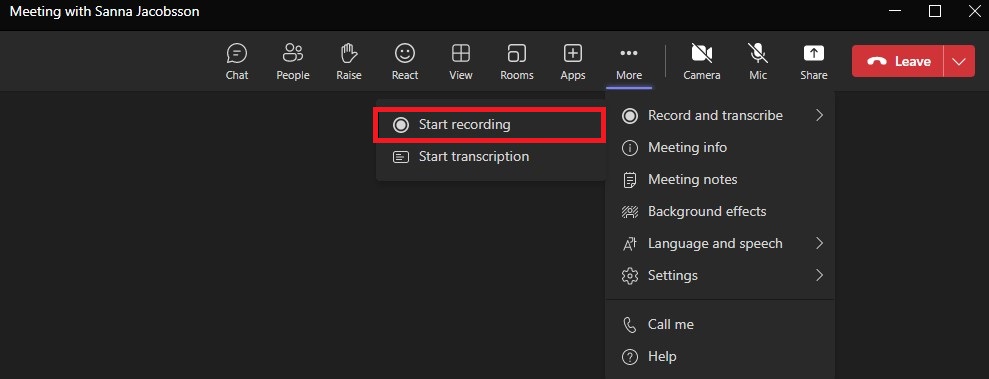
  2. Now you will bring up another box, click Start recording when you are ready. Here you can also choose to Start transcription, if you want to transcribe the meeting.
    Image showing how to start recording your meeting
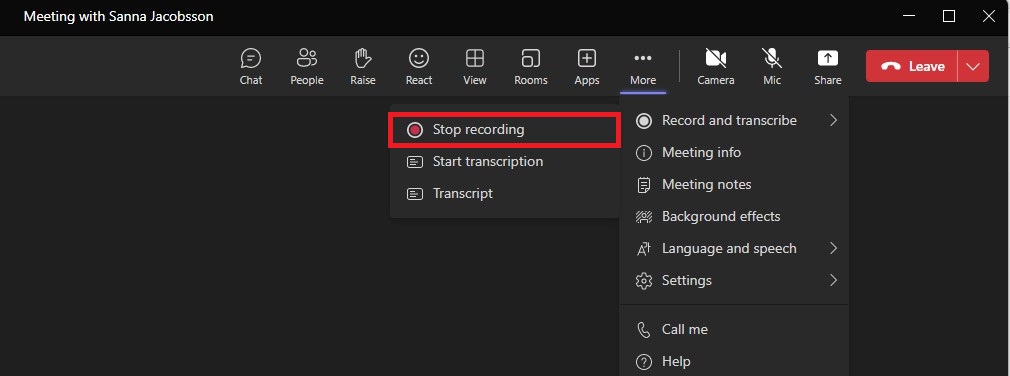
  3. When you want to end the recording, do the same as when you started recording. You go to More and then Record and Transcribe, then click Stop recording.  Recording also stops automatically when the meeting ends.
    Image showing how to stop recording your meeting
  4. Now you have made a recording of your Teams meeting. It may take a few minutes for the recording to be saved. The recording will be automatically saved in the meeting chat after the meeting is finished. Depending on the type of Teams meeting you recorded, the recording will be saved in different places 
    Channel meeting: The recording is saved in a folder under “Files” in the channel’s SharePoint, where all members of the team have access to it.  
    Regular meeting: The recording is saved in the “Recordings” folder on OneDrive for the one who started the recording. 

Automatic recording 

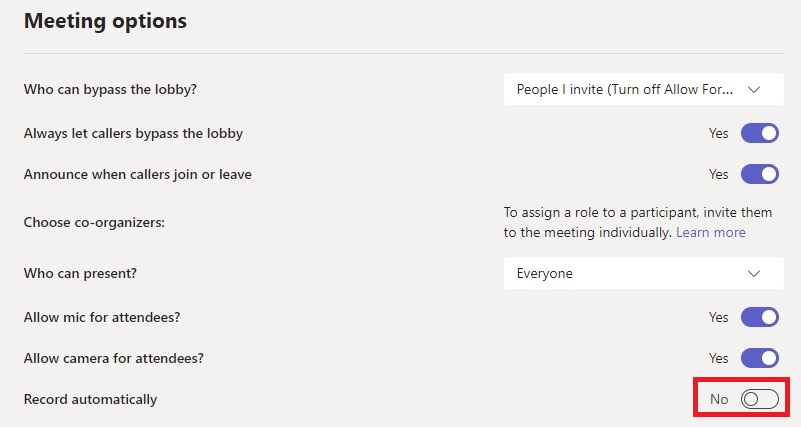
Before the meeting begins, you can choose to have it recorded automatically. Go to Meeting Options, and then check Record automatically. If you choose to do this, it is important that the participants in the meeting agree before the meeting starts that it is okay to be recorded.
Image showing meeting options in Teams

Transfer a call

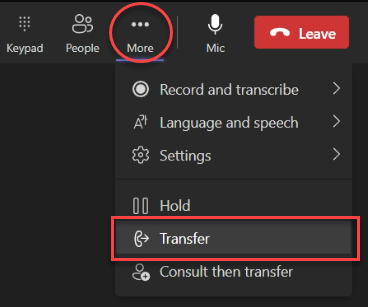
1. When you’re in a call, select More actions > Transfer in your call controls.

2. Start typing the name of the person or phone number you want to transfer the call to and select them when they appear.

3. If you are transferring to another Teams user, turn on Ring back if there’s no answer to send the call back to you if the recipient doesn’t answer. If this setting is not turned on the call will be transferred to the recipient voicemail if there is no answer. If you get the call back the popup toast will show that the recipient was not reached.

4. Select Transfer to complete the transfer.

Consult then transfer

You may want to check in with someone before you transfer a call.

Note: Consult then transfer is not available in Teams for the web.

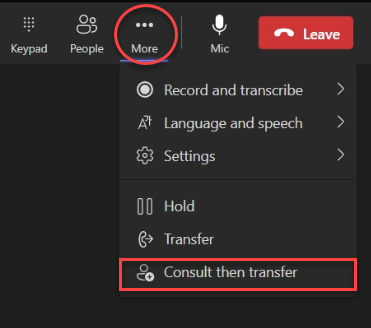
1. When you’re in a call, select More actions   > Consult then transfer.

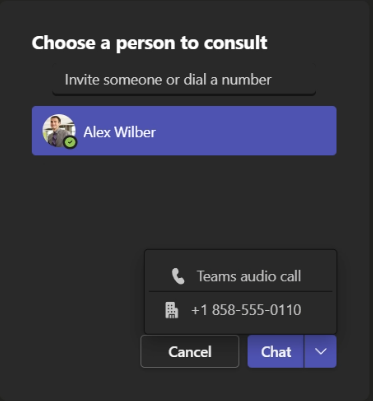
2. Under Choose a person to consult, start typing the name of the person you want to reach or a phone number and select them when they appear.

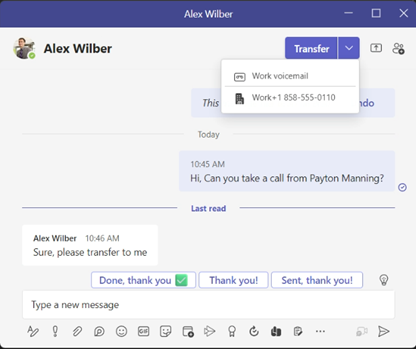
3. Consult with them by calling or using chat. Click on the chat button to start a chat, or select Teams audio call from the drop down options.

4. When you’re ready, hit Transfer to complete the transfer.

Log-in/log-out from Call Queues in Teams

When you are assigned as an agent in a Teams Call Queue, it is possible to opt-in (sign in) and opt-out (sign out). It is only when you are in opt-in status that you will get calls from the Call Queue routed to your Teams client.

Call Queues can be configured so you only get calls when you are in the status “Available” (Green).

The option to sign out and in can be disabled for some Call Queues, talk to the owner of the Call Queue if you are not able to use this function.

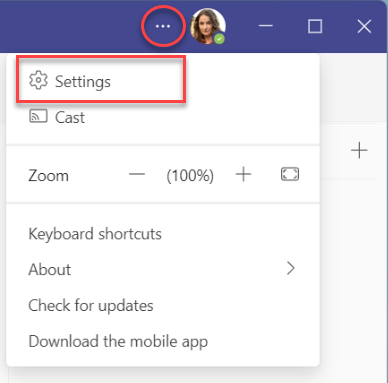
1. Open Settings in Teams by clicking on the three dots next to your profile image and select Settings.

Settings in Teams

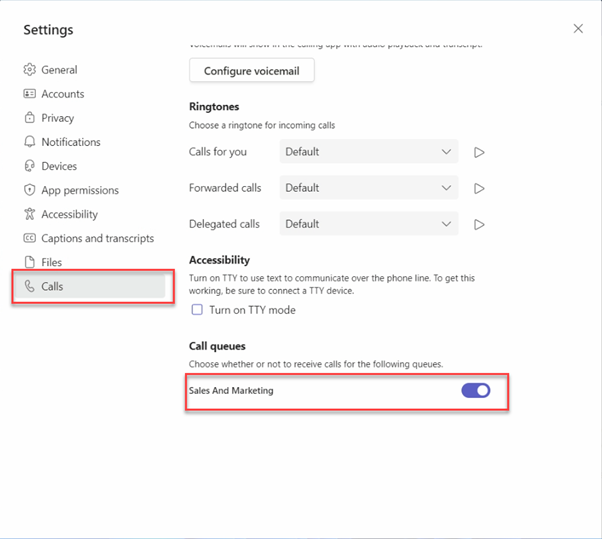
2. Open Calls in the left hand menu in settings and scroll down and you will see all Call Queues that you are assigned to. Click on the toggle switch to opt-in or opt-out.

Calls settings in Teams

Opt-in status  

Opt-out status

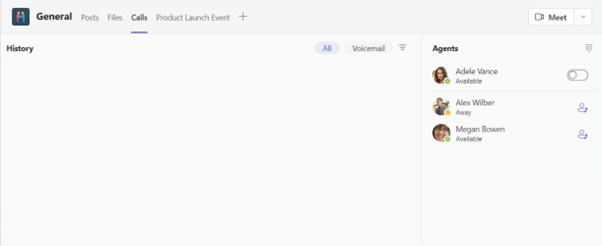
If the Call Queue you are using is attached to a Teams channel you can opt-in / opt-out directly from that channel in Teams.

1. Open the channel your Call Queue is connected to and select the Calls tab.

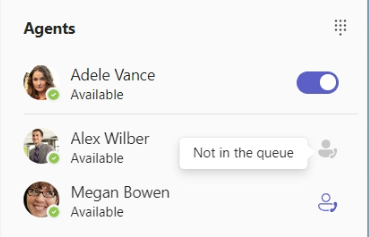
2. Next to your name click on the toggle switch to opt-in / opt-out.

Switch next to your name

3. You can also see other users assigned to the same Call Queue and if they have opted-in or opted-out.

Agents in call queue

Create a booking site in Bookings

Bookings is a digital booking tool where you can both book other people’s services and create your own pages where people can book your services. For example, it can be tutoring times, counseling, meetings, or other services of your choice. Below you can see a description of how to create your own booking page. 

Go to the portal at o365.umu.se

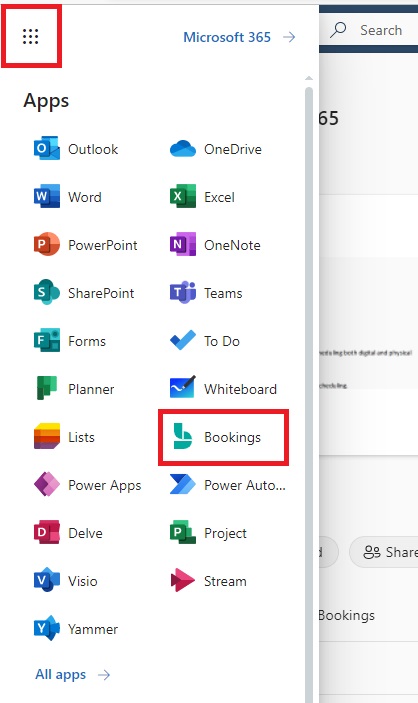
  1. Go to “the waffle” in the top left corner, and then click on Bookings.
    Image showing how to navigate to to Bookings
  2. Now, you are on the Bookings start page. To create a new booking site, click on Create.
    Image showing how where to create your booking site
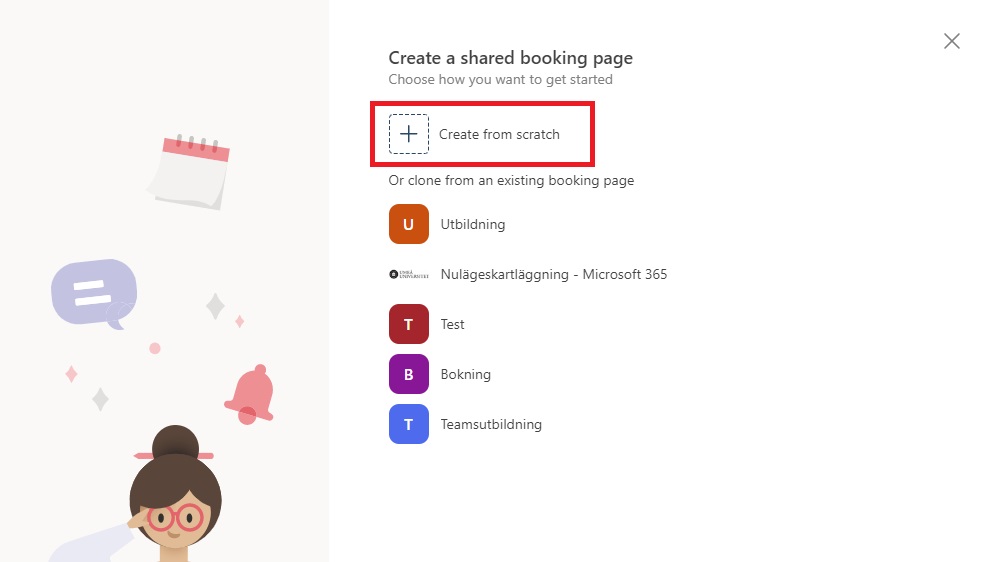
  3. Now you can choose if you want to create a new booking site, or if you want to clone an existing calendar (booking site). To create a new, you click on Create from scratch.
    Image showing how to create a new booking site
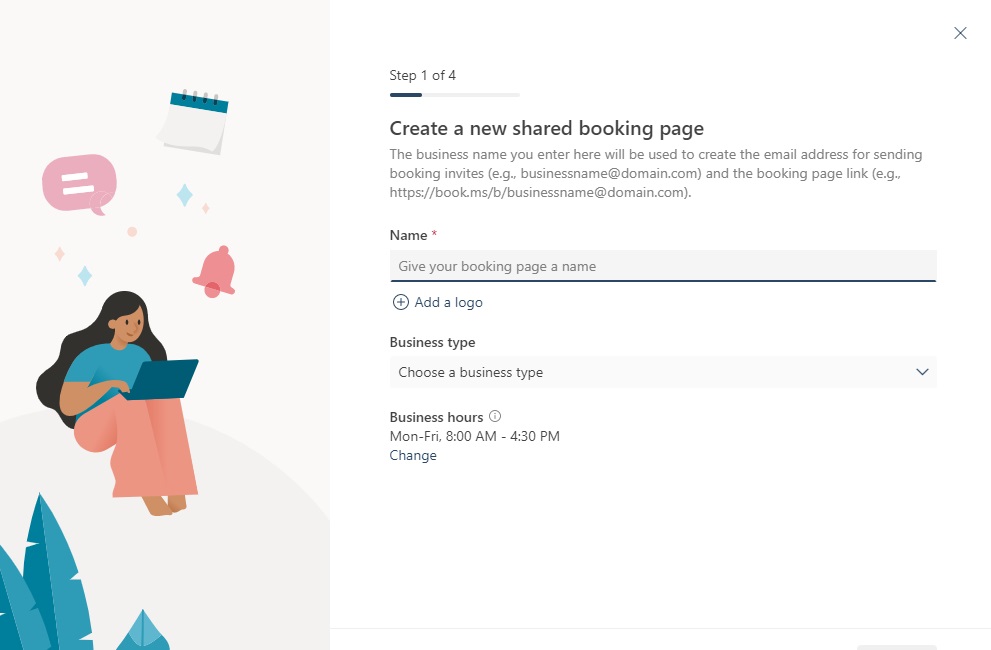
  4. Now you choose a name for your booking site, the display name can be changed afterwards, however, the address name cannot be changed, so remember that if you change the name on your booking site, only the display name changes. You can also add a logo that will be shown on the start page of your booking site. On “Business type” you choose whatever fits your service the most.
    Image showing how you enter the namne for the site
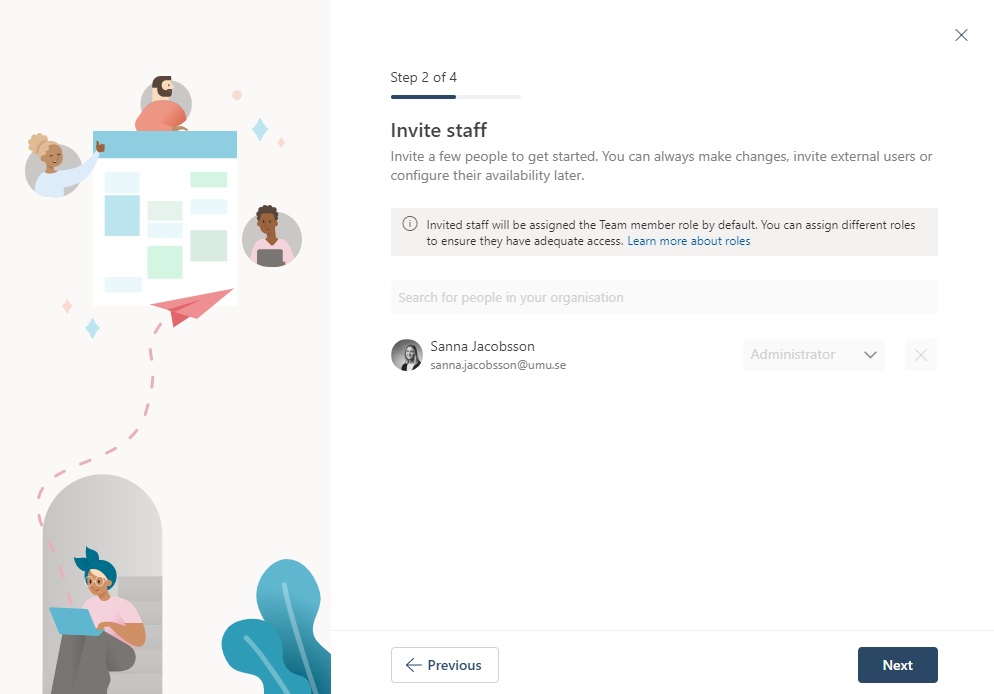
  5. Here you can choose if you want to invite another person to manage your booking site. In the search bar you can search for people in the organization. Afterwards, you can add more people that get access to the booking site. The one that creates the booking page, get the title: “Administrator”, and can manage and edit the site. The people you invite, is “guests”, and do not have the permissions. This can be changed when the site is created. You can also set up room and resources as staff if you want a booking calendar for them.
    Image showing how you can invite staff to your booking site
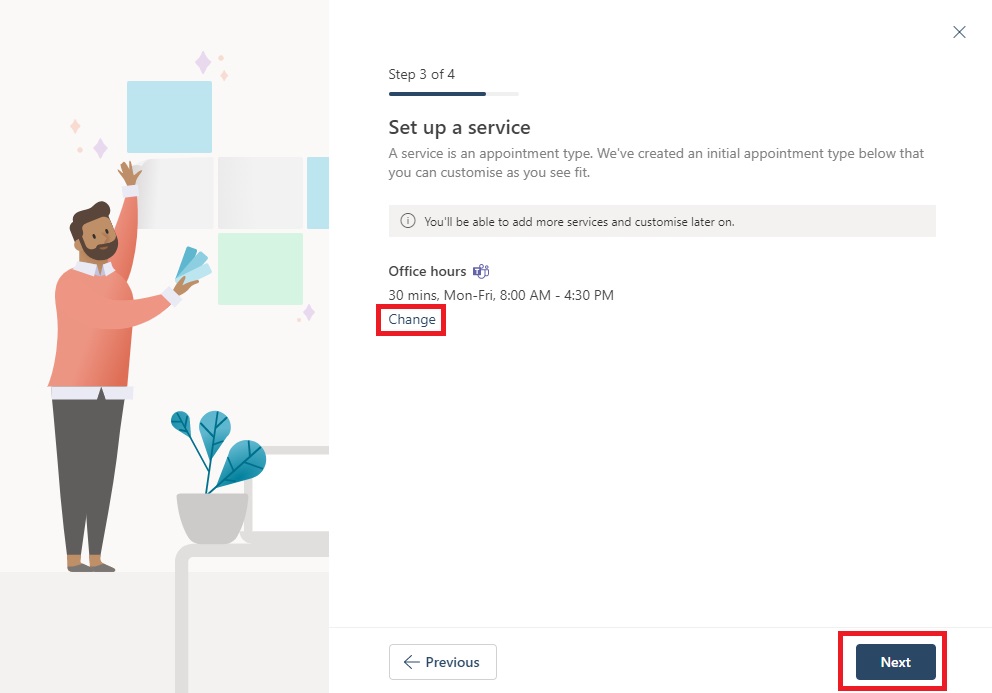
  6. Here you can adjust your times for your service. Click on Change if you want to change the pre set times. This can also be changed once you have created your booking site. Click on Next to continue creating the site.
    Image showing how you set up your times
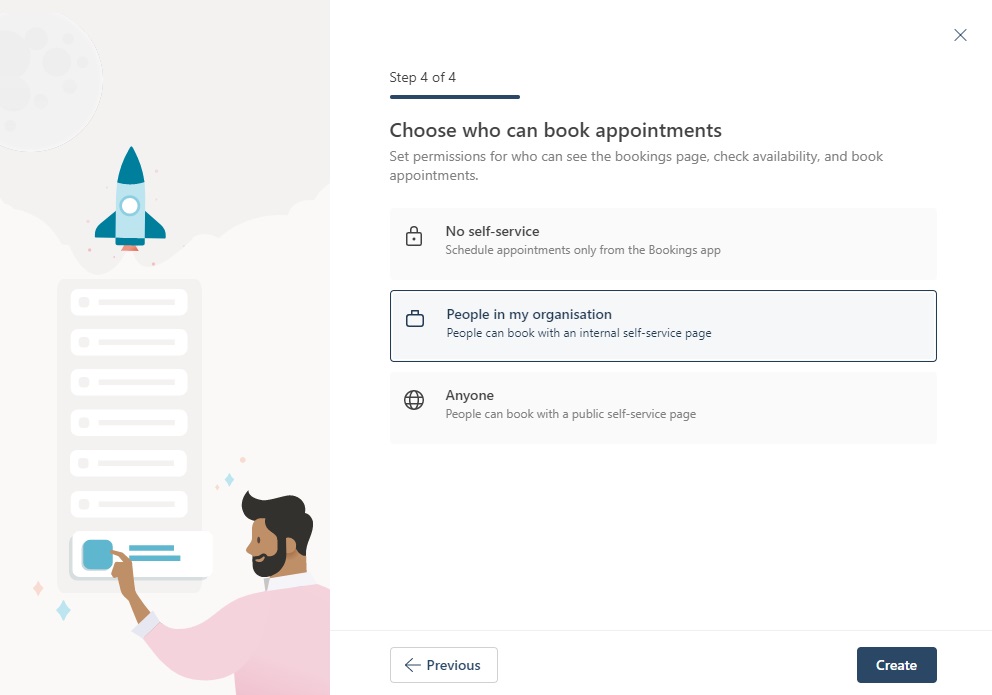
  7. Now you can choose who are going to be able to book your services. When you have chosen, click on Create.
    No self-service: This means that only staff can book appointments.
    People in my organization: This means that a Umu-id is required to be able to book.
    Anyone: This means that anyone can book your services both inside Umea University and externals.
    Image showing the alternatives for who can book
  8. Done! Now your booking site is created.

Install VPN client

Manuals that describe how to install the VPN client on different systems/devices.