Installing “My Backup” (Crashplan) for MacOS

This manual helps MacOS users to install and log in to the cloud-based service “My Backup” (Crashplan)


Before starting, you need to check whether an old version of the program is installed on your computer (the old version is called Code42, version 7 or 8). If you have an old version of the program, it must be uninstalled before you can proceed. The easiest way to do this is to use the Code42 Uninstall program, which you can find by searching in Self Service.


1. You are now ready to proceed. You do this by first going to the address https://console.eu5.cpg.crashplan.com/ and logging in with Umu-id@umu.se

2. Then select Administration – Download. Next, click on the symbol in the list that corresponds to the operating system on your computer. The file for the “My Backup” (Crashplan) program will then be downloaded.

3. Open the downloaded file and choose to install “My Backup” (Code42 CrashPlan).

———————————————–

a. Open System Preferences
b. Select Security & Privacy
c. Select the Privacy tab
d. In the left part go to Full Disk Access and select CrashPlan. If CrashPlan is missing, add it via “+”

———————————————–

  1. Once installation is complete, start My Backup (CrashPlan)and enter Umu-id@umu.se and the server address clients.eu5.cpg.crashplan.com:4287.

  1. Log in with your Umu-id
  2. Click on Manage Files to proceed to select which files you want to back up. The default is just “My Documents”.

For more help, contact the Servicedesk


Instructions for an online defence of doctoral thesis

Instructions for an online defence of doctoral thesis (PDF)

These instructions concerns Triple Helix and Aula Biologica.

Preparations for an online defence of doctoral thesis

Select an alternative host

Make sure there is a person on site during your online defence who can moderate and administer the meeting. Selecting an alternative host is a way to make sure that the online defence of your doctoral thesis can be carried out with fewer disruptions. The alternative host can, for example, moderate the chat, turn off the microphone and camera of participants or remove disturbing participants.

Decide which online service to use

In Triple Helix, you have three online services available that are suitable for online defences of doctoral theses: Zoom, Teams and Starleaf. In the list below you can see an overview of the different services.

Functionality in Zoom and Teams

Zoom Teams
Hold an audio and video meeting x x
Chat x x
Show a presentation/share a screen x x
Share documents during a meeting x x
Manage participants during an ongoing meeting x x
Allow active participation x x
Record meeting x x
Control who accesses the meeting x x
Maximum number of participants 500 10000
Maximum number of streamed videos 49 49
Dial-in allowed x x

Book your defence of the doctoral thesis in two services

Once you have chosen a service, it is time to book your defence of the doctoral thesis. We recommend that you book with two different services – a primary and a secondary service. This is to make sure that the meeting an be carried out even if one of the services for some reason malfunctions.

For Teams and Zoom, you can create a meeting yourself using your chose service.

Create your digital meeting and managing a waiting room

When using Zoom and Teams, there is a feature for having a digital waiting room for the participants. The digital waiting room can be used for the participants to make sure technology will cope but also to keep track of who has joined the meeting. As a host, you can manually allow participants to join the meeting one by one or let everyone in at once.

You can also post a personal note to all participants in the waiting room containing for instance a description of the agenda for the defence of the thesis or guidelines for audience participation.

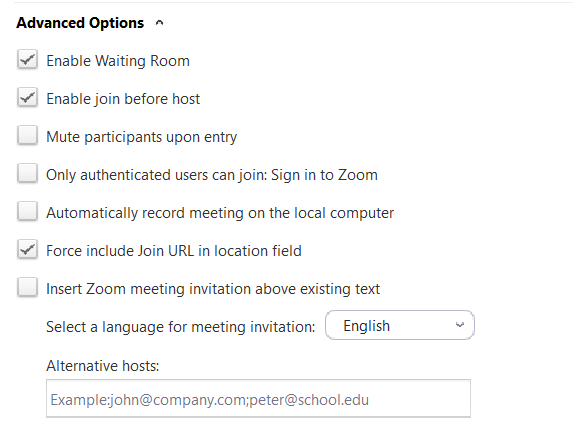
Set up a Zoom meeting

Book a meeting in Zoom, Manual

We recommend that you use a waiting room when creating your meeting in Zoom instead of using a password. If you choose to use a waiting room you can also choose Enable join before host, to let the participants connect before you – to be able to test their technology in the waiting room. You can find the setting under Advanced options.

You can also choose if you want the participants’ microphones to be muted when they join the meeting. This option minimizes interference, for example if someone connects late.

Advanced options in Zoom

Set up a Teams meeting

Book a meeting in Teams, Microsoft

When you set up a meeting in Teams with Outlook, you can change your meeting options by clicking the cogwheel symbol. Options can be changed after this, for example before your meeting.

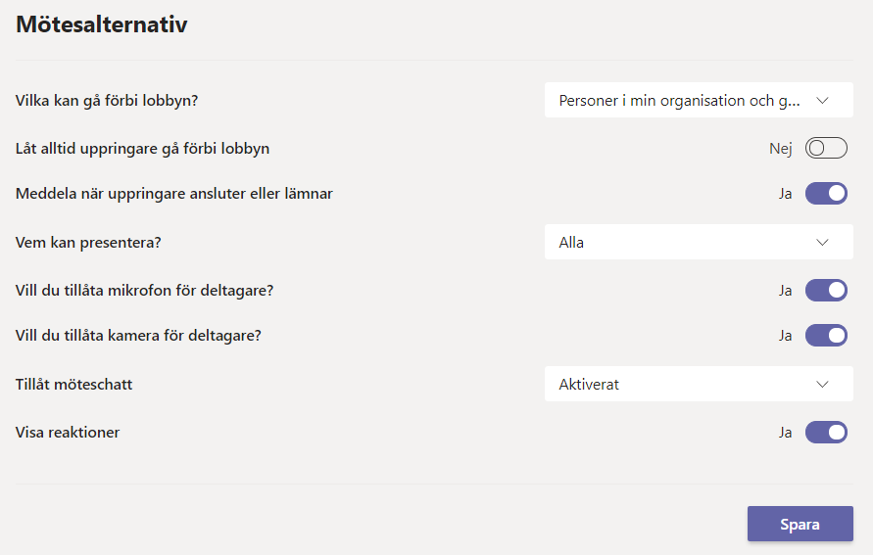
Change an already booked meeting’s settings

  1. Go to your Outlook booking and, double-click the calendar event to see details of the meeting.
  2. Below the link to join the meeting you will find a link labelled Meeting options (Mötesalternativ). Click the link.

You will be shown a view with further settings:

  • Who can bypass the lobby? (Vilka kan gå förbi lobbyn?) There are a few options.
  • Allowing dial-in users to bypass the lobby should always be set to No.
  • Notify the host when a dial-in user leaves the meeting – tick “Yes” if you want to hear a signal each time a participant leaves or joins the meeting.
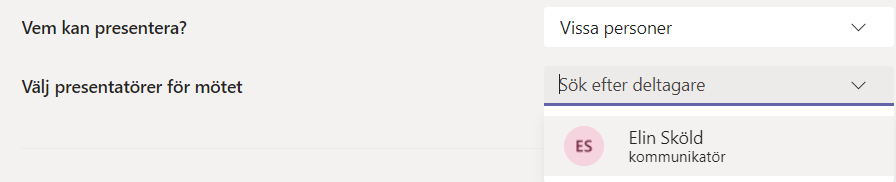
  • Who can share their screen? A recommendation is to allow at least a chairperson or host to share their screen beside you. Choose by inviting people into the meeting and choose their names in the list. There are four options:
    • Everyone
    • Everyone in my organisation
    • Some individuals
    • Only me.
  • You can then choose whether the participants should be allowed to activate their microphone and camera, whether the chat should be activated and whether the participants can use reactions, for example raising their hands.
  • Note, if you select No on the option to allow microphone and camera, the participants will not be able to activate these during the meeting. However, you can activate them for the participants or change this setting afterwards.
    Meeting alternatives in teams

Provide information about the defence of the doctoral thesis and share links

Wherever you publish information about your public defence of the doctoral thesis, you must also include the links to the meeting. This because defences of theses are public events that must be open to the public, even if they take place online.

You must also state which online service is primary and which online service is secondary.

Give your audience a few advice in your invitation

To create good conditions for your online defence of doctoral thesis, it can be a good idea to send your participants som advice when you publish your invitation. For example:

  1. Ask your participants to download the software necessary for participation in the meeting.
  2. Ask your participants to join the meeting through the assigned services no later than 10–15 minutes prior to the start of the defence so that everyone has time to check their internet connection and technology before the event starts.
  3. Ask participants to turn off their microphones and video when joining the meeting to minimize the risk of unintentional interference. The microphone can be activated later if they want to ask questions or interact in another way.
  4. Encourage participants to activate their video when they connect if the bandwidth allows it.

Check out your booked room

A dew days before the meeting, check the room and the technology a couple of days before the meeting to make sure that all equipment is present and working properly.

Preparations for the online defence of the doctoral thesis

Schedule an hour before the meeting to make sure that all your technology and your digital meeting is working as intended. Use a local area network, i.e. a network cable, instead of wifi.

The Campus Services Office will always supply a technician onsite who will help you with the technology during the start of the meeting.

Start the online defence of the doctoral thesis about 15 minutes before the set time so that the audience can join in the waiting room and test their technology.

During the online defence of the doctoral thesis

Waiting room

Here you will find instructions on how to handle the waiting room once you are in the meeting. You can always go back and change the settings, even after the meeting has started.

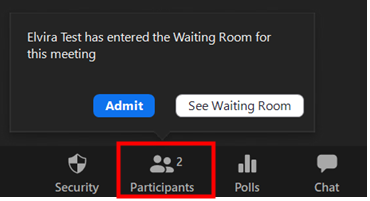
Waiting room in Zoom

When someone has joined your waiting room and want to join the meeting, a pop-up box will appear at the bottom of the screen. You can choose to view the waiting room or let the participant join. Viewing the waiting room can be necessary if several people wish to join simultaneously. You can reach the waiting room via the icon labelled Participants.

Participants Zoom

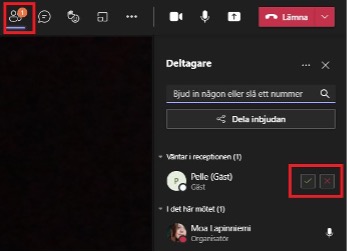
Waiting room (lobby) in Teams

If you have set up a lobby, you will get a box in the middle of the screen that informs you of who wants to join the meeting. You can choose to approve or deny entry or go to the participant list at the top. This can be relevant if there are many people who wants to connect at the same time.

Lobby in Teams

Manage participants

In all three online services the host can manage participants. This means that the host can turn off both microphones and videos for participants who has these turned on (if this disrupts the meeting). The host can also remove a participant if necessary. This option is found under Security in Zoom.

Depending on what setup you have for the online defence of the thesis, the host may need to keep an eye on the chat in case the audience wants to ask questions. Both Zoom and Teams also offers an option to raise your hand, or to contribute with reactions.

Any questions?

Please contact Servicedesk or Infocenter so we can help you with the online solutions.

Application for Erasmus+ teacher exchange

Application for Erasmus+ staff exchange

Order and cancellation of VPN account

Information about ordering and cancellation of VPN

Inviting members to a team or channel in Teams

In this manual we describe how to invite members to your team using different methods. Please note that it is possible to invite both internal and external members at the same time. We also describe how an external can join a team.

Inviting an internal member

  1. Find the team that members will be invited to.
  2. Choose the 3 dots to the right of the Team name.
  3. Click Add member.
  4. Search for and choose the persons name from the list and then click on Add.  If you wish to add more than one member at the same time, just keep typing in the names.
  5. When you have chosen your members you must give them rights and permissions. Click on them individually and choose: Owner or Member.

Remember that all students are also in our system. To be sure that you invite the right person, use the Umu-id or email address.

Inviting external members

There are two ways in which to invite external members.  Alternative 1 is preferable.

Alternative 1:

  1. Choose the 3 dots to the right of the Team name and then choose  Add member.
  2. Choose Add member.  Write in the persons email address in the window and then choose  Add.  The person will automatically be added as a Guest.

Alternative 2:

  1. Choose the 3 dots to the right of the Team name.
  2. Choose ”Get link to team” > Send to the external person.

Read more on the different types of permissions in Teams

Connect as an external

If you, as an external person are invited to a team in an UMU environment, it is easiest to open an incognnito window and open the invitation link from there. This is to avoid conflicts if you already work with Teams in your own organization.

When you’re asked to sign in, you can do so using your UMU-email address or you UMU-id (umu-id@ad.umu.se).

You wont see the team among your other teams in your organization’s environment. You will find the team in your profile i Teams, and will then need to log into UMU’s environment.
Image showing how to se your external teams

Creating a channel in Teams

In this manual we will show you how to create a channel in Teams.

  1. Go in to the team you wish to create a channel in.
  2. Choose the 3 dots to the right of the name.
  3. Choose Add channel
    Note that your Teams can look different, especially in colour and layout
  4. Choose a name and description for your channel. You can also choose if the channel should be available to all team members or only a few.
  5. Click on Add. You have now successfully added a channel to your team.

Tips for a successful team in Teams

Create a good base structure

  • What is the main reason for the team? 
  • What does the group need? 
  • Which channels will you have?  ….to start with and why?

Choosing the correct rights and permissions

  • Decide which rights and permissions each member will have with regards to channels, messages and tabs.
  • Always create at least two (2) “owners” of a team.

Understanding channels

  • Discuss the proposed channels with members of your team.
  • Create a clear and meaningful name.
  • Describe the channel and what it shall be used for. 

Communicate clearly within the team

  • Use titles that have a clear meaning to make it easier to understand what they are about 
  • Use the @ to to notify a specific person.  Otherwise the whole team will get the notification of your post. 
  • To answer a post click on “Answer” so that you do not start a whole new conversation.  This way all the threads hang together as well.Click on the A at the bottom of the screen if you wish to change formatting of your post.

Moving Common Files

  • Create a folder for respective files 
  • Upload shared files to the team and remove them from your existing folders so you don’t have multiple documents in multiple places
  • Decide together that from a certain date ALL files will be put into Teams and nowhere else (to prevent multiple copies of documents)
  • If you work a lot with specific files, synchronize your teams files in explorer. That way you can directly access them from your computer.

Notifications in Teams

  • Set up your personal notifications for the entire application, how you want to be notified when someone sends a message to you, etc.
  • Set up channel notifications for the teams/channels you are active in and want to know when someone has updated.

Digital meetings

  • Just as for physical meetings, it is a good idea to prepare an agenda for the meeting.
  • If there are many participants in the meeting, a recommendation is to mute the microphone when you are not speaking. That way, you will avoid any disturbing background noise. When you need to speak, unmute your microphone. If there are only a few participants in the meeting, it will usually be a more active meeting if everyone has their microphones turned on the whole meeting.
  • The meeting will also be more active if all participants have their cameras on. However, if someone has a slow internet connection it may be a good idea to only use the microphone.
  • All participants can use the chat to share documents and links with each other during the meeting. When the meeting is over, the chat is saved, and you can go back to see what was written there.
  • You can share an entire screen, a window, a PowerPoint file, or a Whiteboard with the meeting participants.

Create a “team” in Teams

  1.   Open Teams.  You will find Teams as an app in your computer, or via att log in to Office 365 in your web browser.   Log in with your Umu-id. 
    Log in to Office 365
  2.  In the menu choose  ”Teams
  3. From the menu on the left hand side choose “Teams”
  4. To Join a team or create a team click on  Join or create team (Bottom left hand corner)
    Note that your teams can look a little different in colour and theme


  5. There are four different types of themes.  If the goal is to create a workplace for a workgroup or project you can choose “Other”.
    More information on the types of Teams
     

    Once you have chosen your team type it is time to give your team a Name and a Description (you can change either or both afterwards).  You can also choose if your new Team will be a Private team or a Public team.   This team will be the center for your collaboration.  In every team you can later create different channels for more detailed work.

    Creating a channel in Teams (swedish)


  6. The last step in creating your team is to invite members.  In the box you can write in the name of the person or people from within your organisation (one at a time).  Once you have your list click on “Add”.   You can then decide the rights and permissions for each member.  owner or Private.

    More on rights and permissions   If you choose to invite external members to your team you must type in their email address.  They will then receive an invitation with which they can join as a guest.

  7. Your team is now ready for you to work in.