Share a form or quiz to collaborate in Forms

In this manual we show you how to share a forms or quiz to collaborate. If you want to share a form or quiz as a template (i.e., dublicate the form) see this manual: Share a form as a template in Forms

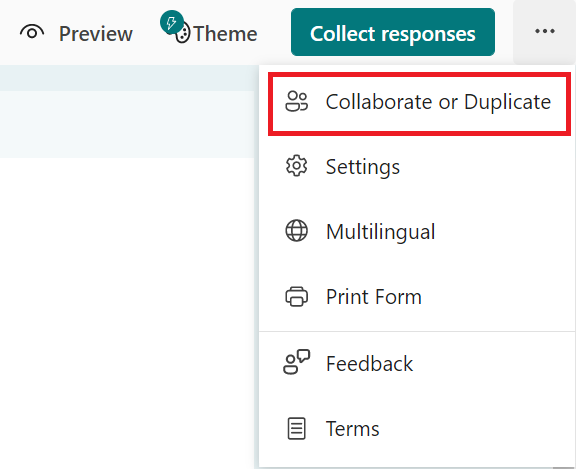
  1. Open the form/quiz you want to collaborate on with others.
  2. Click on the three dots in the upper right corner, then select Collaborate or Duplicate.
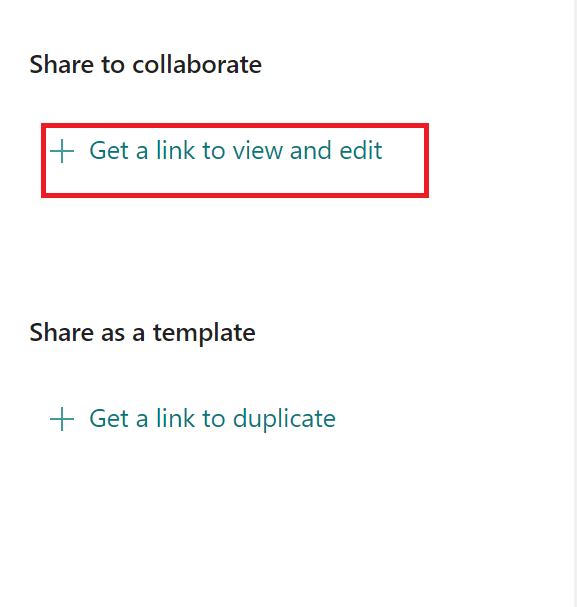
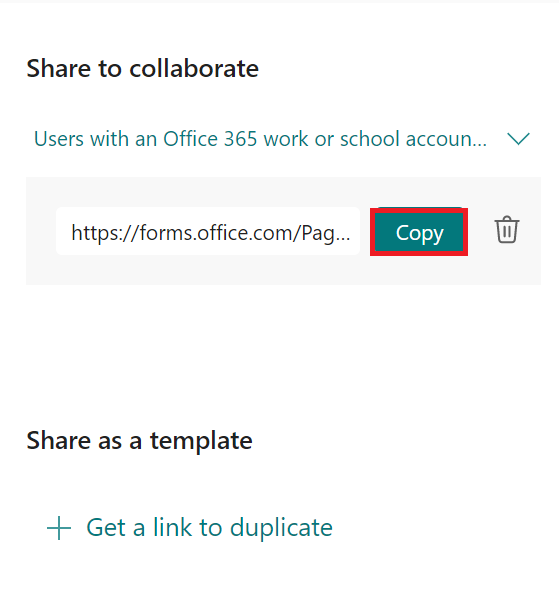
  3. Select Get a link to view and edit below the headline Share to Collaborate.
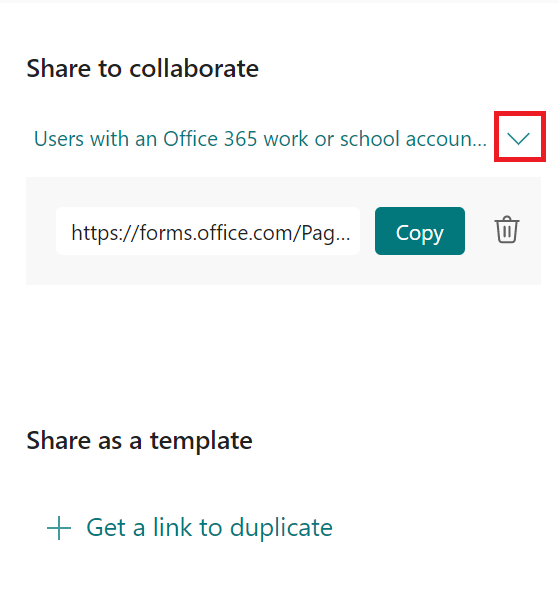
  4. A link will be created, but before you copy it you can select the arrow to decide the permissions.
    Share to collaborate
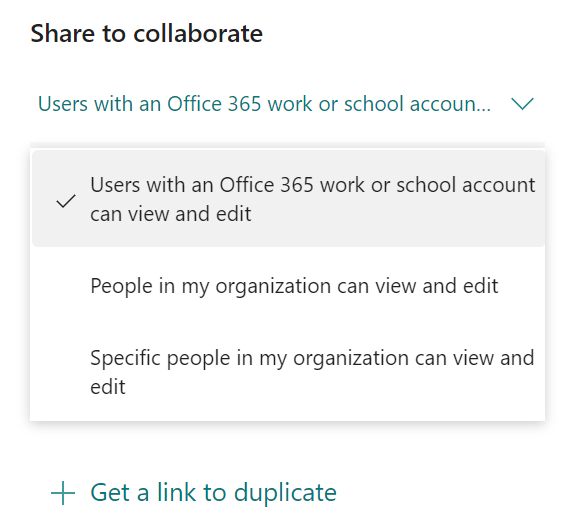
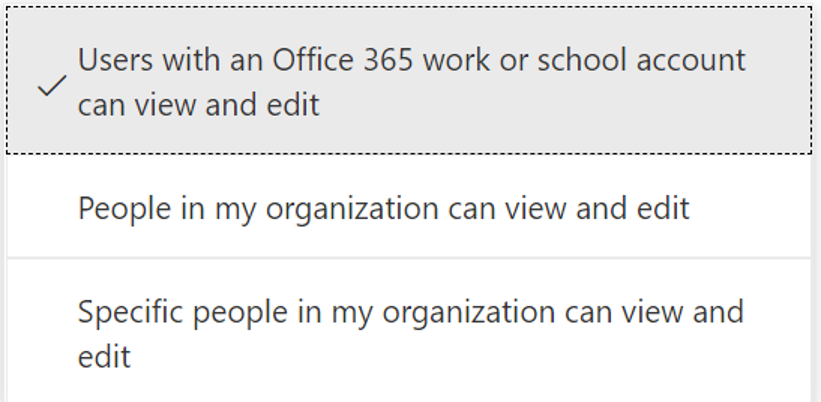
  5. Select who will have access to the form/quiz. The ones you choose will be able to both view and edit it.
    • Choose Users with an Office 365 work or school account can view and edit if you want to share to everyone (regardless of organization) who has an Office 365 work or school account.
    • Choose People in my organization can view and edit if you want to share to someone at Umeå University.
    • Choose Specific people in my organization can view and edit if you want to share to specific people at Umeå University. Then, you will have to enter their name, email address or a group.
      Check premissions before share to collaborate
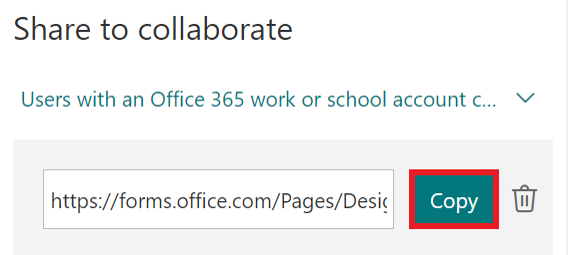
  6. Select Copy and send the link to the people you wish to collaborate with.
    Share to collaborate - select copy

Share a form as a template in Forms

In this manual, we will show you how to share a form (survey) or a questionnaire (test, quiz) as a template. The purpose of sharing a form as a template is that you can share the form to a colleague or yourself to start from (a template). If you want to share a form to collaborate with a friend, see this manual: Share a form or quiz to collaborate in Forms

  1. Open the form or quiz you want to share as a template.
  2. Click on the three dots in the right corner, and select collaborate or duplicate.

3. Click on the + sign below share to collaborate.

4. Click on the arrow to view the options of who you can collaborate with.

5. Choose who you want to collaborate with by selecting the arrow to make sure the right person has access to view and edit through the link.

6.

  • Select Users with a work or school account for Office 365 can view and edit to share with everyone (regardless of organization) with office 365 work or school account.
  • Select People in my organization can view and edit if you want to share with colleagues at Umeå University.
  • Select Specific people in my organization can view and edit if you want to share with a specific person at Umeå University.A list will come up where you enter the email address.

6. If you’re done, click Copy and then send the link to the person you wish to collaborate with.

7. If you’re unsure, kick the arrow again to correct the sharing settings.

Most common Excel problems in LimeSurvey

The following is a list of the most common problems with Excel in LimeSurvey.

Editing a .csv

It is NOT recommended to use Excel to edit .csv files becaue Excel does changes in the data structure of a .csv file which will result in a fail during your import.   It is recommended to use Libre office or some other open source program that does not make changes to the internal data source.

Export fails

If your Excel export fails when exporting a .csv file in LimeSurvey try to clear the browser cache and all cookies. Also make sure to export the file with semicolon as the separator.

Modifying your responses before you Import back into LimeSurvey

In order to do multiple changes in a document that includes responses, sometimes you want to open the file in Excel, and do the changes before import/export.  Remember never to change the top 2 lines!  It is recommended to make your changes in a text file when saving.  if you save it as a .csv file.  Excel will by default save as a comma-delimited file and that cannot be imported back into LimeSurve.  By saving your changes as a .txt file you can import them back into LimeSurvey.

Change standard method for login (MFA)

If you want to change your standard method for login, you can change it with this method.

  1. Visit the website Microsoft Safety info.
  2. Click the menu Security info.
    Add method multi-factor authentication
  3. Click on Default sign-in method.
  4. Choose between using a code from you app or getting a notification from the app.
  5. Done!

Add multi-factor authentication on new device (MFA)

Multifactor authentication (MFA) is a service that gives you increased protection when logging in to some of the university’s systems. With multi-factor authentication, you log in to the university’s systems in two steps: using your Umu-id and password, and the using the Microsoft Authenticator app on your phone or tablet. In this guide, we will describe how to add multi-factor authentication on a new device.


  1. Visit the Microsoft Security info website.
  2. Go to the tab Security info.
  3. Click Add method.
    Add method multi-factor authentication
  4. Click Add in the window that appears.
    Add method Authenticator
  5. You will now be asked to install Microsoft Authenticator on your new unit. If you haven’t already, please download the app to your phone or tablet from Google Play or App Store.
  6. Click Next.
    Install Authenticator on device
  7. In the next screen, click Next.
    Set up account Authenticator
  8. A screen now appears that asks you to scan a QR code. Keep the screen open while you take out your phone.
    Scan Qr code Authenticator
  9. Start the Microsoft Authenticator app on your mobile or tablet. Note that the images below are from an Iphone but the process looks similar in Android products.
  10. Click on the plus sign in the upper right corner of the screen to add an account.
    Microsoft Authenticator add acount
  11. Select the account type Work or school account (Arbets- eller skolkonto).
    Microsoft Authenticator arbets- eller skolkonto
  12. In the window that appears, select Scan QR Code.
    Microsoft Authenticator adding account
  13. Use your mobile or tablet to scan the QR code shown on the computer screen.
  14. After scanning the code, click Next.
    Scan Qr code Authenticator
  15. A message will be shown, stating that Microsoft Authenticator has been connected to your account. Click Next.
  16. In the next screen you will be asked to test the application. At the same time the Microsoft Authenticator app will receive a notification asking you to accept the login. Click Accept on your mobile/tablet.
    Test the application Authenticator
  17. Your screen will now show a confirmation of the test. Click Next.
    Notification approved Authenticator
  18. You have now activated multifactor authentication for a second device! Your standard login method is set to getting at notification from Microsoft Authenticator but you can change it (link in the right column). Click Done.

Zoom Guides

The zoom guides have moved to an open page in Canvas.

How to find and install Whiteboard

Whiteboard is available in different versions; a web app, a desktop app for Windows and a mobile app for iOS.

Find the Whiteboard Web App

To access Whiteboard on the Web:
  1. Go to the university website for Office 365
  2. Log in with your Umu ID and password
  3. You will find an icon for Whiteboard in the bottom left column.

Option 1 to download Whiteboard to Windows

  1. Open the Software Center on your computer.
    Image Representative Icon for Windows Software Center
  2. Locate Microsoft Whiteboard in the list of applications.
    Icon Representing App for Microsoft Whiteboard
  3. Click the Microsoft Whiteboard icon.
  4. Then click ‘Install’ .

Option 2 to download Whiteboard to Windows

  1. Open the Microsoft Store on your computer.
  2. Use the search function to find the Microsoft Whiteboard.
    Download Whiteboard1
  3. Once you’ve found the app, select ‘Get
    Download Whiteboard2Download Whiteboard 3
  4. If you get a dialogue box asking you to log in, select ‘No‘.
  5. Your Microsoft Whiteboard download and installation should now start. It may take some time to install.
  6. Microsoft Whiteboard is now ready to use on your computer!
  7. When you open the app for the first time, you may be asked to log in. Then log in with: umuid@ad.umu.se + Umui-id password.

Frequently asked questions about OneDrive

Onedrive FAQ

How do I transfer files to OneDrive?

You can either upload files directly from OneDrive in the portal (m365.umu.se) or in OneDrive in windows explorer on your computer by dragging and dropping the files in the folder OneDrive – Umeå University.

Files in OneDrive

Can I create folders in OneDrive?

Yes, you can create folders in OneDrive. Either directly in windows explorer or in OneDrive on the portal (m365.umu.se).

Can I give a colleague access to a file in my OneDrive?

Yes, you can share files or folders with a colleague. If you share a document, the colleague will have access to the latest version. This means that if you change the document, the colleague will also see it without you having to send the document again.

You can choose whether the colleague should be able to edit the document or just read it. If you choose to edit it, you will also be able to edit the document at the same time.

Share files and folders

Can I see which files I have shared with others?

Yes, in OneDrive on the portal (m365.umu.se) you can see which files you have shared.

See files you shared in OneDrive

Can I see which files others have shared with me?

Yes, in addition to receiving an email when someone has shared a file with you, you can see in OneDrive on the portal (o365.umu.se) which files others have shared with you.

See files shared with you in OneDrive

Can I stop sharing a document?

Yes, in OneDrive  you can stop sharing a document.

Stop sharing files in OneDrive

What happens if I accidentally delete a file in my OneDrive?

If you accidentally delete files in your OneDrive, it is possible to restore them. The files can be restored from the OneDrive trash via the portal (m365.umu.se) for 30 days. In the instruction below you can find information about how to restore your files.

Restore deleted files or folders in OneDrive

After 30 days, the files are placed in a secondary trash can for 60 days before disappearing. You can find a link to your secondary trash at the bottom of the page of your OneDrive trash.

Your files are stored in the recycle bin for a total of 90 days. The same applies to files in teams or shared libraries.

Where are the files physically stored?

The files you store in OneDrive are stored in Microsoft Datacenter. Umeå University has decided that all data will be stored within Europe.

Can I use OneDrive if I use a Mac?

Yes, you can use OneDrive if you use a Mac.

Inviting multiple users to a team in Teams

Here are two tips on how to invite members to join a team themselves. Note that these options only work for users with an account at Umeå University.

Invite with a code

All teams have a code that can be used to join the team. The person using the code will join the team immediately. Please note that only people with Umu accounts can connect with a code and that everyone that has access to the code can connect with the team without your permission.

Get the team code

  1. Go to your team. Select the three dots to the right of the team name.
  2. Click Manage Teams.
    Invite Multiple Users Teams
  3. Go to Settings.
  4. Select Team Code.Invite Multiple Users Teams 2
  5. Click Generate to generate the code that you can copy and share to the people you want to invite to your team.

Join teams with a code

  1. Go to Microsoft Teams and select the Team tab.
  2. Click Join or create a team.
    Invite Multiple Users Teams 3
  3. In the next  screen you will get the option to create a team or join with a code. Paste the code to join the team.
    Invite Multiple Users Teams 4

Invite with link

You can also invite members to your team by sending them a link to the team. With this alternative, the owner of the team needs to accept or deny access to the team.

  1. Go to your team. Select the three dots to the right of the team name.
  2. Click on Get link to team.
    Invite multiple users Teams 5
  3. You will then receive a link to copy and send to the members.
    Copy link to invite team members Teams
  4. When they click on the link they can ask to join the team. The owner receives notifications in Teams and by email and can decide to accept or deny access to the team.
  5. You can also find pending request by going to your team, clicking Manage teams and looking in the Pending requests tab.