Clear the Teams client cache
If you’re experiencing issues that affect Microsoft Teams, clearing the cache on your device may help.

If you’re experiencing issues that affect Microsoft Teams, clearing the cache on your device may help.
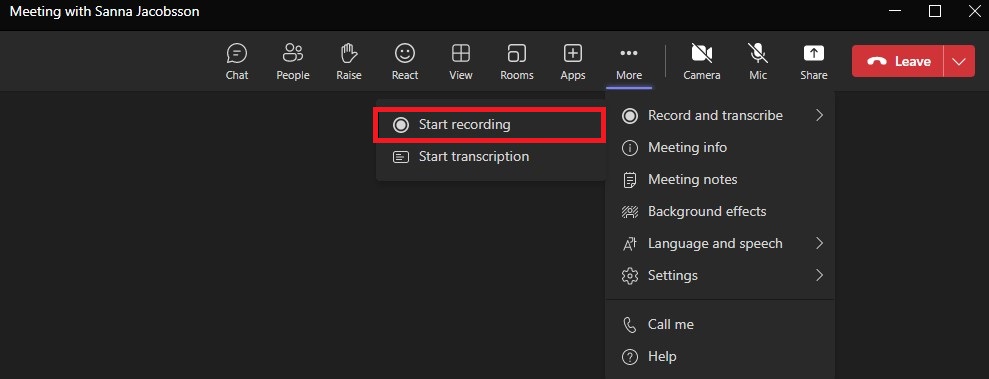
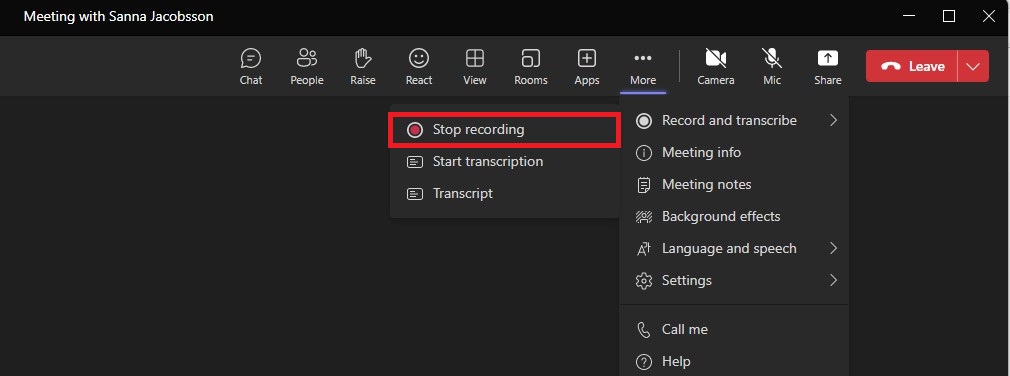
In this manual, we describe how to record digital meetings in Teams, and where to find the recording when the meeting is over. Please note that it is important that you notify the participants in the meeting beforehand so they can decide whether it is okay to be recorded.
Think before you record a meeting
Ideally, avoid recording meetings unless you absolutely have to. Rather, write memos to document the meeting. If you still want to record a meeting, you should:
Join a Teams meeting
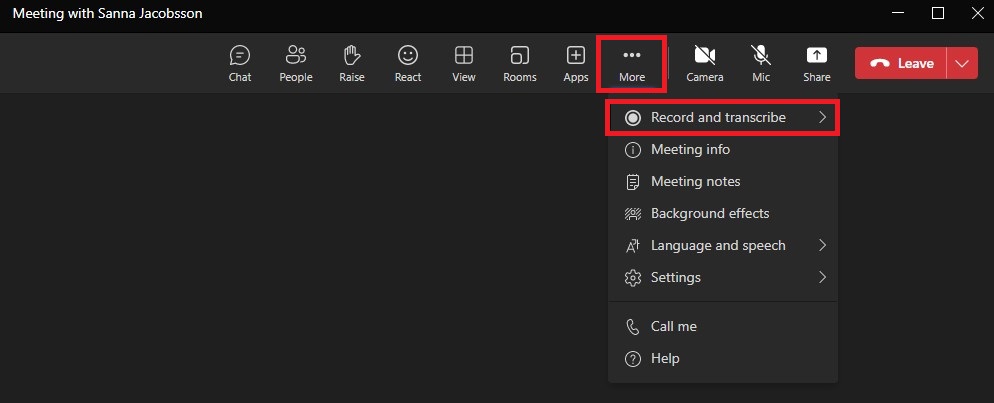
Automatic recording
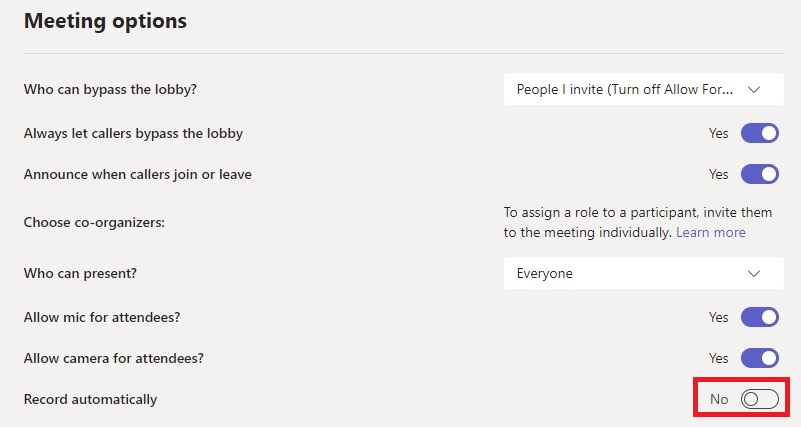
Before the meeting begins, you can choose to have it recorded automatically. Go to Meeting Options, and then check Record automatically. If you choose to do this, it is important that the participants in the meeting agree before the meeting starts that it is okay to be recorded.
1. When you’re in a call, select More actions > Transfer in your call controls.
![]()
2. Start typing the name of the person or phone number you want to transfer the call to and select them when they appear.
![]()
3. If you are transferring to another Teams user, turn on Ring back if there’s no answer to send the call back to you if the recipient doesn’t answer. If this setting is not turned on the call will be transferred to the recipient voicemail if there is no answer. If you get the call back the popup toast will show that the recipient was not reached.

4. Select Transfer to complete the transfer.
You may want to check in with someone before you transfer a call.
Note: Consult then transfer is not available in Teams for the web.
1. When you’re in a call, select More actions > Consult then transfer.
![]()
2. Under Choose a person to consult, start typing the name of the person you want to reach or a phone number and select them when they appear.
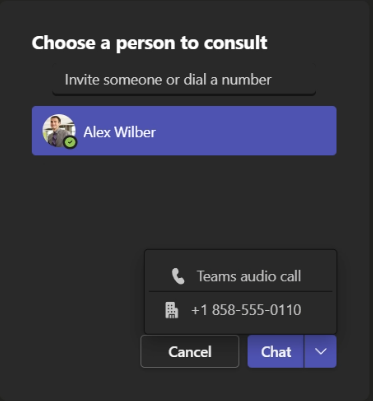
3. Consult with them by calling or using chat. Click on the chat button to start a chat, or select Teams audio call from the drop down options.
4. When you’re ready, hit Transfer to complete the transfer.
![]()
When you are assigned as an agent in a Teams Call Queue, it is possible to opt-in (sign in) and opt-out (sign out). It is only when you are in opt-in status that you will get calls from the Call Queue routed to your Teams client.
Call Queues can be configured so you only get calls when you are in the status “Available” (Green).
The option to sign out and in can be disabled for some Call Queues, talk to the owner of the Call Queue if you are not able to use this function.
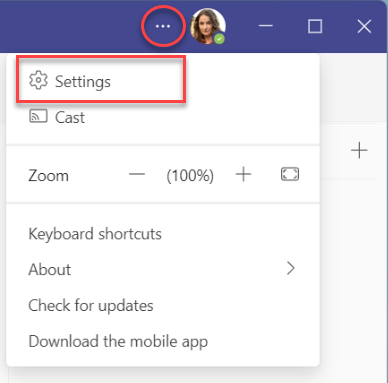
1. Open Settings in Teams by clicking on the three dots next to your profile image and select Settings.
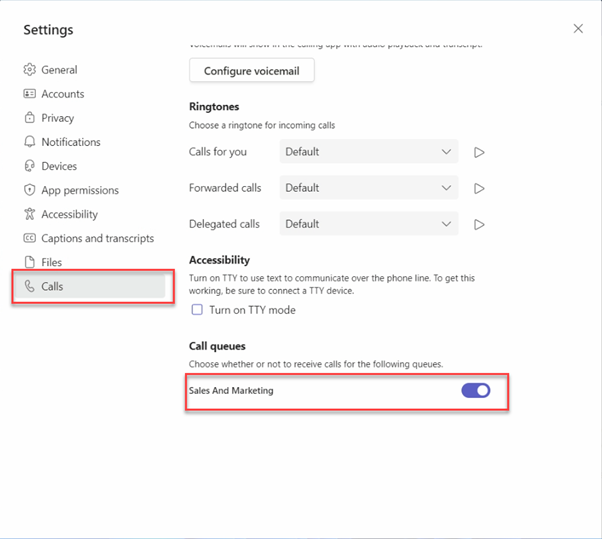
2. Open Calls in the left hand menu in settings and scroll down and you will see all Call Queues that you are assigned to. Click on the toggle switch to opt-in or opt-out.
Opt-in status ![]()
Opt-out status ![]()
If the Call Queue you are using is attached to a Teams channel you can opt-in / opt-out directly from that channel in Teams.
1. Open the channel your Call Queue is connected to and select the Calls tab.
2. Next to your name click on the toggle switch to opt-in / opt-out.
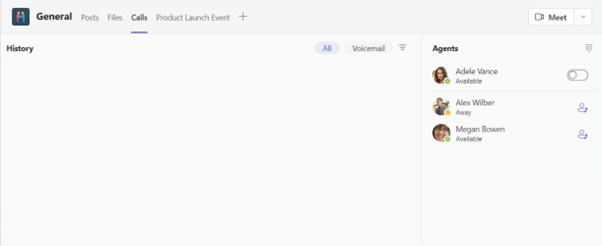
3. You can also see other users assigned to the same Call Queue and if they have opted-in or opted-out.
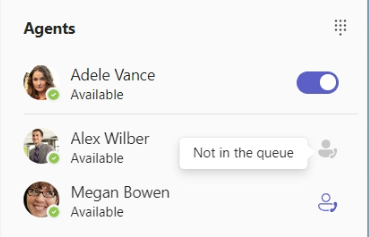
This is what you will see when you click on the “Calls” tab in Teams.
Observe that this view is only visible if your telephony is moved from Skype to Teams.
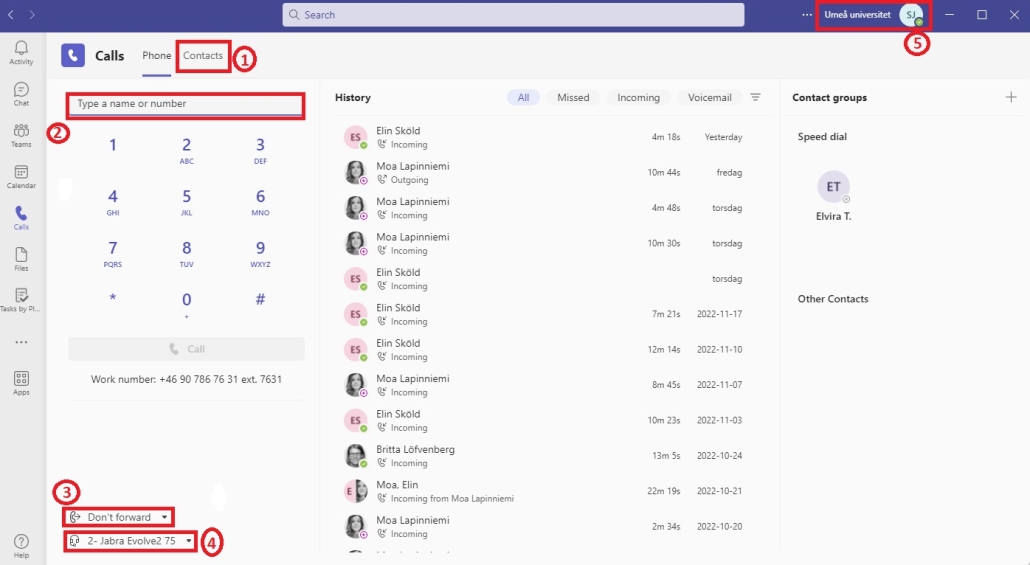
You reach your settings by going to your profile in the top right corner, then choose “Manage account”, and then “Calls”.
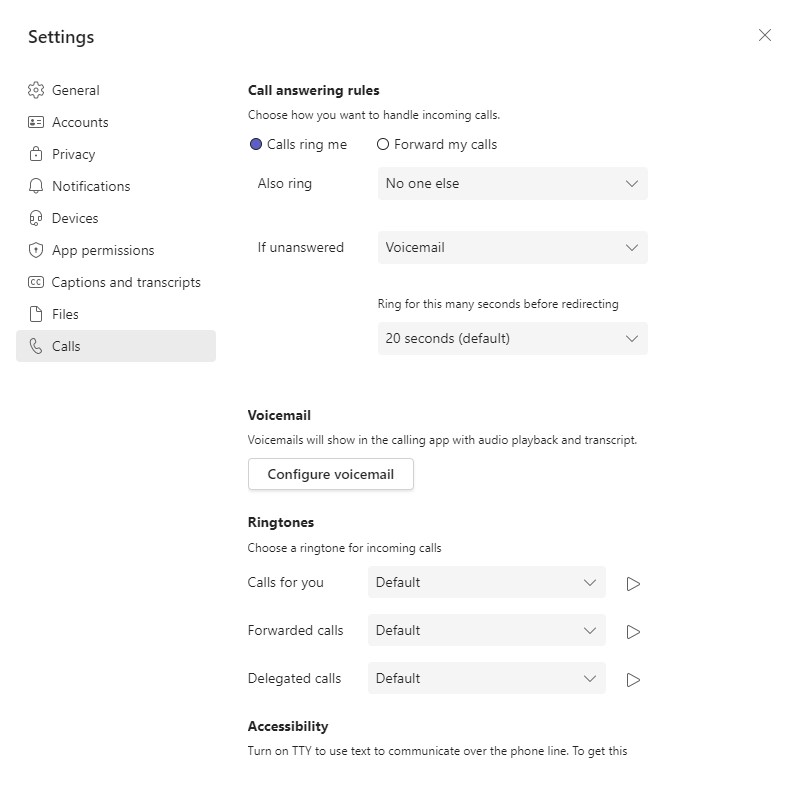
Under Call answering rules you can set up rules for what you want to happen when you don’t answer calls, and rules for forwarding calls. Through Also ring you can choose whether you, for example, want it to call your mobile phone as well, when receiving a call through Teams.
Under Voicemail you can adjust your settings for your voicemail. You can Configure your voicemail and choose how you want calls to be handled when being forward to voicemail. The recommendation is to forward your calls after 20 seconds,
Under Ringtones you can listen to and choose between different ringtones for your calls.
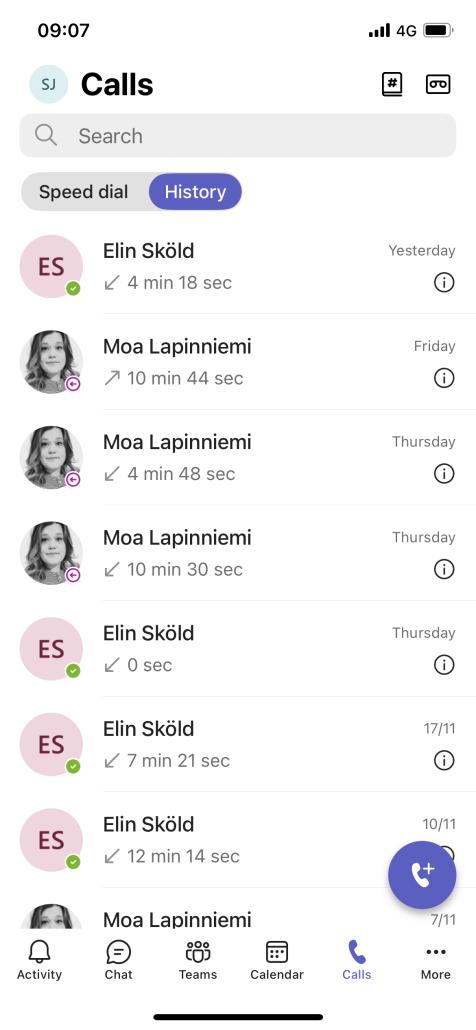
This is what you will see when you click on the “Calls” tab in the Teams app.
You see a list of your call history.
Click on the phone in the bottom right corner to make a call.
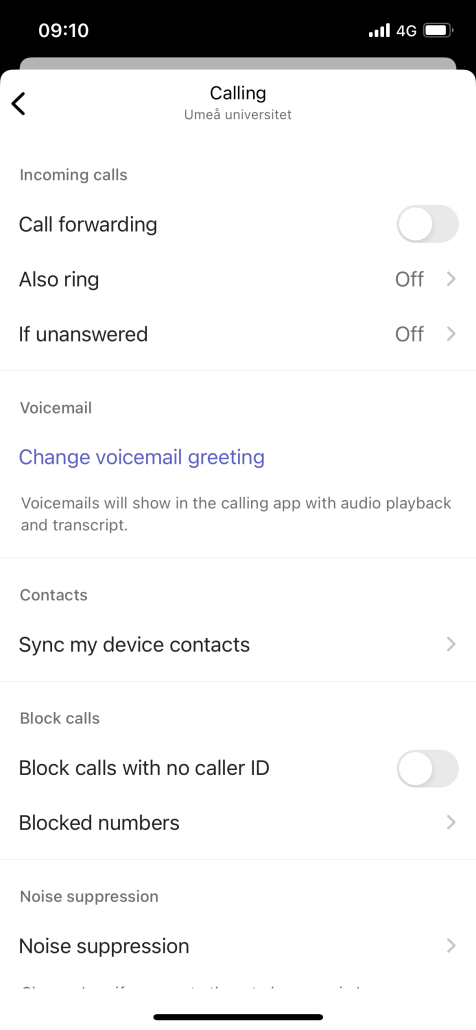
You reach the settings by going to your profile on the left in the app, then choose “Settings”, and then “Calling”.
Here you can choose to forward your calls, set up what you want to happen in the event of a missed call, and change your voicemail greeting.
You can also choose to sync your device contacts and therefore reach all your contacts you have saved on your phone directly through Teams.
You can also choose to block numbers.
If you can’t or don’t want to receive calls in Teams, you can forward your calls in a few different ways.
Select the “Do Not Disturb” status to forward calls and temporarily turn off notifications.
Click on your profile in the upper right corner, then click on the status and select “Do not disturb”.
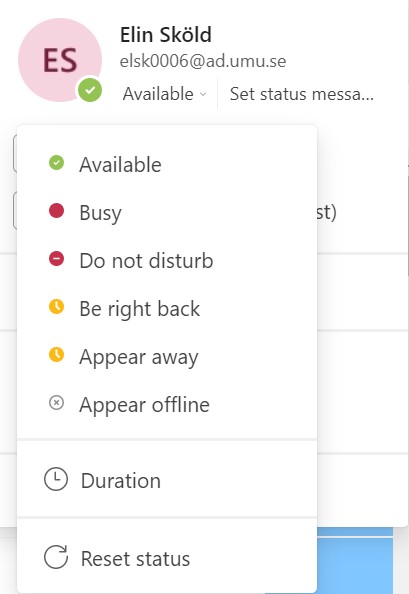
Under “Duration” you can choose how long you want the status to be displayed.
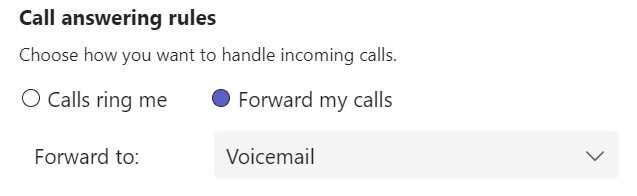
In your Calls settings in Teams, you decide what happens in case of unanswered calls, by default the call goes to voicemail.
In the Calls settings in Teams, you can choose “Forward my calls” and what happens when forwarding, for example forwarding to voicemail.
Remember to change the setting back when you want to be available again.
If you have scheduled yourself as “Out of office” in your calendar in Outlook, you will also appear with the status “Out of office” in Teams.
You can supplement your absence in Teams with a status message. Click on your profile in the upper right corner and then select “Set status message”. You can also choose how long the message should be displayed.
When you’re away from Teams, your calls are directed to voicemail by default.
In the Calls settings in Teams, under “Configure voicemail”, you can enter your own out of office greeting and choose when you want it to be played, for example when you have an auto-reply in Outlook or an out of office event in your calendar.
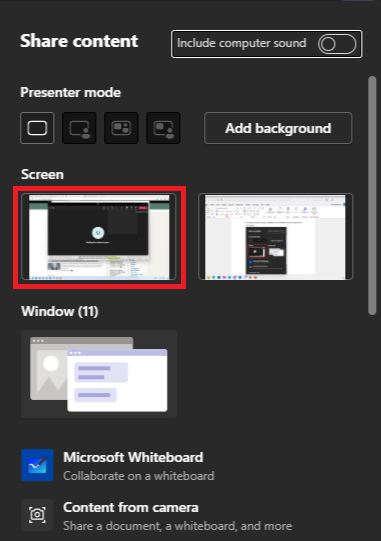
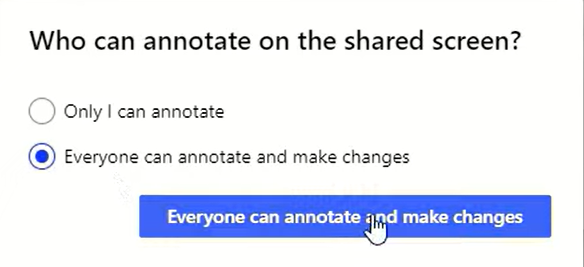
This guide describes how you can make joint annotations, with the participants in your Teams meeting, on a shared screen. In that way you can work together on a digital Whiteboard.
Join a Teams meeting


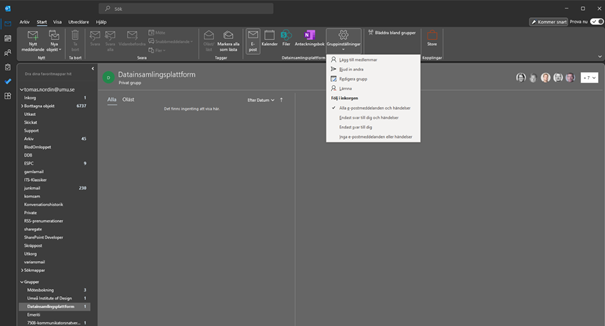
You can delete groups in the respective tools where the group is located, such as Planner, SharePoint, and Teams. Note that if you delete a group, you delete everything that belongs to the group. For example, if you delete a group in Planner, you delete the SharePoint site and possibly the Team that belongs to the group.

If you’ve moved your email to Office 365, you can easily administer the groups you belong to or own through Outlook.
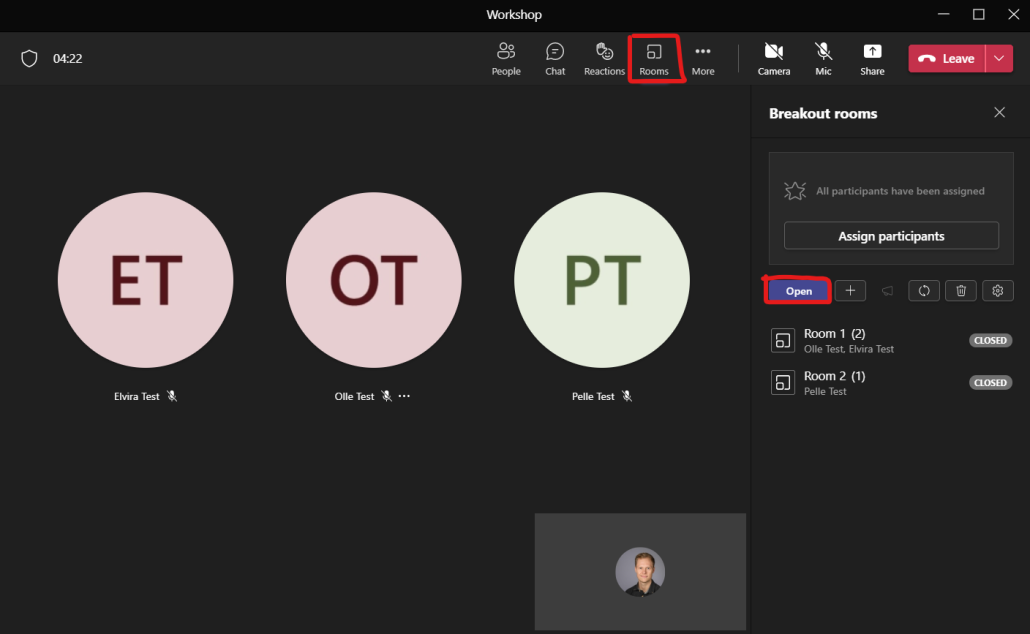
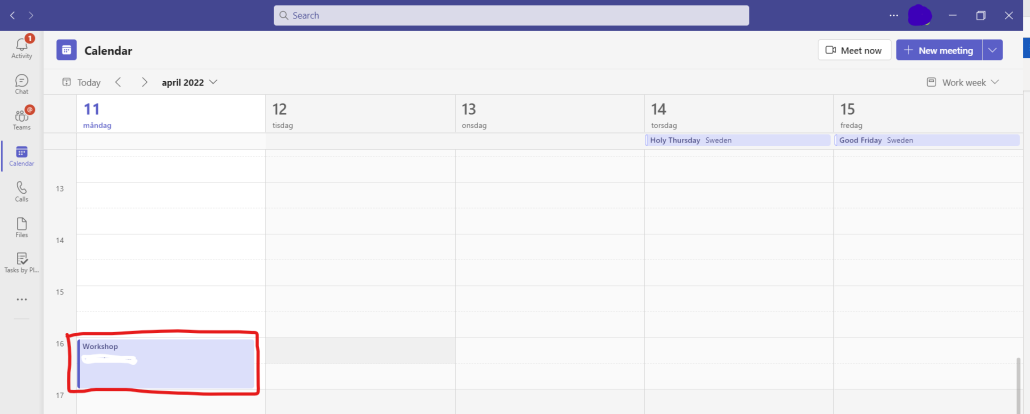
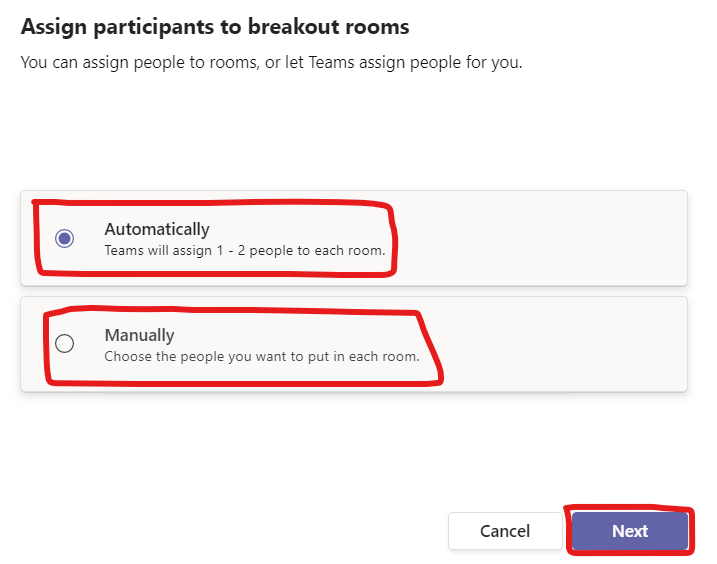
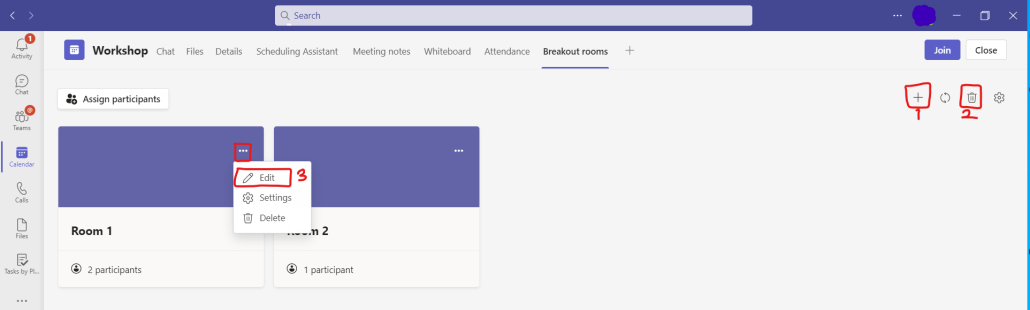
In this manual, we describe how you as a meeting organizer use breakout rooms in Teams to create meaningful discussions and exchange of ideas. **Observe** that to use Breakout rooms, you need to use the Desktop application for Teams.
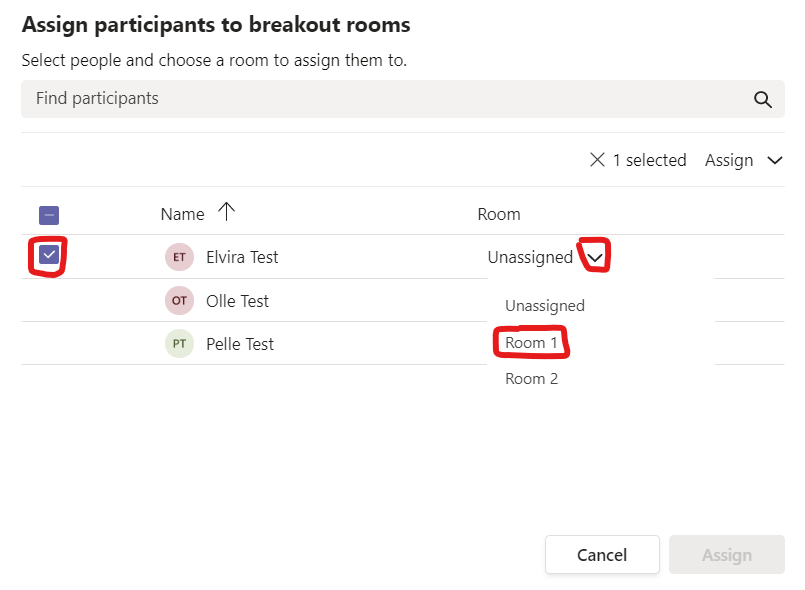
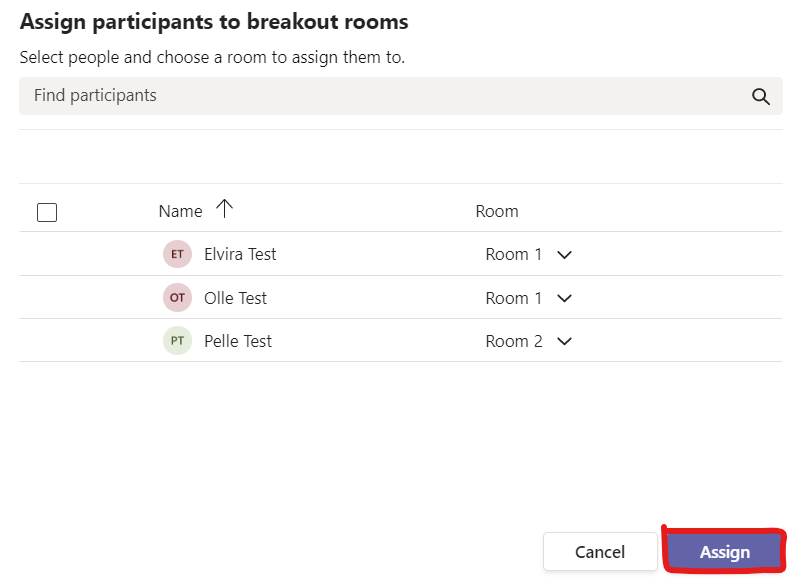
We recommend that you prepare your Breakout rooms before the Teams meeting. It is only the meeting organizer (the person sending out the booking) who can do this. (You can create your Breakout rooms directly in the Teams meeting – see this manual). To prepare the Breaout rooms before the meeting, follow these steps:
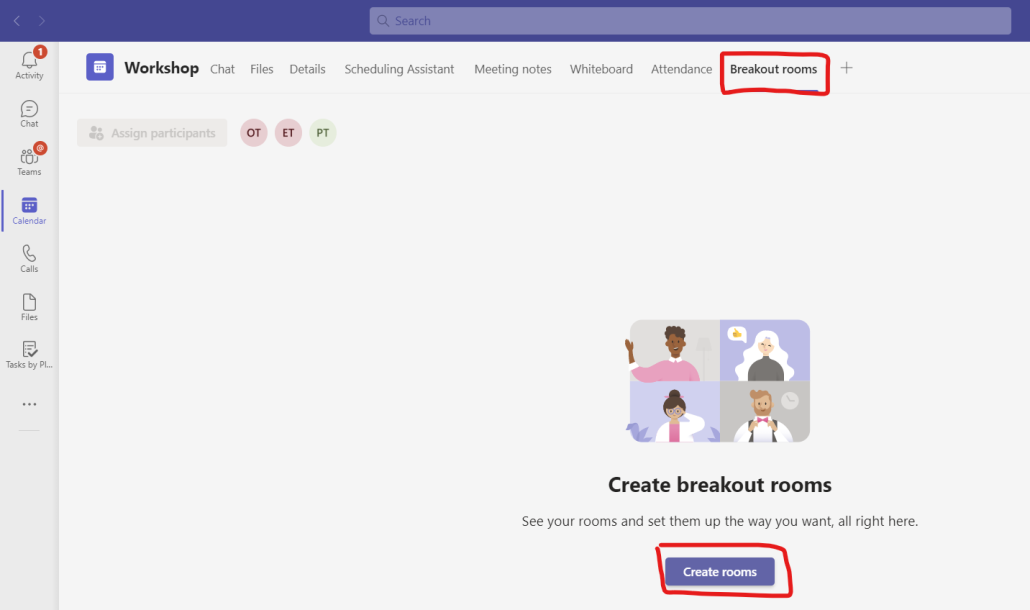
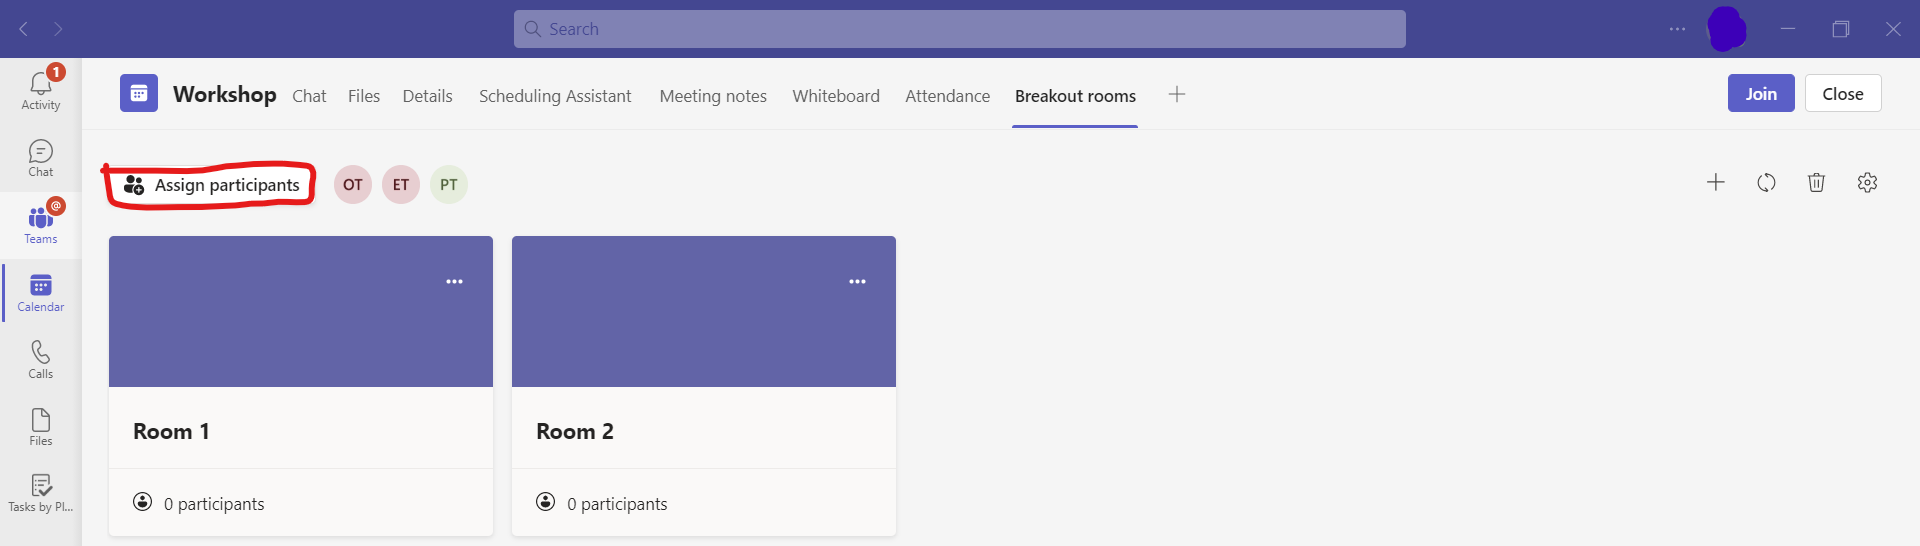
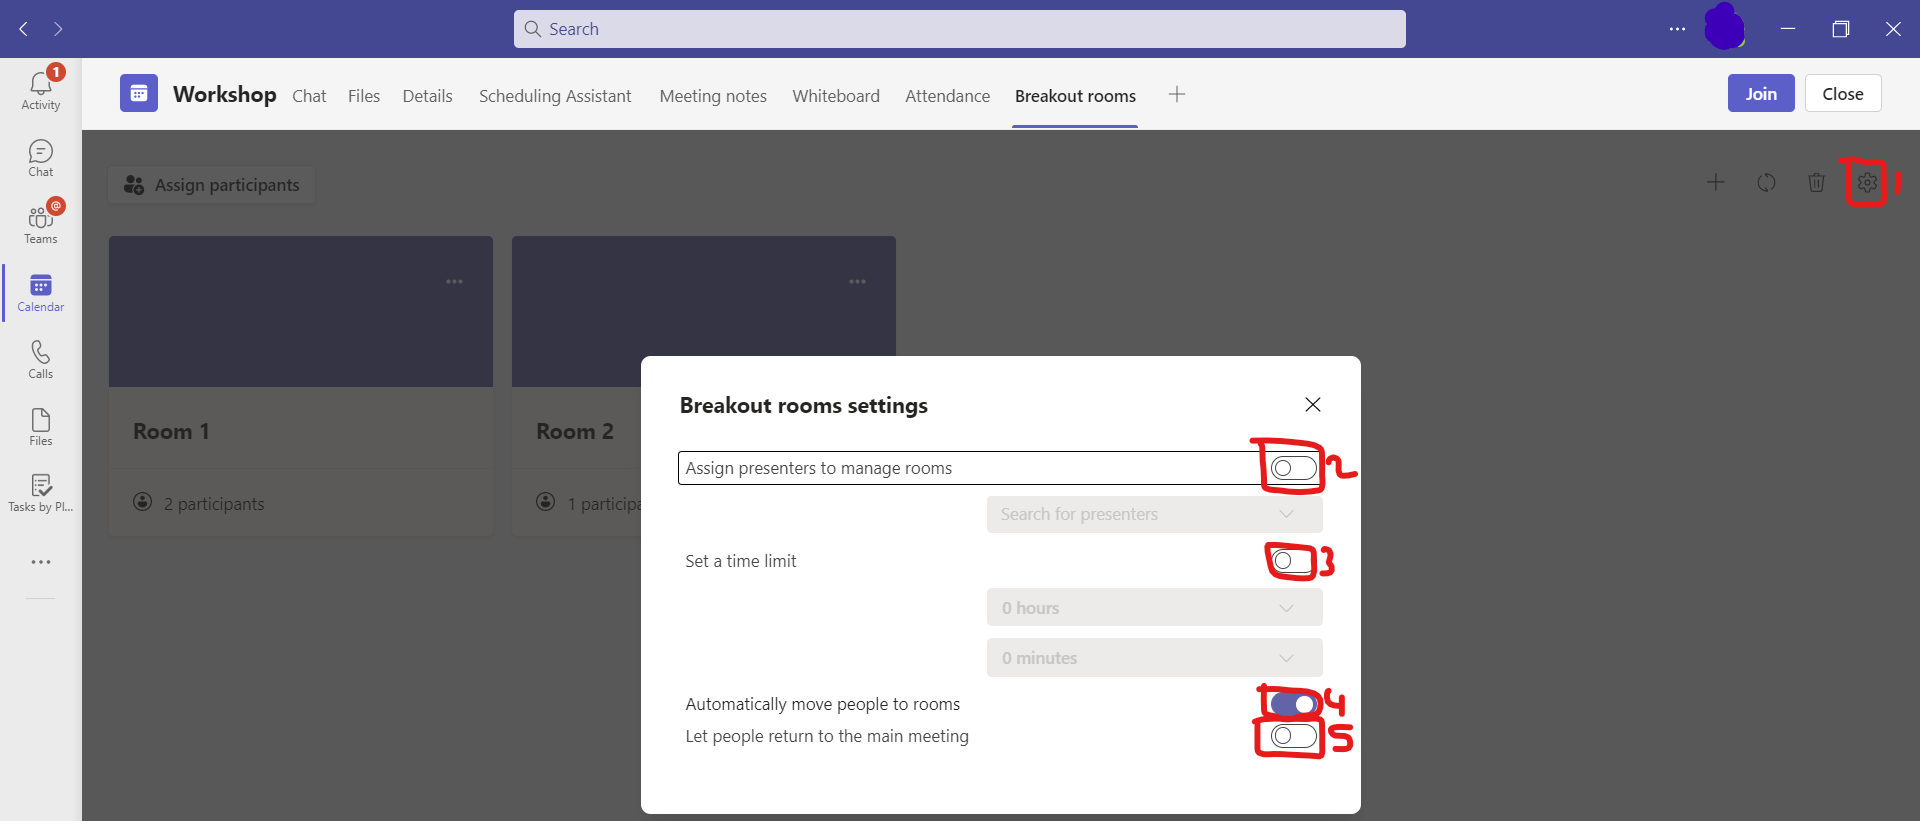
After you have assigned people you can set more settings, change the number or remove rooms, and rename the rooms.
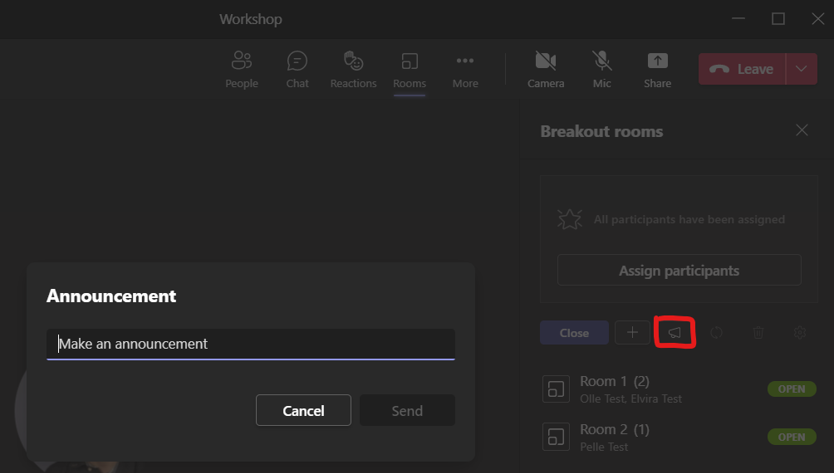
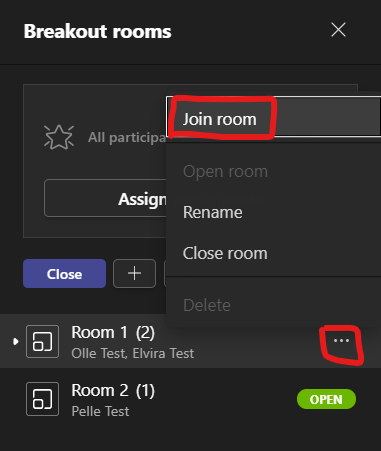
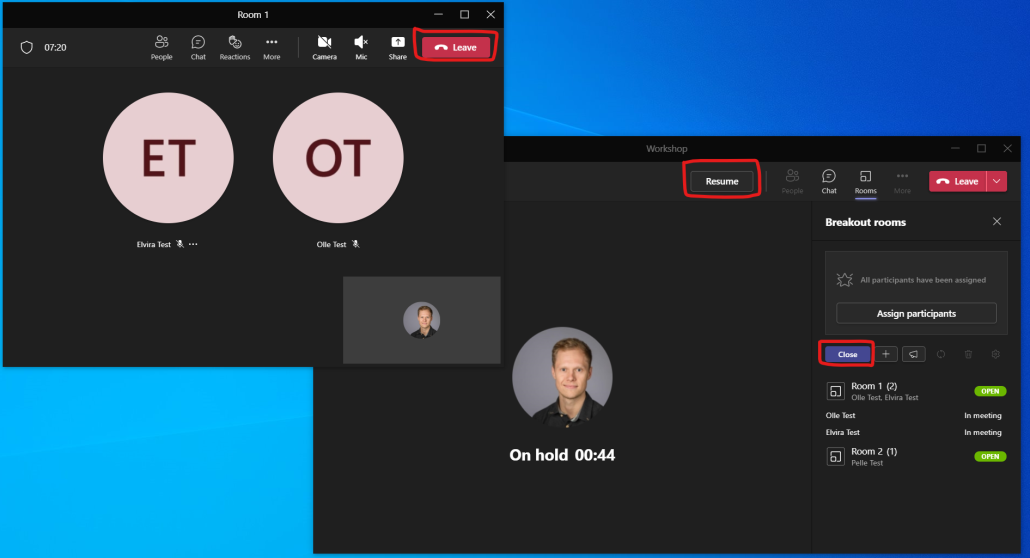
In the Teams meeting, it’s now time to start the rooms. This only takes a few seconds to do since you have already prepared the rooms.