Engelska kategorin för studentinformation.

Record meetings in Teams

In this manual, we describe how to record digital meetings in Teams, and where to find the recording when the meeting is over. Please note that it is important that you notify the participants in the meeting beforehand so they can decide whether it is okay to be recorded.  

Think before you record a meeting 

Ideally, avoid recording meetings unless you absolutely have to. Rather, write memos to document the meeting. If you still want to record a meeting, you should: 

  • Inform the participants in the meeting before so they can decide whether it is okay to be recorded. 
  • Ensure that the information recorded does not contain sensitive data. 

Join a Teams meeting

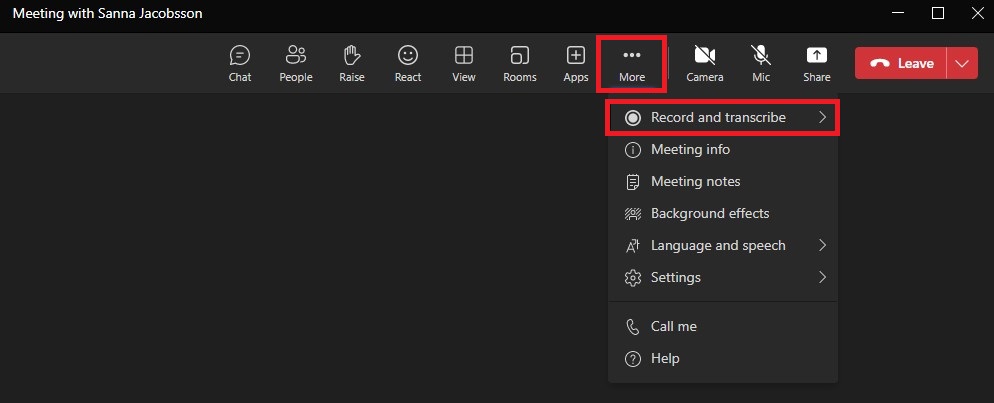
  1. After you start or join a teams meeting, click More, and then  click Record and Transcribe.
    Image showing how to record you meeting
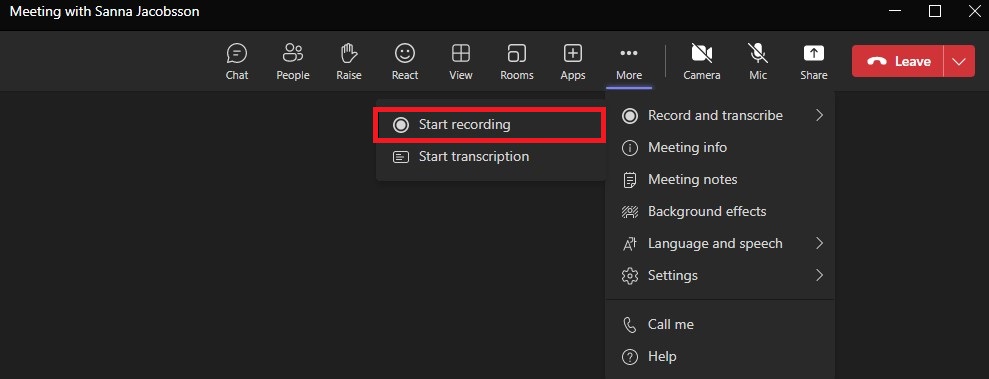
  2. Now you will bring up another box, click Start recording when you are ready. Here you can also choose to Start transcription, if you want to transcribe the meeting.
    Image showing how to start recording your meeting
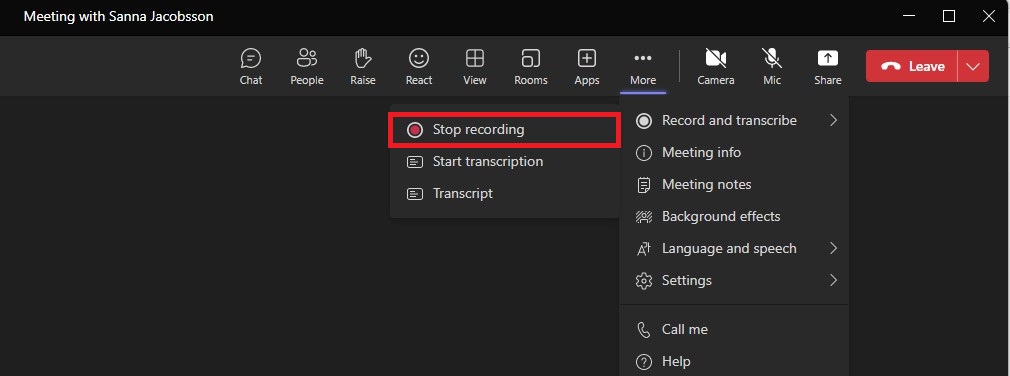
  3. When you want to end the recording, do the same as when you started recording. You go to More and then Record and Transcribe, then click Stop recording.  Recording also stops automatically when the meeting ends.
    Image showing how to stop recording your meeting
  4. Now you have made a recording of your Teams meeting. It may take a few minutes for the recording to be saved. The recording will be automatically saved in the meeting chat after the meeting is finished. Depending on the type of Teams meeting you recorded, the recording will be saved in different places 
    Channel meeting: The recording is saved in a folder under “Files” in the channel’s SharePoint, where all members of the team have access to it.  
    Regular meeting: The recording is saved in the “Recordings” folder on OneDrive for the one who started the recording. 
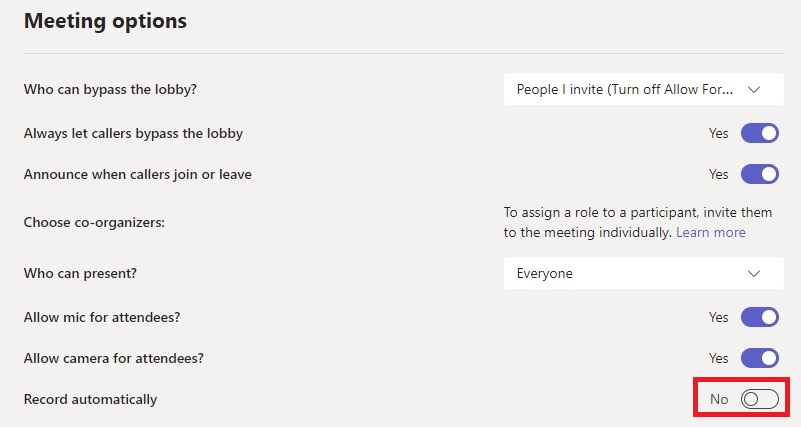
Automatic recording 

Before the meeting begins, you can choose to have it recorded automatically. Go to Meeting Options, and then check Record automatically. If you choose to do this, it is important that the participants in the meeting agree before the meeting starts that it is okay to be recorded.
Image showing meeting options in Teams

Install VPN client

Manuals that describe how to install the VPN client on different systems/devices.

DiVA: Register student thesis

Make shared annotations on a shared screen in a Teams meeting

This guide describes how you can make joint annotations, with the participants in your Teams meeting, on a shared screen. In that way you can work together on a digital Whiteboard.

Join a Teams meeting

  1. Join or start s Teams meeting.
  2. Choose Share, in the upper menu bar, to share your screen.
    Image showing how to share yuor screen in Teams
  3. A new window will now show, choose Screen, to be able to share your annotations.
    Image showing which screen to share
  4. Your screen is now shared. At the top of your screen, there is a menu bar with different options. Choose the Pen to the right side of Give control, to start your annotations.
    Image showing the upper menu
  5. Choose Everyone can annotate and make changes, to allow all the participants in the meeting to annotate on the screen.
    Image showing who can annotate
  6. Everyone can now annotate on the screen, and you can draw by dragging the mouse pointer across the screen. Use the upper menu to change the pencil, add reactions, or post-it notes.
    Image showing how to edit in shared annotions

Send from alias in your e-mail in Microsoft 365

  1. Create new mail
    Image showing how to create a new mail
  2. Choose Options.
    Image showing how to choose "options"
  3. Choose Show from, this field is then added.
    Image showing "Show from"
  4. Click on From in the mail.If it is your first time doing this, you need to state you student e-mail adress. Choose From, and then choose another e-mail adress and state your studentmail in the format: umuid@student.umu.se.Next time the mail adress is going to be avaliable as an option when clicking on From.
    image showing where the email is from
    Image showing the email adress

Create conversations in Microsoft Lists

In this guide we describe how to start conversations in Lists, through Teams. In that way you can create threads that are connected to specific lists.

Start conversations in Lists through Teams

  1. Go to the Teams channel the list you want to start a conversation about exists.
  2. Choose the row in the list you want to start conversation about, then click on the three dots and choose Open, or click on Comment directly in the upper menu bar.
    Image showing how to open a list in Teams
  3. In this view you find more information about the row in the list, choose Conversation in the menu bar to start a conversation.
    Image showing how to open a conversation in Teams
  4. The chat function is now inserted to the right. Here you can write messages and tag persons you want to mention.
    Image showing how to start a conversation  in a list
  5. When you start a conversation, it is also showing in the main channel and can be seen by the members in the channel.
    Image showing how it looks  like when you have send a message in Lists
  6. In the main channel, others can reply in the conversation, by clicking Reply under the post.
    Image showing ythe published conversation in the main channel

Create a board view in Microsoft Lists

Lists is a tool in Microsoft 365 where you can create, share, and track lists. In this manual we describe how you create a board view.

Observe that the appearance can differ whether you are using Mac or Windows.

Create board view

  1. Go to your chosen list in Microsoft Lists you want to create a board view in.
  2. Choose All objects in the menu bar and then Create new view.
    Image showing how to choose "All items" i Microsoft lists
  3. Now you see the window where you can edit and create you new view:
    1. Add the name you want for your board view.
    2. Then choose Board
    3. Choose how you want to organize your board by clicking the arrow to the right in this field. If you don’t already have any completed columns, it will automatically create a column that is named choice1. If you have completed columns, choose the column you want to organize you board view by (Example: by location, status, or date). Your board view will then be sorted and structured by how you have organized your board.
    4. If you want your list to be public for others, you tic this box. If you want it to be private, you keep this box empty. If you choose to make it private, you are the only one who can see and edit the board.
    5. When you are ready, click Create.
    Image showing how to create and edit your board view
  4. Now your Board view is showing, and here you can Add new buckets and manage your current buckets. You can place your objects to the bucket they belong to and add more object by clicking the Plus-sign in the right corner of each bucket.
    Image showing your board view

Import files to Microsoft Forms

Microsoft Forms is a tool that can be used if you want to create a form or a test. In this guide we describe how to import files with already completed question to Forms.

    1. To open Forms, use this link: office.com, or go to the office portal (o365.umu.se). If you choose the latter option, go to All my forms further down on the page.Picture that bescribes how it looks when you go to "All my forms"
    2. Choose Quick import to import your file.
      Image that shows how it looks when you find "Quick import"
    3. To import the file, choose Upload from this device. Observe that the limit for the file size is 10MB. Now yoy can also click See import guidance to see how to structure your Word-document, or PDF before you upload it.
      Image that shows how it looks when you are about to upload you file
    4. Then pick the file you want to import.
    5. Choose whether you want to create a Test or a Form.
      Image that shows how it looks when you decide if you want to create a form or a test
    6. When the file has converted, you choose if you want to Import another file, or Start reviewing the form/test.
      Image that shows how it looks like when your file has been converted
    7. Now you can edit your imported questions, to make sure they have the correct layout. You can also delete or add questions.
      Image that shows how iut looks like when you can edit your uploaded form

Observe

With this function you can only create question with multiple alternatives, and questions with open text (for example fill in an empty space). For more advanced types of questions you must add them directly in Forms.