Install eduroam manually
Should the “automatic” method of installing eduroam on your device not work, there are manuals below for how to do it via a more manual approach.
Mobilmenu:
Windows | macOS | Android | iOS / iPadOS | Chromebook | Ubuntu
This guide helps you to manually install the certificates needed to connect to eduroam on Windows 10/11.
Creating and installing eduroam certificates
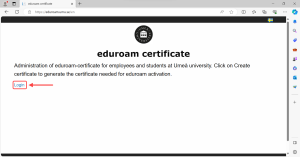
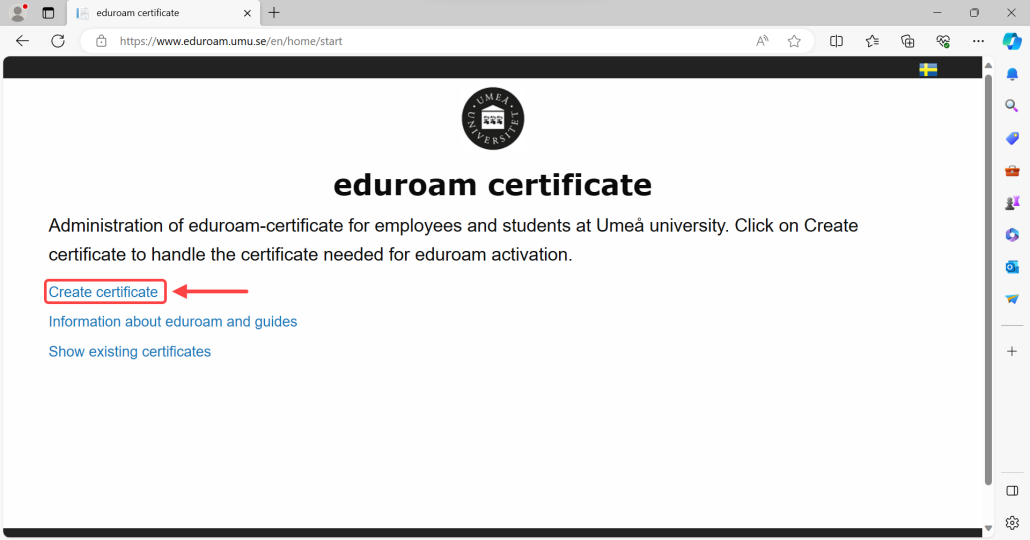
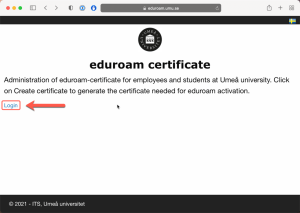
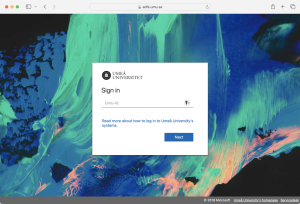
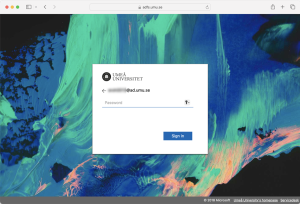
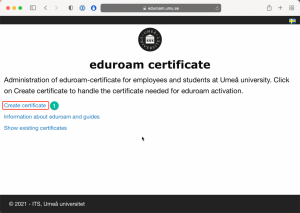
1. Logon with your UmU-ID at https://www.eduroam.umu.se, click on Create certificate.
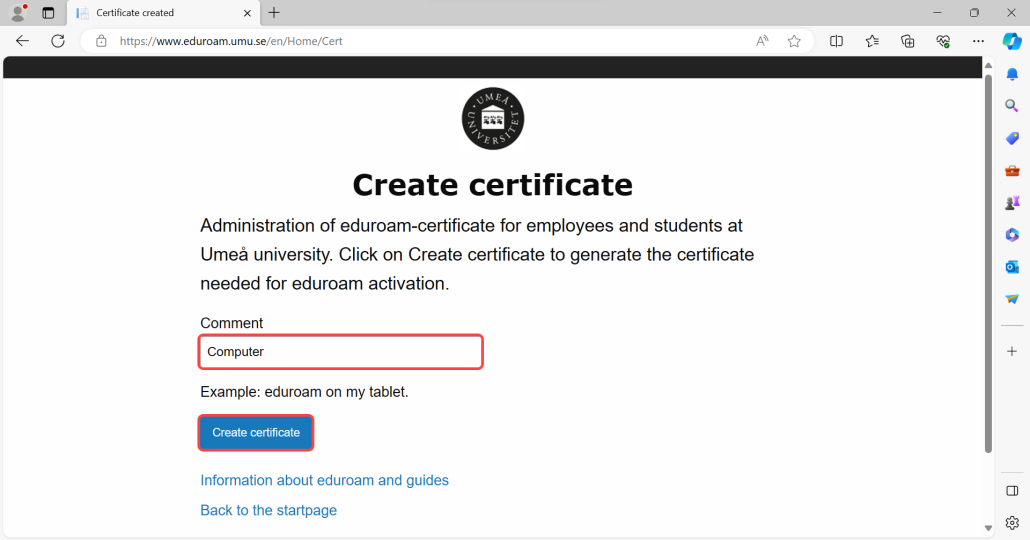
2. Add information (as in your name or computer name) about the certificate and click on Create certificate.
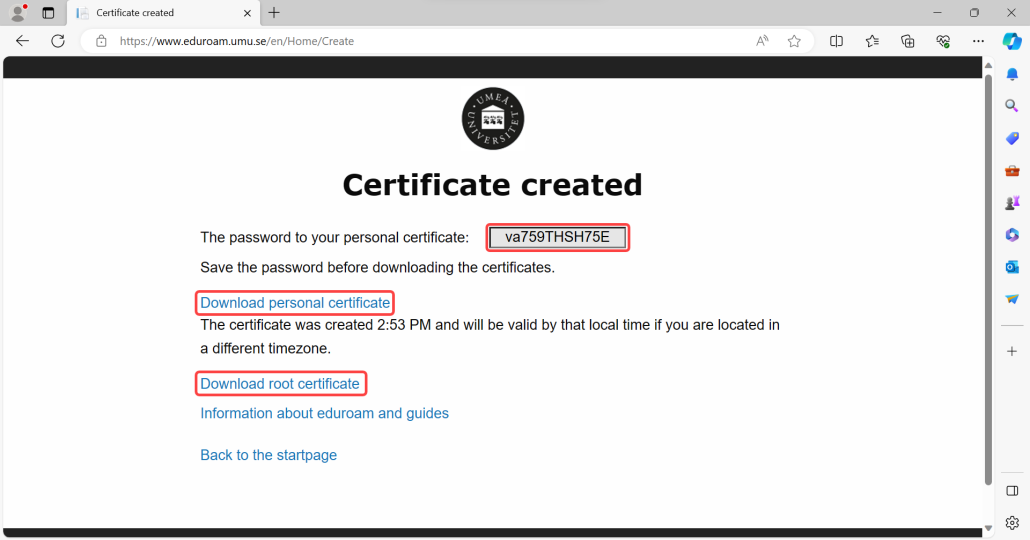
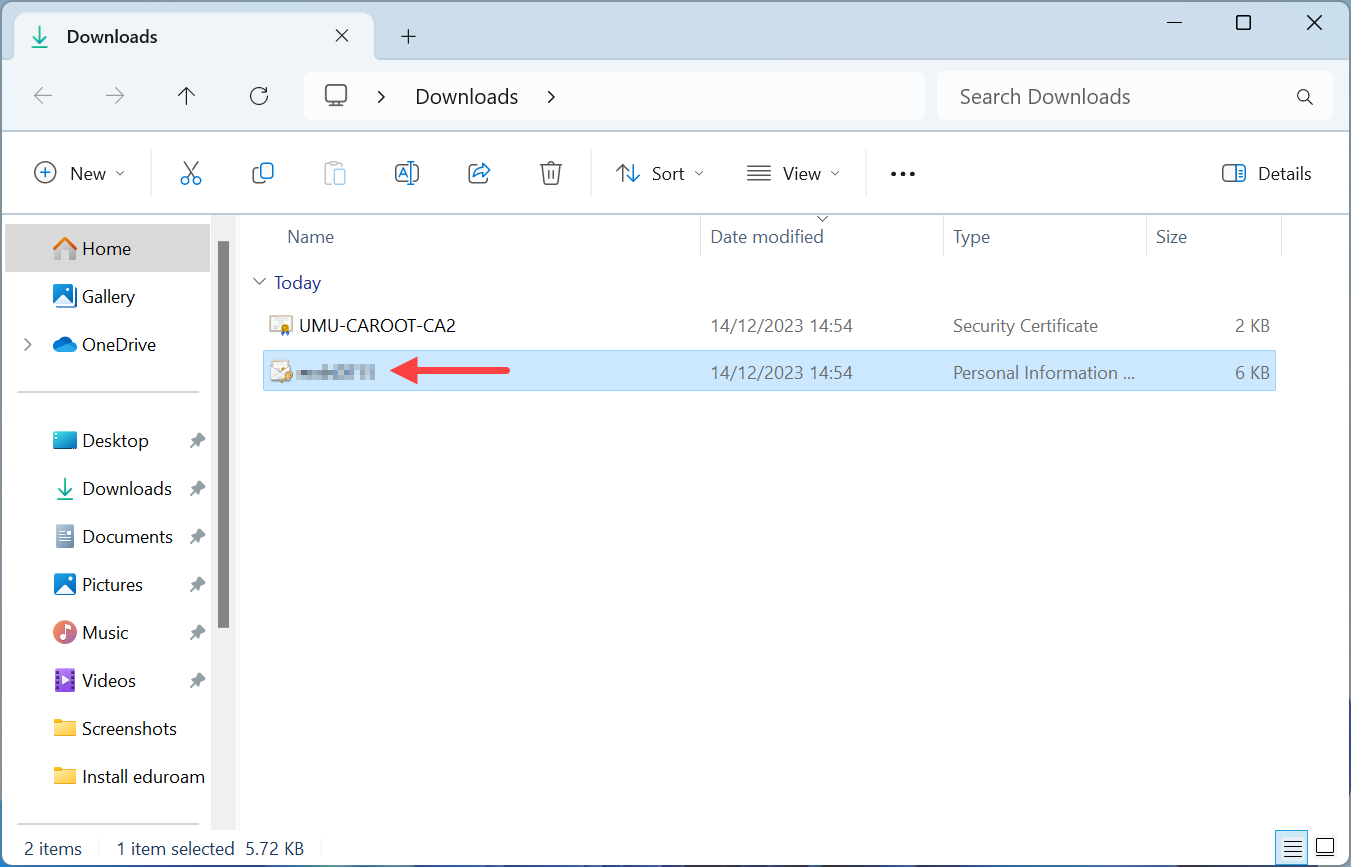
3. Copy the password and download the personal and root certificate.
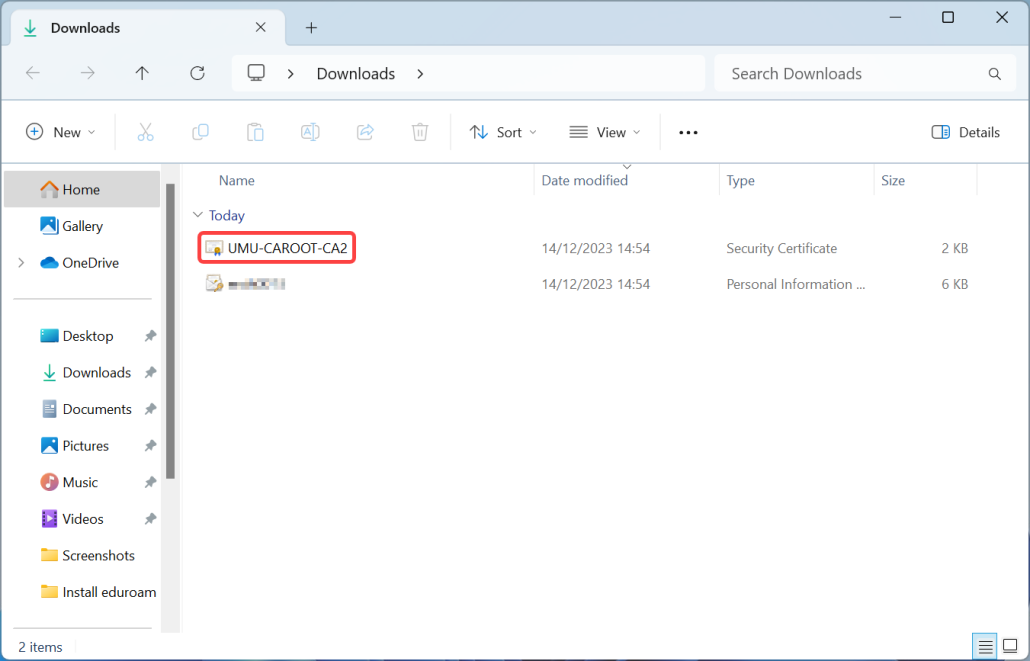
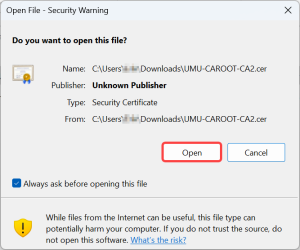
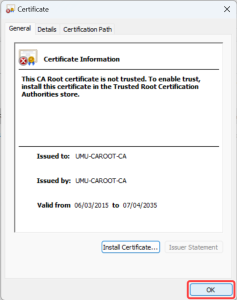
4. Browse to the downloaded files and open UMU-CAROOT-CA2.cer.
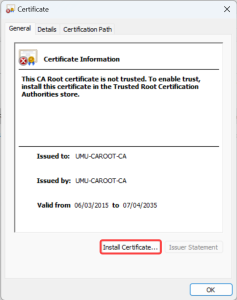
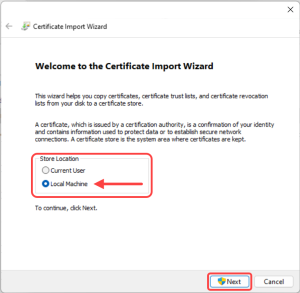
5. Choose Local computer and click on Next.
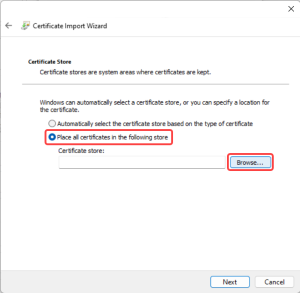
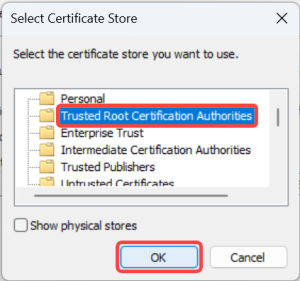
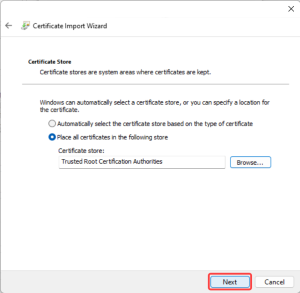
6. Choose Place all.. and click on Browse.., choose Trusted rootcert.. and click OK. The dialogue window closes and then click Next.
7. Click Yes to install the certificate.
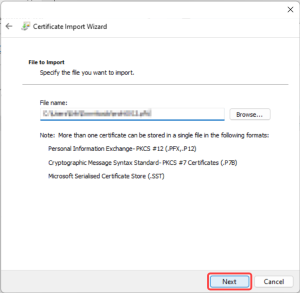
8. Open your personal certificate. (with suffix .pfx)
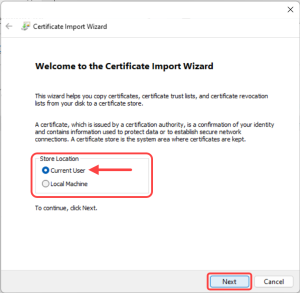
9. Choose Current User and click on Next.
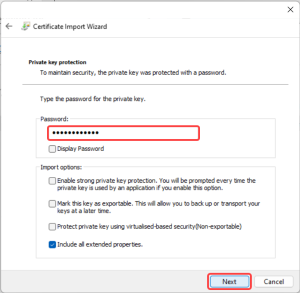
10. Click Next until your asked to enter a password, paste the password from step 3 and click Next.
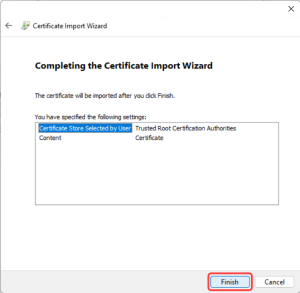
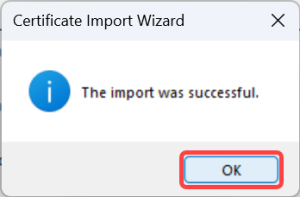
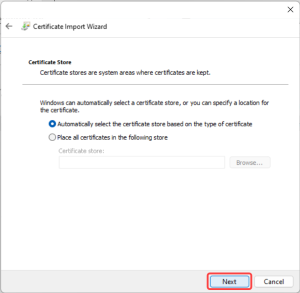
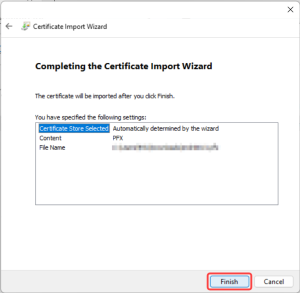
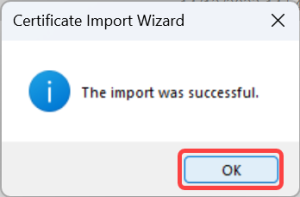
11. Click Next and then Done.
Configure Windows 10 to connect using the certificate
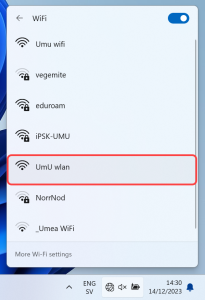
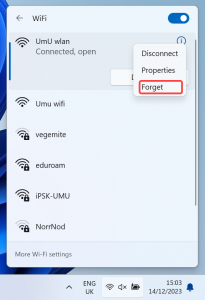
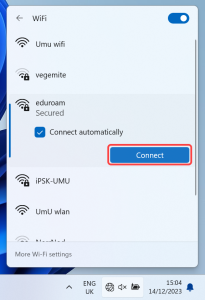
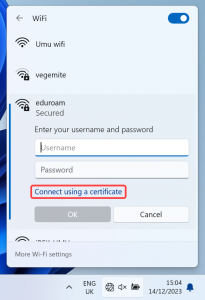
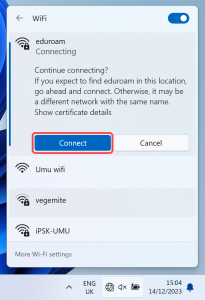
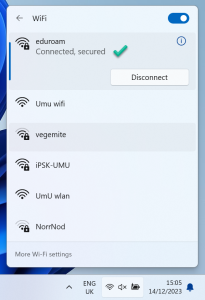
Search for available networks and choose eduroam, click on Connect using certificate.
This guide is written for manual installation of the certificates needed to connect to the eduroam wireless network on a PC running macOS.
NOTE! The guide is written with the help of an MacBook Pro that has had eduroam before and is running macOS 12 Monterey. If you have had eduroam before on your computer, it is recommended that you uninstall/delete certificates and profiles and perform a reboot before trying to follow this manual. If you are unsure on how to proceed, you can contact Servicedesk.
Step 1
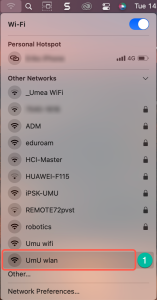
To download the certificates, you need to be connected to the internet. Our recommendation is that you connect to the network called UmU wlan. Select UmU wlan in the network list and follow the on-screen instructions.
Step 2
Start Safari and go to http://www.eduroam.umu.se
Log in with your Umu-id and password.
Step 3 – Create Certificate
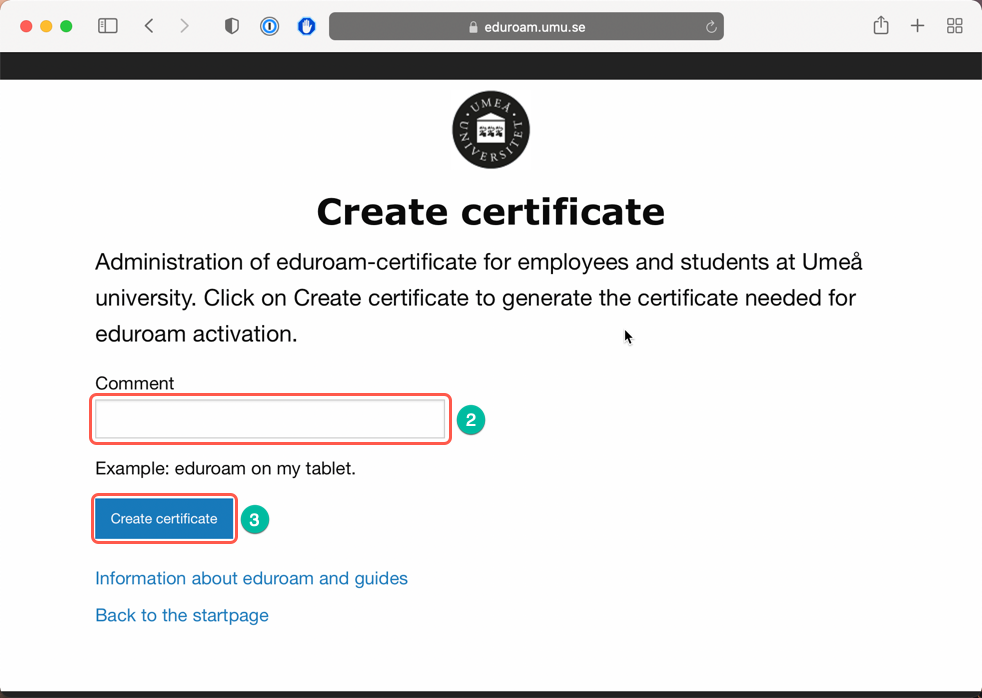
Once logged in, you will need to create your certificate. Click Create Certificate .
On the next page, you need to give the certificate a “name” ,
then click on the blue Create Certificate button .
It may take a while but eventually you will come to a new page.
Step 4 – Download the certificates
Once the certificates have been created, they need to be downloaded.
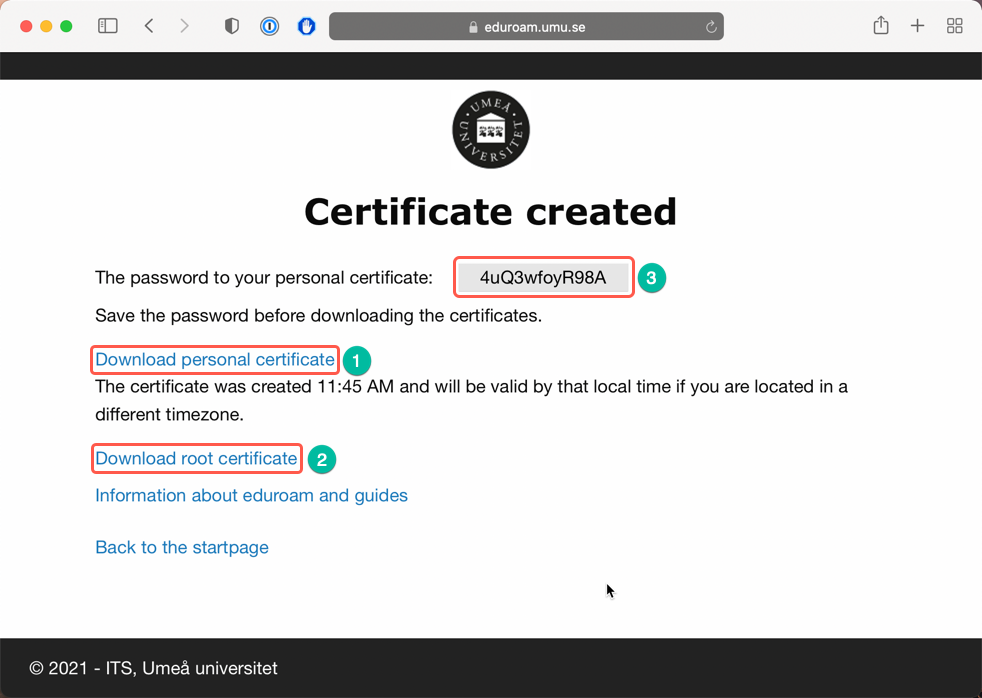
In addition to a personal certificate , you also need to download a so-called ROOT certificate .
The personal certificate has also been given a password .
Start by copying the password for the personal certificate . Then click Download Personal Certificate . You will probably then be met by a warning, if so click on Allow. Then click Download Root Certificate .
Step 5 – Install Root Certificate
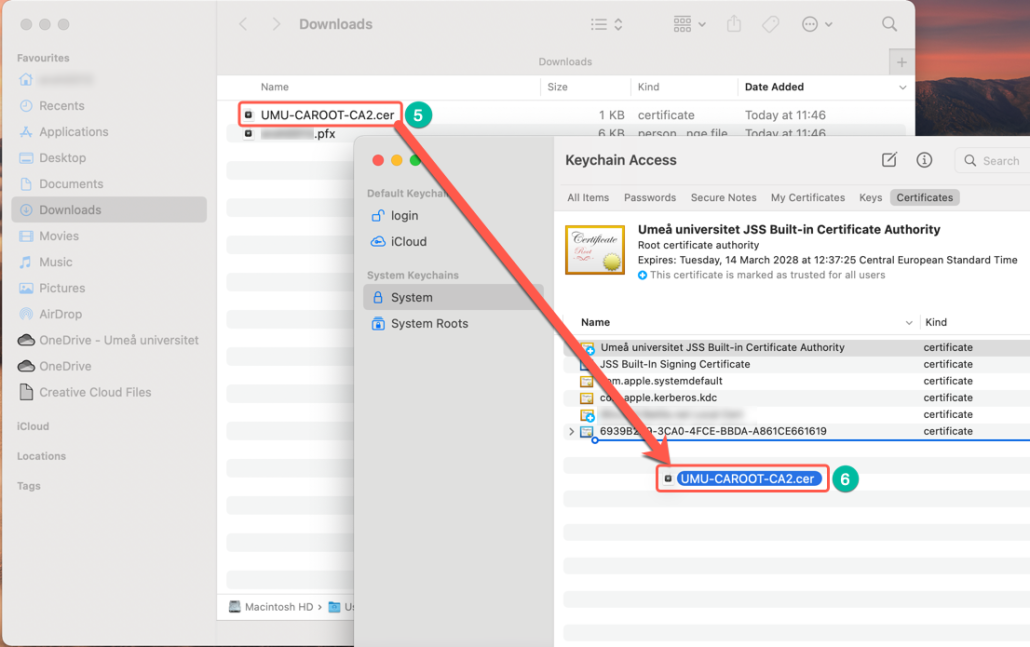
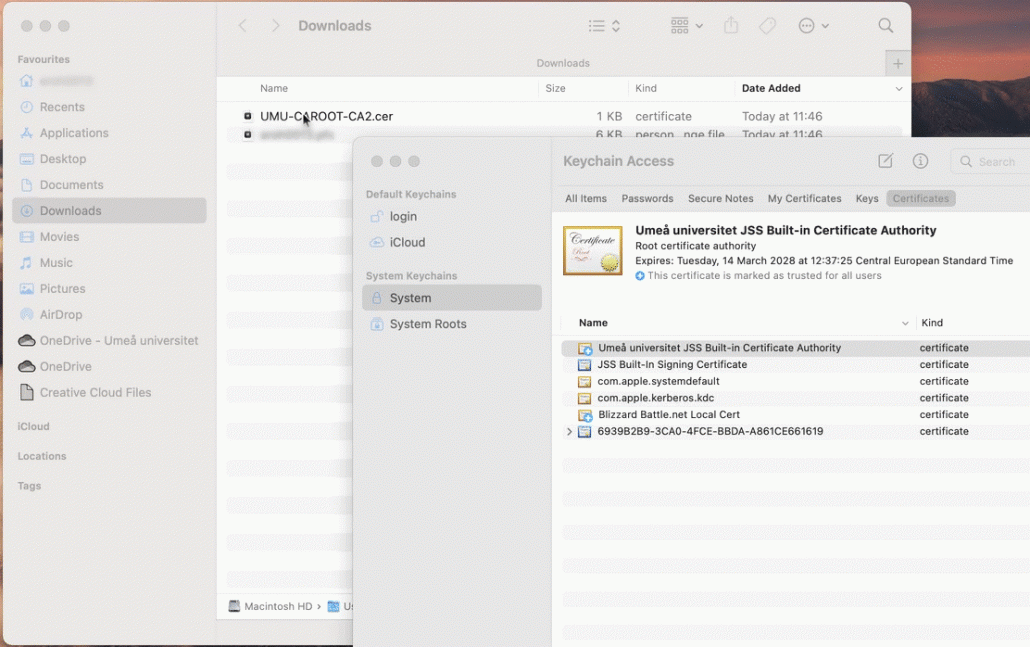
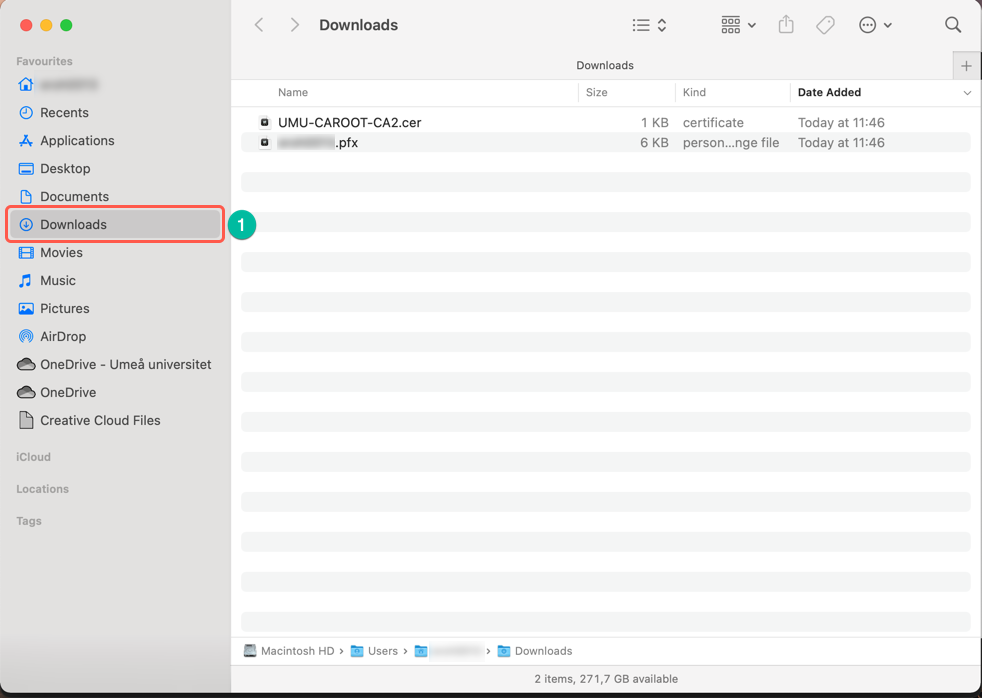
Open the Downloads folder in Finder . Also open Keychain Access ,
suggested via the search function Spotlight.
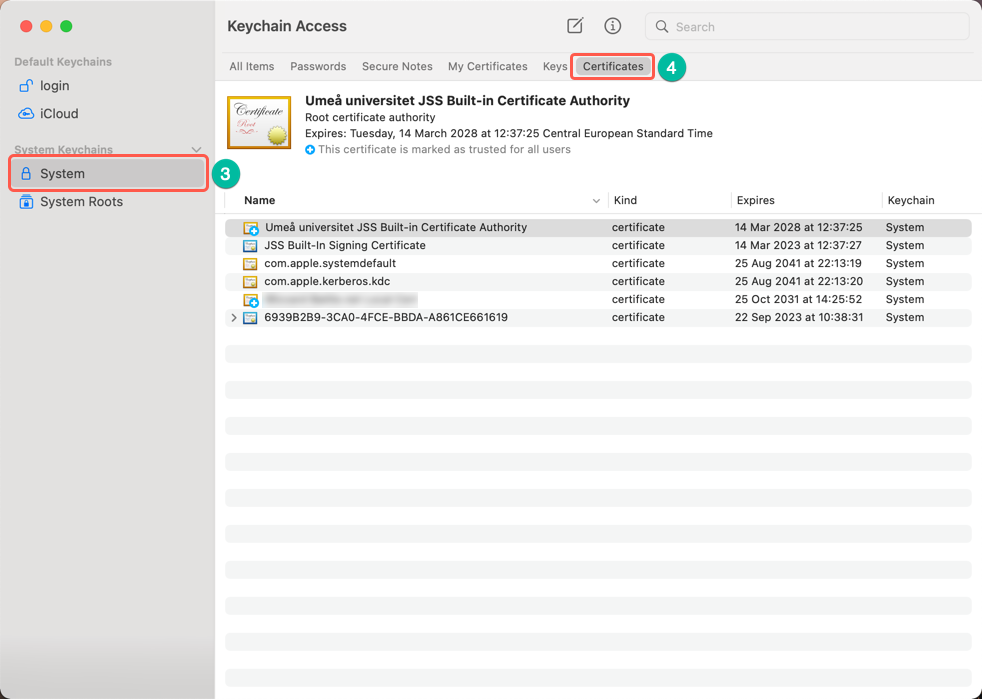
In Keychain Access click on System then on Certificates .
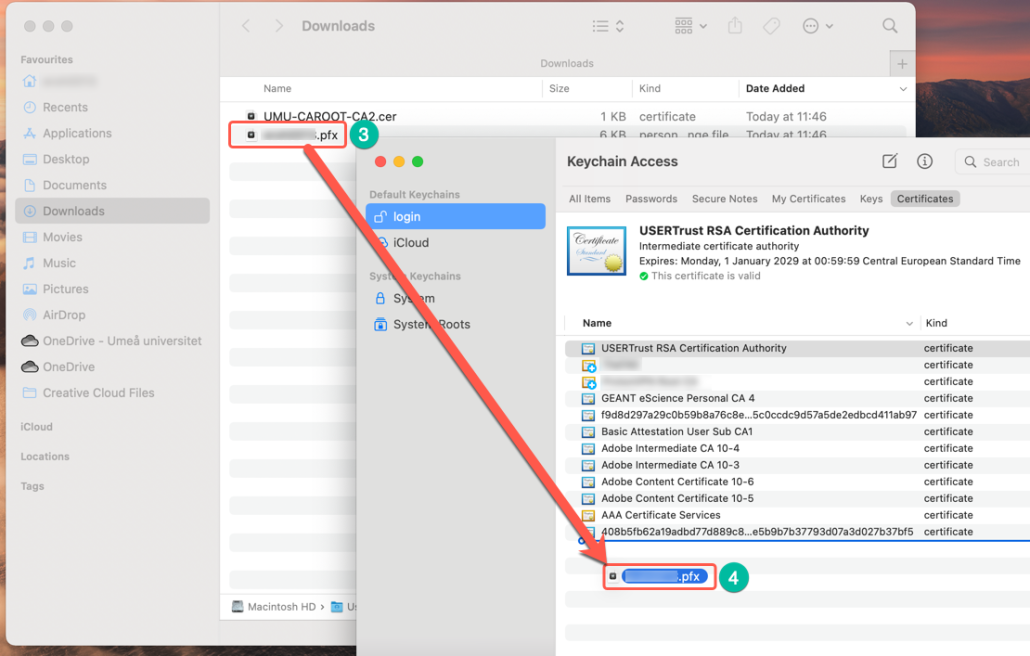
Make sure the Downloads folder in the Finder and Keychain Access are open at the same time. You need to drag and drop the UMU-CAROOT-CA2.cer certificate from Downloads to the Keychain Access .
Then follow the information on the screen. See Tips and Tricks for drag and drop help.
Step 6 – Install Personal Certificate
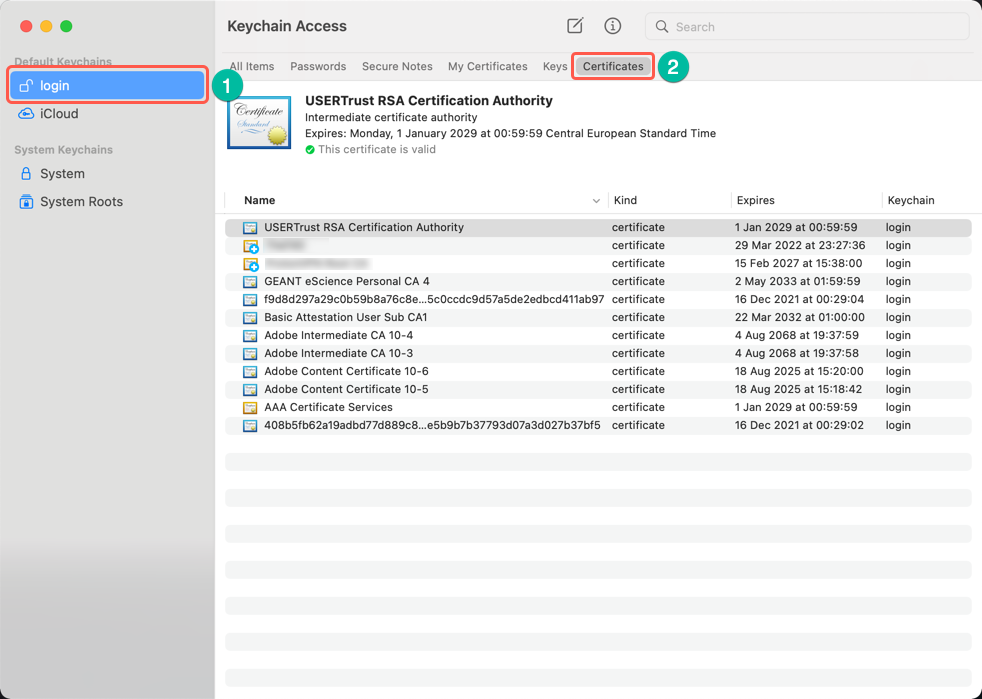
Change the view in Keychain Access to Login and Certificate .
Now you need to drag and drop your personal certificate named Umu-id.pfx from Downloads in Finder to Keychain Access . In the same way dragged and dropped the Root Certificate in Step 5.
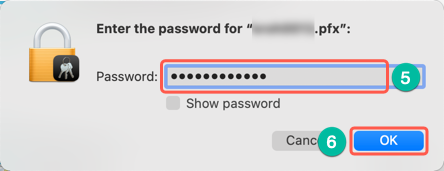
You will now be prompted to enter the password you received and copied in Step 4. Paste and click OK .
Step 7 – Connect to eduroam
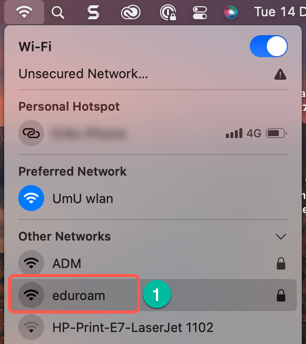
Open the list of available networks again and click on eduroam .
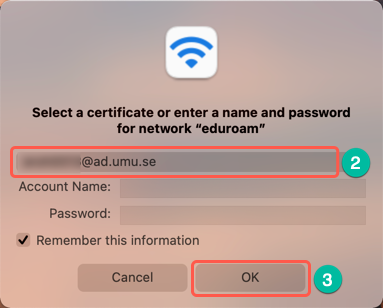
If everything is correct, you should now see the window below where you can select your personal certificate (Umu-id@ad.umu.se) . Account name and Password can be left blank. Click OK .
NOTE: If you are using an older version of macOS (11 or earlier) you will likely need to change mode to EAP-TLS.
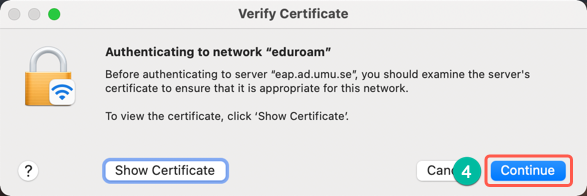
Click Continue .
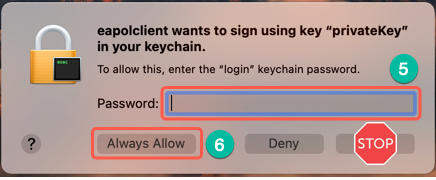
Type your computer username password and then it is important you click Always Allow .
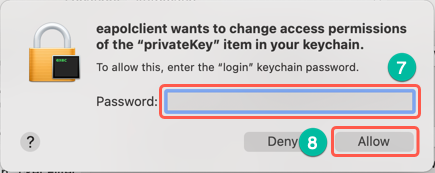
Type your computer username password once more and click Allow .
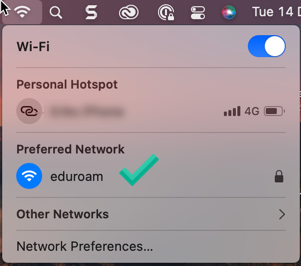
Give it a few seconds and then you should be connected to eduroam.
Tips and Tricks – Drag and drop the certificate
Click and hold the file and while holding down move the cursor to the destination and then you can release to drop it. Click on the image below for an animated GIF that shows the process.
This manual will guide you on how to connect to eduroam after the manual installation of the required certificates.
NOTE! Due to the different implementations of Android because of many manufacturers, this manual might not work for your phone but hopefully, it can give you some idea on how to connect to the eduroam network.
The manual is written with the help of a Samsung Galaxy S20 FE 5G, Android 11, Samsung One UI 3.1, and Chrome 92.
Step 1
You need to be connected to the internet. If you have 4G/5G you are all set but if you need a temporary internet connection we recommend you connect to the network UmU wlan.
Step 2
Open Chrome and go to https://www.eduroam.umu.se/ and click Login.
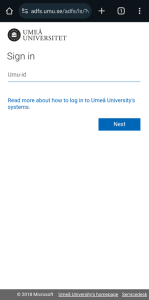
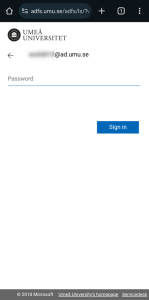
You will be forwarded to the Umeå University login page. Sign in with your Umu-id and password.
Step 3
To create your certificate click on Create certificate. On the page, after that, you need to give it a comment. Type whatever you want, for example, Android, and then click the Create certificate button. A circular progress animation will let you know that your certificate is being created.
Step 4
The next page will look something like the screenshot below. Here you have a password for your personal certificate, a link to download your personal certificate, and a link to download the root certificate.
Step 5 – Download and install the personal certificate
Copy the password for the personal certificate and click on the link Download personal certificate.
The system/browser wants to install the certificate and the first thing you need to do is to extract it, to do this paste the password you copied and click OK.
The next thing to do is to choose the type of the certificate, click Wi-Fi certificate and then click OK.
The certificate will be given a long and random name but we recommend you change that to your Umu-id and click OK.
Step 6 – Download the Root certificate
After the download and installation of the personal certificate, you will again see the Certificate created page.
You now need to click Download root certificate. You will, however, most likely see an error saying it can’t be installed but that is fine, just click the OK button.
Step 7 – Change Root certificate file extension
To be able to install the Root certificate we first need to make sure the file has the correct file extension.
Open the My Files (or equivalent for your phone) and find the Downloads folder where the file is.
In this example, we can actually see that the file (UMU-CAROOT-CA2.cer.crt) has the wrong file extension, or rather, it is two (.cer.crt). What we need to do is to remove the .crt part of the file.
Hold down on the file to mark it and so the options menu is showing.
Click on More and then Rename.
The file name including the file extension can now be edited. Remove the .crt part so the file name is
UMU-CAROOT-CA2.cer and click Rename. You will be prompted that the file extension has changed, this is fine and just click Change.
Step 8 – Install Root Certificate
You now need to navigate to Settings > Connections > Wi-Fi. Here you need to find the Advanced settings.
In this example, you need to click the three dots in the upper right corner and then click Advanced.
For other phones, you can find it below the Available networks.
At the Advanced settings for Wi-Fi, you need to click on Install network certificate.
Open the Download folder and find the UMU-CAROOT-CA2.cer, mark it and click Done.
You are now prompted to give it a name. Type umu and click OK. The certificate should now be installed.
Step 9 – Connect to eduroam
Return to the page where you see the Available networks and click on eduroam.
Here you need to make sure the settings are as shown in the example.
EAP method: TLS
Identity: Umu-id@ad.umu.se
CA certificate: umu
Online certificate status: Don’t validate
Domain: eap.ad.umu.se
User certificate: the one called your Umu-id
Auto reconnect: Yes
And then click Connect and you should now be connected.
This manual will guide you how to connect to eduroam on an iPhone (and iPad) after manual installation of the required certificates.
NOTE! Make sure you have updated iOS/iPadOS to version 15.2 before following this guide.
Step 1
You need to be connected to the internet. If you have 4G/5G you are all set but if you need a temporary internet connection we recommend you connect to the network UmU wlan.
Step 2
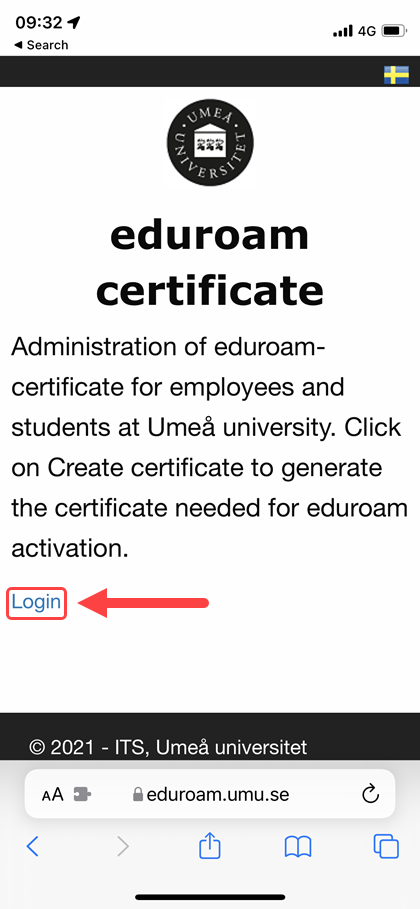
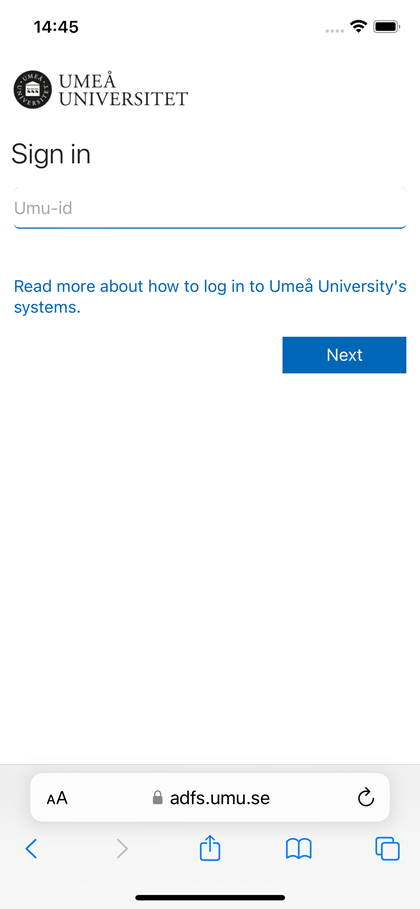
Open Safari and go to https://www.eduroam.umu.se/ and click Login.
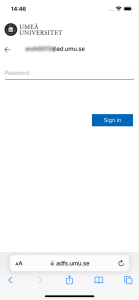
You will be forwarded to the Umeå University login page. Sign in with you Umu-id and password.
Step 3 – Create certificate
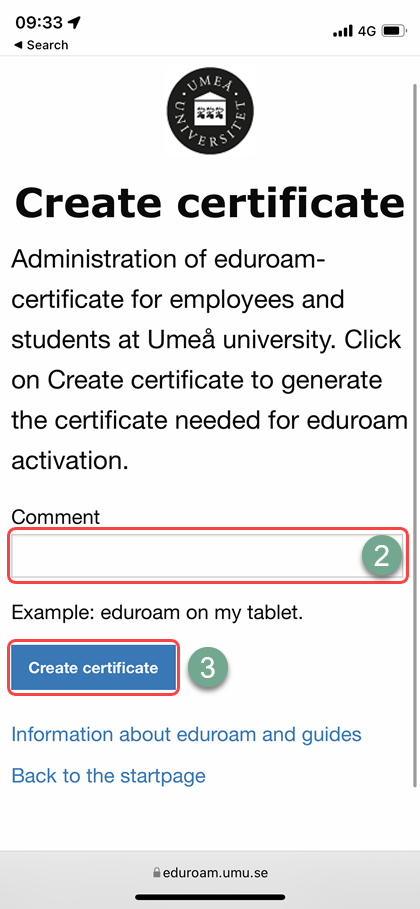
To create your certificate click on Create certificate .
On the page after that you need to give it a comment .
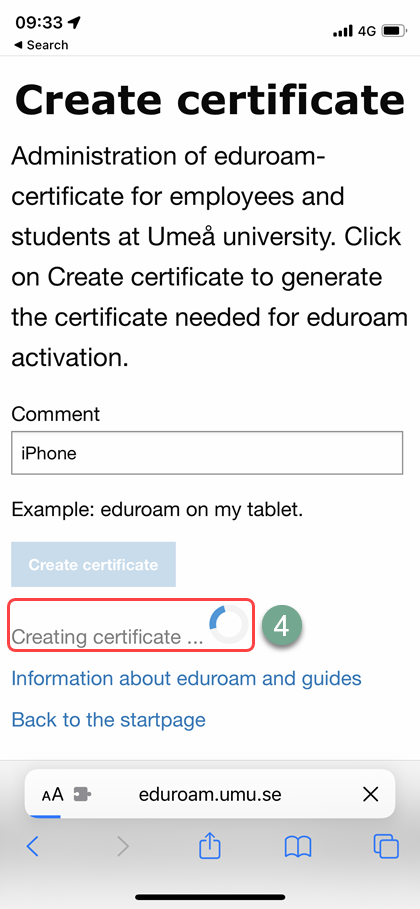
Type whatever you want, for example iPhone, and then click the Create certificate button .
A circular progress animation will let you know that your certificate is being created .
Step 4 – Certificate created
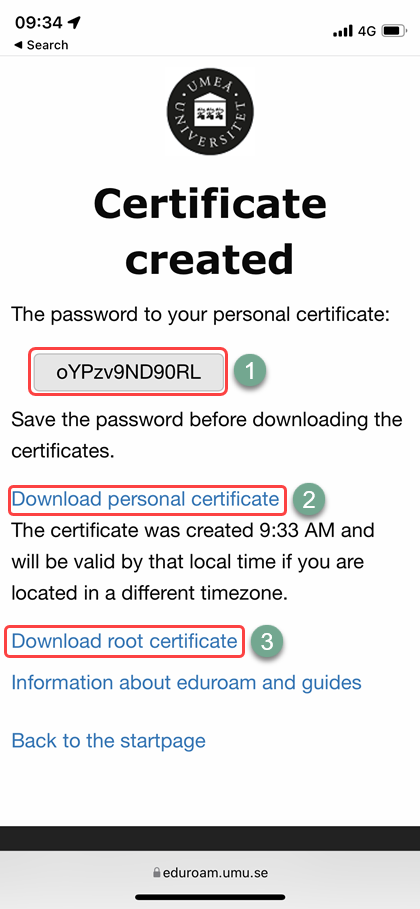
After a while you will see the Certificate created page that has the password for your personal certificate , a link to download you personal certificate and a link to download the root certificate .
Step 5 – Download and install personal certificate
Copy the password for the personal certificate and click on the link Download personal certificate .
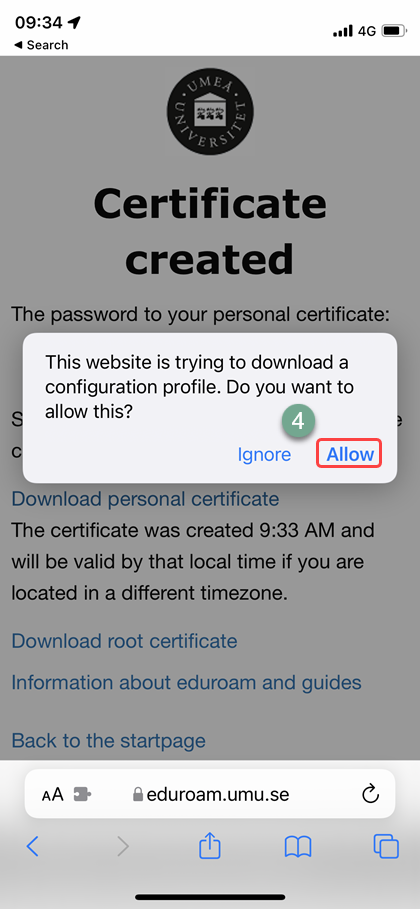
You will be prompted to allow the downloading of the certificate, this is OK so click Allow .
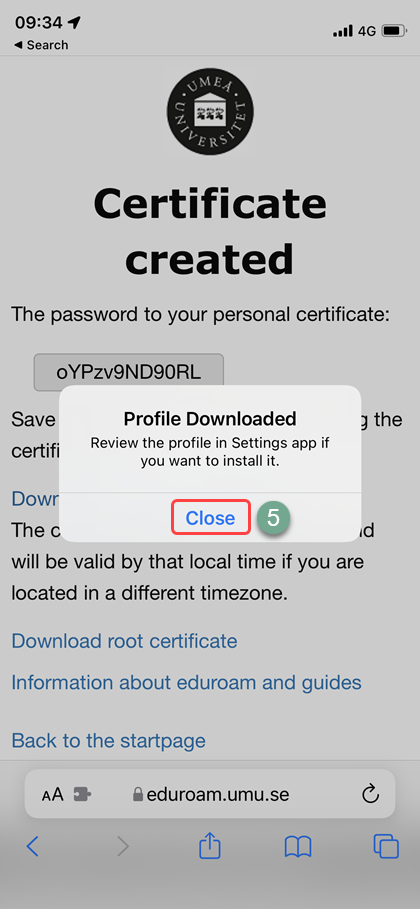
After the certificate/profile has been downloaded click Close .
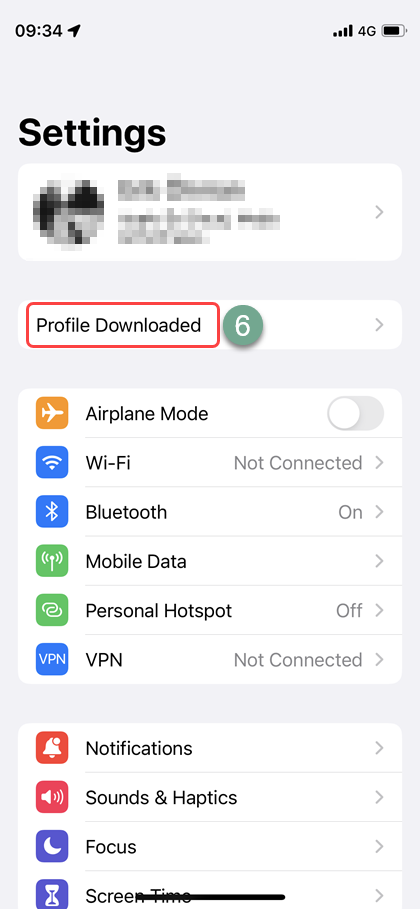
Open the Settings app and click on Profile Downloaded .
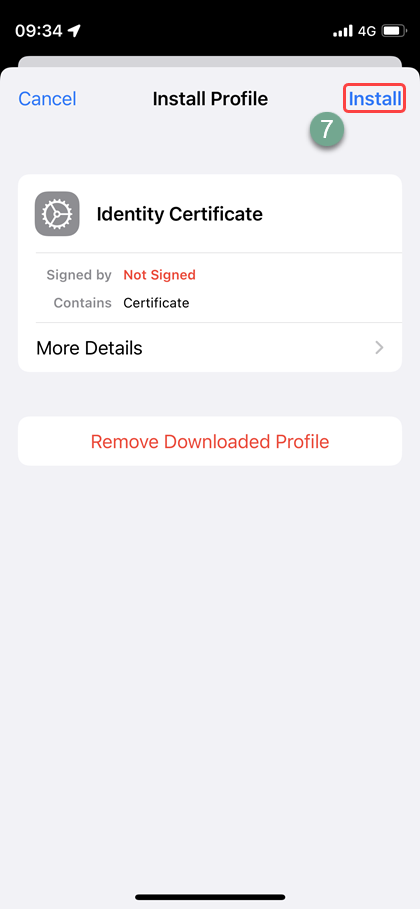
Click on Install in the upper right corner .
Enter the iPhone passcode .
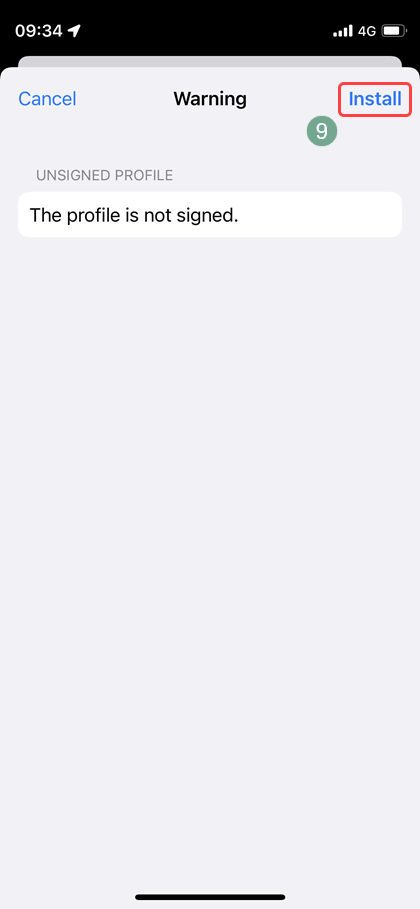
Click Install again in the upper right corner then click Install again to verify.
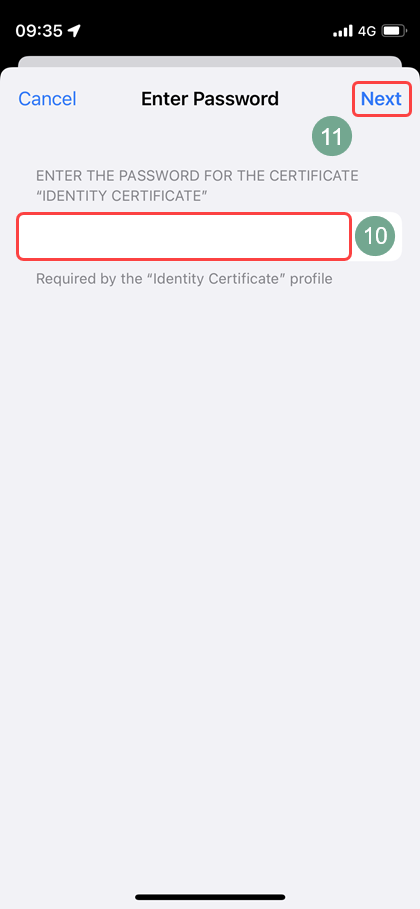
Paste the password we copied in the beginning of Step 5 and click Next .
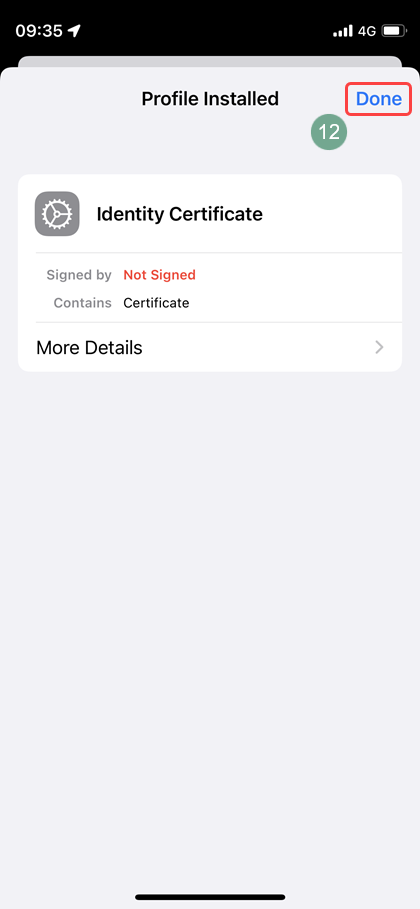
When you see the Profile Installed page, click Done .
Step 6 – Download and install root certificate
Go back to Safari and click on the link Download root certificate .
As you did in Step 5, Allow the certificate and Close when done.
Go back to the Settings app and you should be on the page VPN & Device Management.
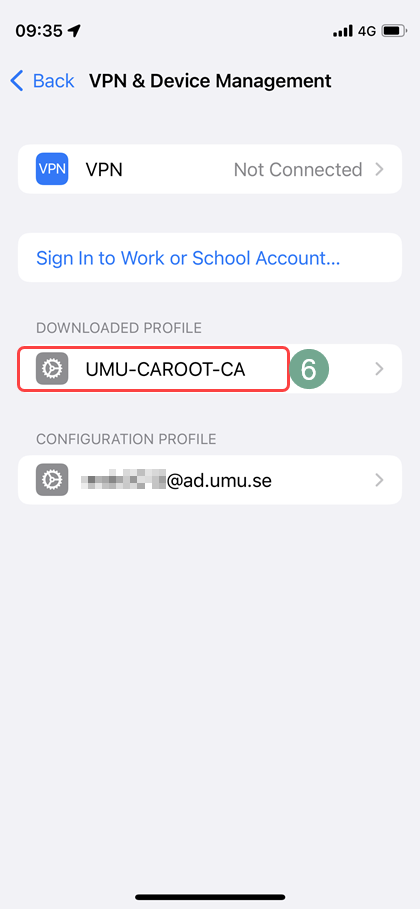
Click on UMU-CAROOT-CA under the header Downloaded Profile.
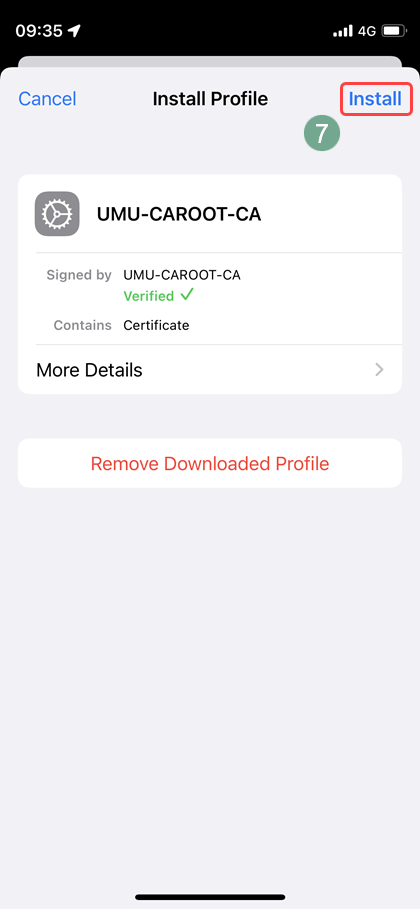
Click Install in the upper right corner and verify by clicking Install again.
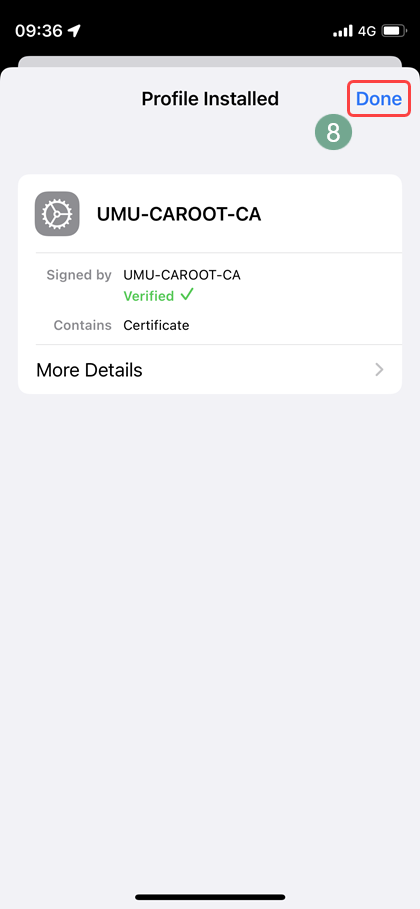
When you see the page Profile Installed, click Done .
Step 7 – Connect to eduroam
Go back to the main Settings page.
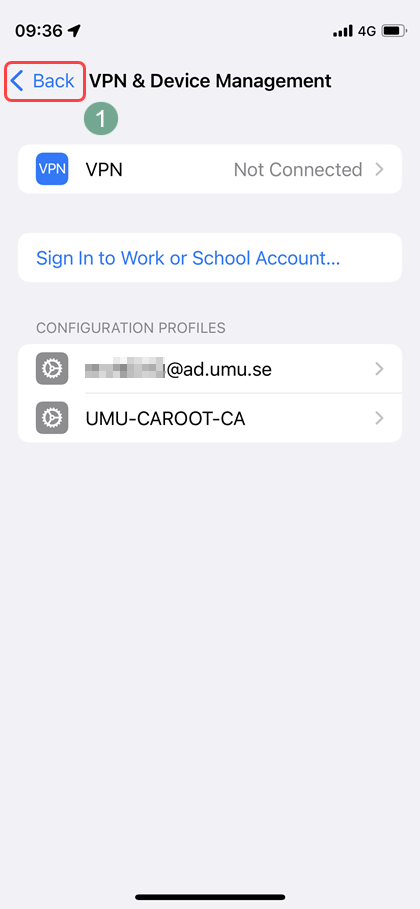
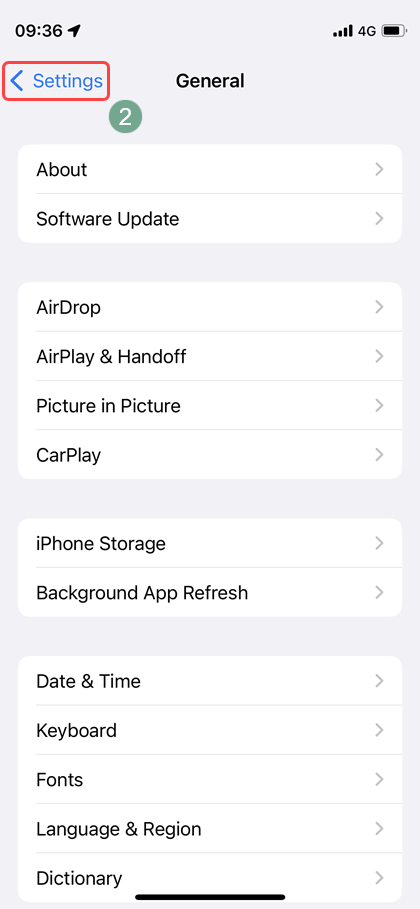
From the VPN & Device Management page you can click < Back and
then < Settings in the upper left corner.
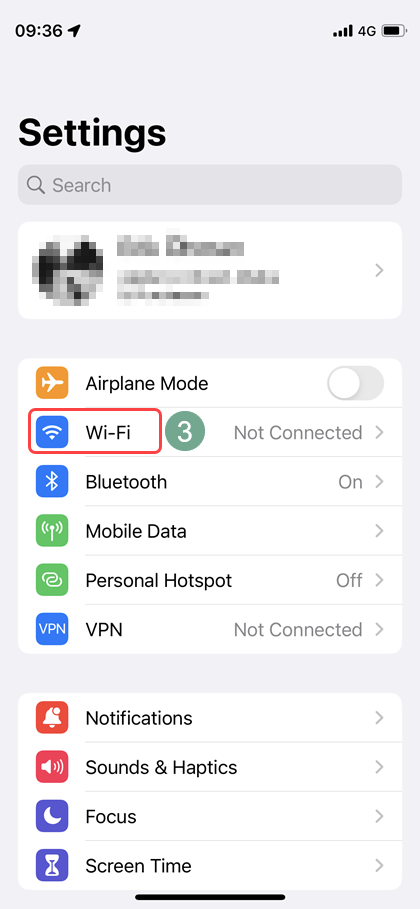
On the main Settings page click Wi-Fi .
On the Wi-Fi page, click eduroam .
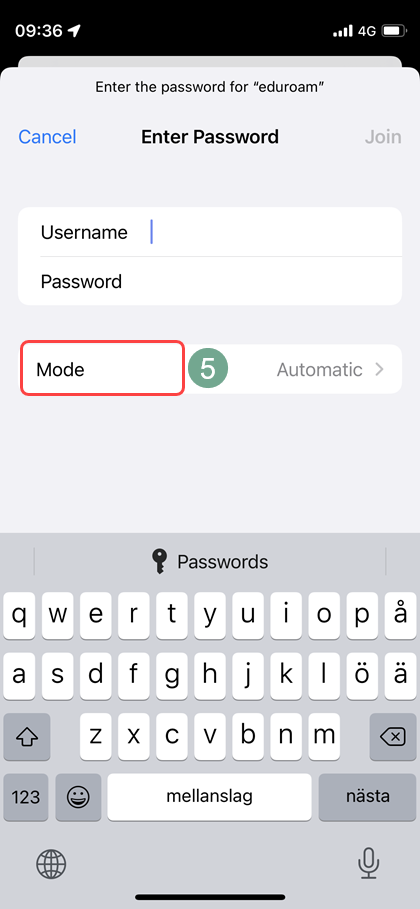
When it prompts you for Username and Password click on Mode instead .
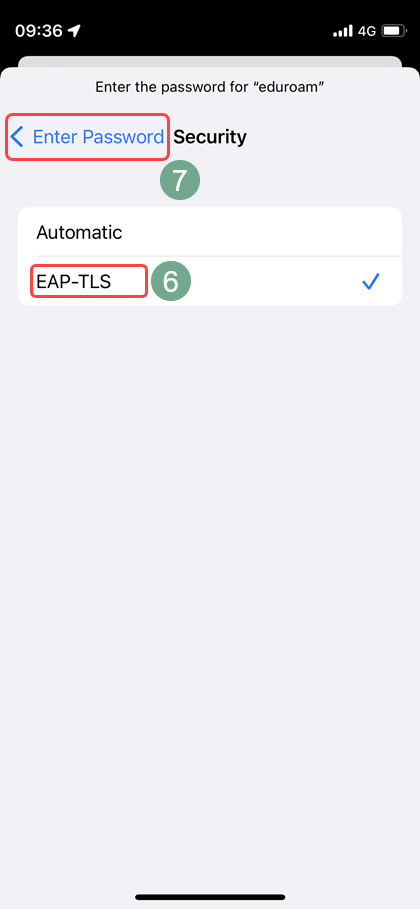
Mark the mode EAP-TLS and go back by clicking < Enter Password 7️ in the upper left corner.
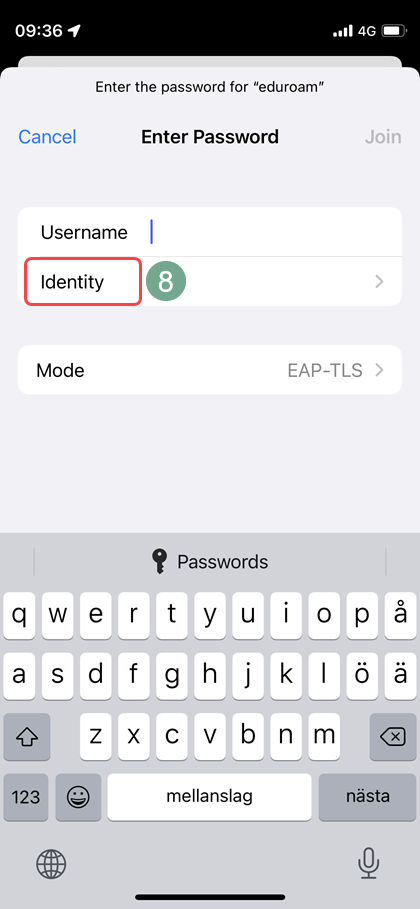
Back on the Enter Password page click on Identity .
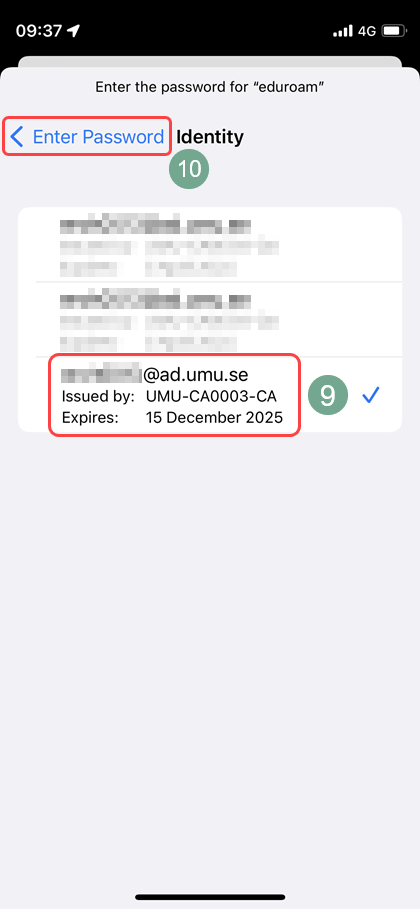
Click on the Identity called Umu-id@ad.umu.se , if you see more than one click on
the one with the latest expiry date.
Go back by clicking < Enter password in the upper left corner.
Back on the Enter Password page you can now click Join in the upper right corner.
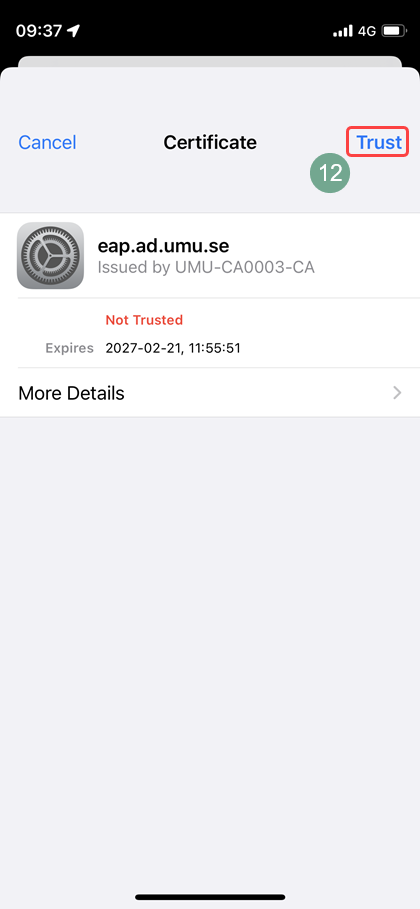
A certificate page will be shown, click on Trust in the upper right corner.
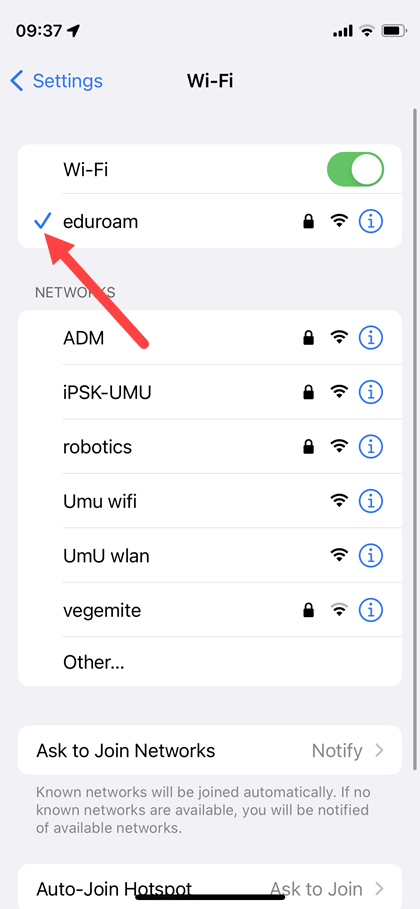
Give it a few seconds and you should now see a check mark to the left of the network eduroam and you are now connected.
How to configure eduroam certificates on Chromebook
- 1. Logon to https://www.eduroam.umu.se with your Umu-id.
If you’re not connected to internet, you might have connect through UmU-Wlan first (logon with a browser). - Click on Skapa certifikat.
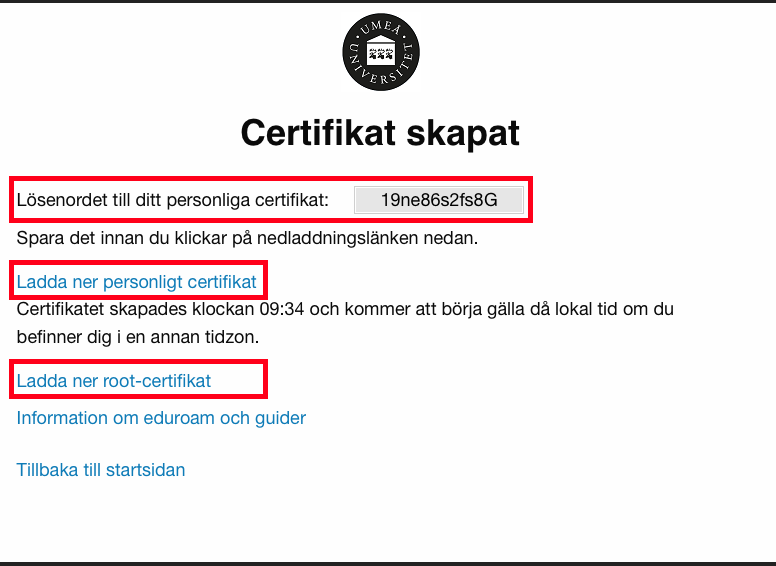
- Copy the password in the box and click on Ladda ner personligt certifikat and Ladda ner root-certifikat.
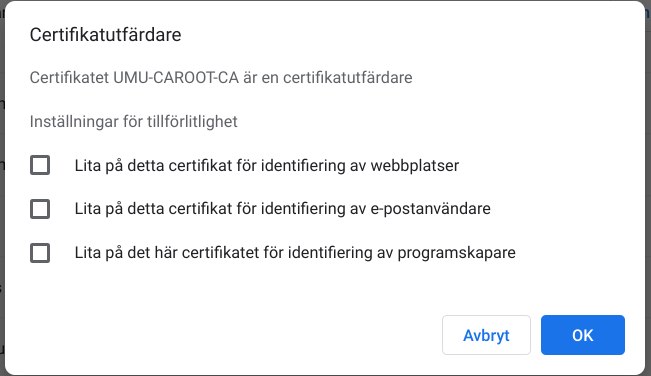
- When downloading the root-certificate (UMU-CAROOT-CA) you don’t have check the boxes.
- In Chromes address field, type chrome://settings/certificates, choose the tab Authorities. Click on Import…
- Go to Downloads, import the file UMU-CAROOT-CA2. You might have to view All files to be able to select it.
- Go to Your certificates, choose Import and bind to device your ”Umu-id” certificate, then paste the password you copied in step 3.
Configure your Chromebook to use the certficate
- Open Chrome again and go to chrome://settings. Under Network expand Add connection and choose Add Wi-Fi.
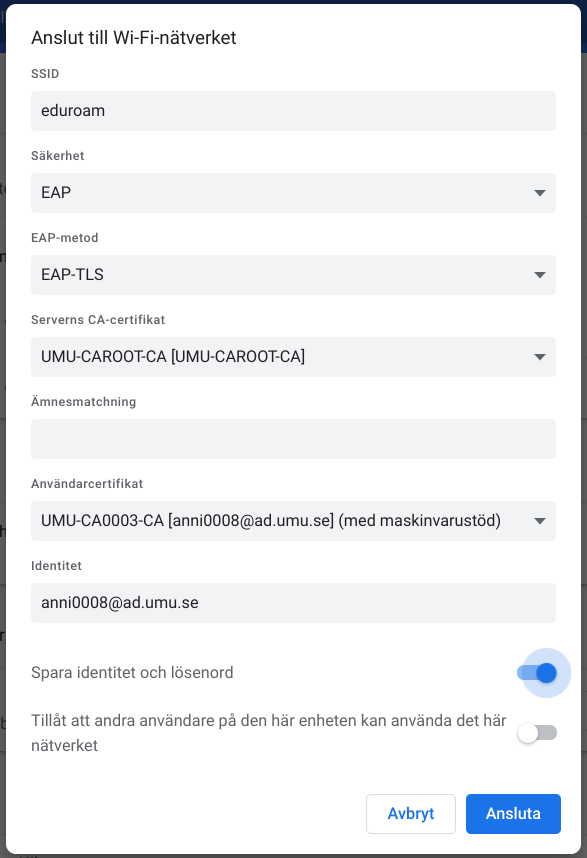
- Configure Wi-Fi settings
- SSID eduroam
- Choose TLS or EAP-TLS as EAP method (depends on version)
- Choose none as Phase 2 authentication (if available)
- Server CA-certifikat UMU-CAROOT-CA
- Användarcertifikat UMU-CA0003-CA
- Identity Umu-id@ad.umu.se (ex. “abcd0001@ad.umu.se”)
- Check Save identity and password
- Click on Connect
This guide is written for manual installation of the certificates needed to connect to the eduroam wireless network.
NOTE! This guide is written with the help of Ubuntu 22.04 LTS and if you use another version of the OS there might be UI-differences.
Step 1
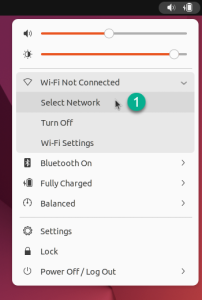
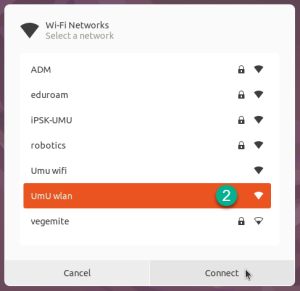
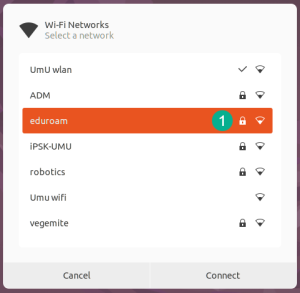
To download the certificates, you need to be connected to the internet. Our recommendation is that you connect to the network called UmU wlan. First Click Select Network and then click UmU wlan in the network list and follow the on-screen instructions.
Step 2
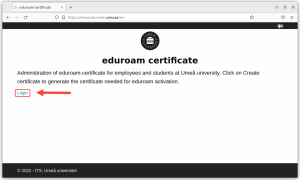
Start Firefox and go to http://www.eduroam.umu.se
Log in with your Umu-id and password.
Step 3
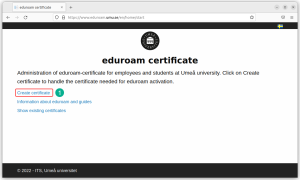
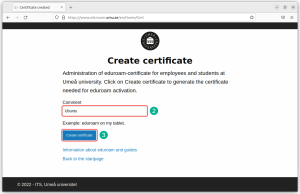
Once logged in, you will need to create your certificate. Click Create Certificate .
On the next page, you need to give the certificate a “name” 2️, then click on the blue Create Certificate button .
It may take a while but eventually you will come to a new page.
Step 4 – Download the certificates
Once the certificates have been created, they need to be downloaded.
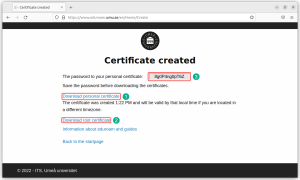
In addition to a personal certificate , you also need to download a so-called ROOT certificate .
The personal certificate has also been given a password .
Start by copying the password for the personal certificate . Then click Download Personal Certificate . Then click Download Root Certificate .
Step 5 – Change personal certificate file extension
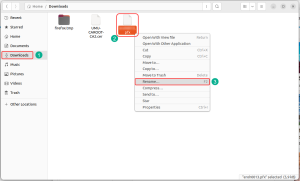
Open the Files app and go to Downloads , right click on the file named Your-Umu-id.pfx and click Rename… .
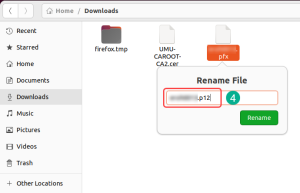
Click in the rename field behind .pfx and change it i to .p12
Close the Files app.
Step 6 – Connect to eduroam
Open the network list again and now click on eduroam .
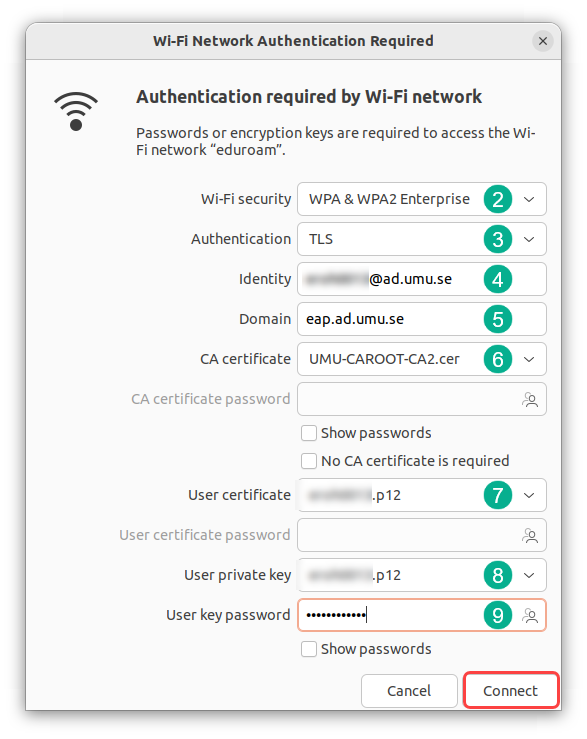
When trying to connect the Wi-Fi Network Authentication Required window will open and the settings need to be as follow.
Wi-Fi security : WPA & WPA 2 Enterprise
Authentication : TLS
Identity : Your-Umu-id@ad.umu.se
Domain : eap.ad.umu.se
CA certificate : UMU-CAROOT-CA2.cer that can be found in the Download folder
User certificate : Umu-id.p12 that can be found in the Download folder
User private key : Added automaticity (same as User certificate)
User key password : Paste password copied from Step 4
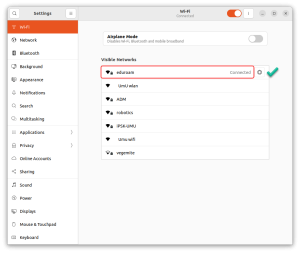
Click Connect and you will see that network list again and after a few seconds you should be connected.