Version history for files in Microsoft 365
/in Employee, Microsoft 365, Sharepoint, StudentIn this manual, we’ll go through where to find version history of your documents in OneDrive, Teams, and SharePoint. Version history can save up to 500 versions of a document, and a new version is created each time you make a change to the document. Below is a description of how to do this and where to find the feature.
Open a file that you’ve saved in Microsoft 365. It can be a Word-document, PowerPoint, or Excel.
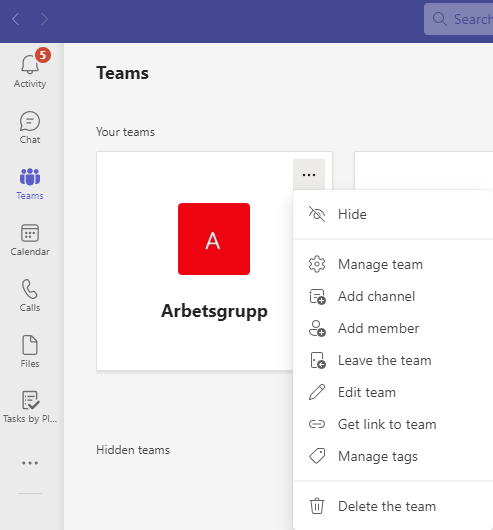
- Click at the top of the document where the title of the file appears.

- In the box that appears, click at the bottom on Version history.
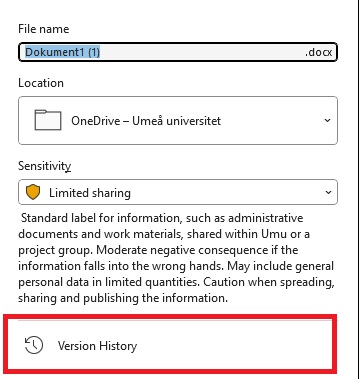
- You will now see a box on the right with a list of previous versions of a document. Click on Open version to see a previous version.
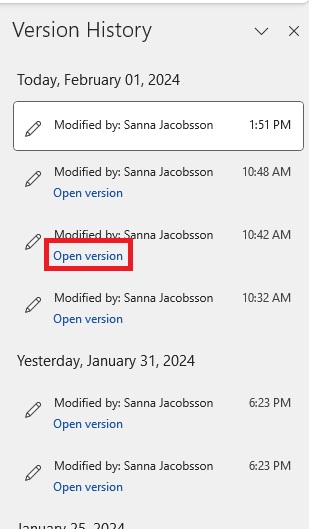
- Now you will get a new window where you can see what the document looked like before. Here you can choose to Compare with the current version or to Restore the documents to this previous version. If you do, a new version of the document will be created. If you don’t want to restore or compare, close the document.

Delete groups in Microsoft 365
/in Employee, Microsoft 365, Okategoriserade, Sharepoint, TeamsDelete groups in the tool
You can delete groups in the respective tools where the group is located, such as Planner, SharePoint, and Teams. Note that if you delete a group, you delete everything that belongs to the group. For example, if you delete a group in Planner, you delete the SharePoint site and possibly the Team that belongs to the group.
Delete group in Planner
- Go to Hubben – Planner (office.com), it lists all planners you have authorization to.
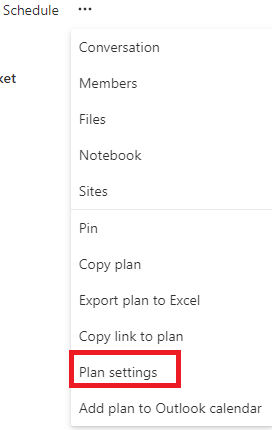
- To delete, go under the three dots and select Plan settings.
- At the bottom of the Plan Settings dialog window, you can find the button to delete the group.
Delete group in SharePoint
- It’s not easy to find all of your SharePoint sites. That’s why you need to search for them, and you can do so with the following link that includes a search query: SharePoint
- Select the site you want to administrate. If you are an owner, then under the gear you will receive website information. At the bottom of that window is the Delete option.
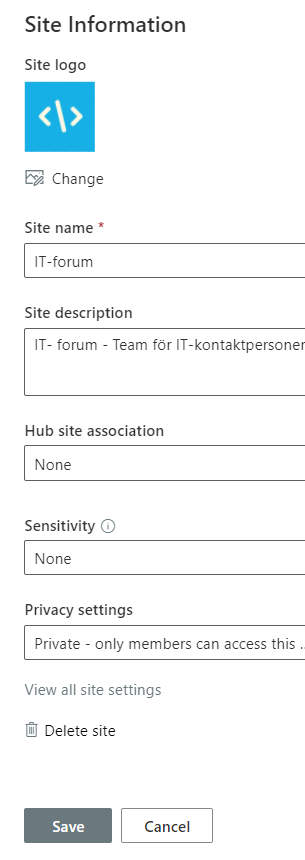
Delete group in Teams
- Go to your Teams client and select Team on the menu to the left.
- In the listing of teams, you can click on the three dots of the desired team. If you are the owner, you have the option of clicking on Delete team at the bottom of the menu.
Administrate groups through Outlook (Office 365)
If you’ve moved your email to Office 365, you can easily administer the groups you belong to or own through Outlook.
- Open Outlook and go to your email box.
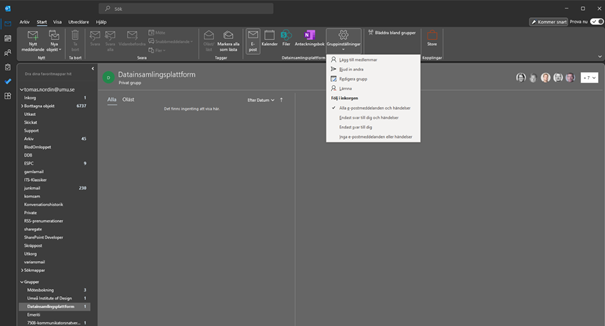
- Select Groups on the menu to the left.
- It lists the groups that you have permission to and that are configured to be visible in Outlook.
- Select Group, then open Group Settings in the top menu. In the menu presented, you can administer your group.
Syncronize files from OneDrive, Teams or SharePoint to your computer
/in Microsoft 365, Okategoriserade, OneDrive, Sharepoint, TeamsYou can sync folders, files, and entire libraries from Microsoft 365 to your computer. This means that you can work with the same files you have in Teams, SharePoint or OneDrive. In this manual, we will show you how to sync files from your OneDrive, Team, Team Channel, and a shared SharePoint library. Our recommendation is that you do not sync too many files.
Sync my own files from OneDrive to your computer
- Select Start on your computer and find the OneDrive app.
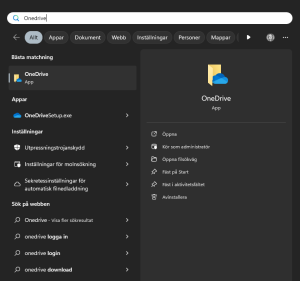
- Log in to OneDrive with your account, umuid@ad.umu.se.
- When you are logged in, the blue cloud appears down to the right.

- You can set which folders you want to sync by clicking on the OneDrive cloud and then the gear at the top right
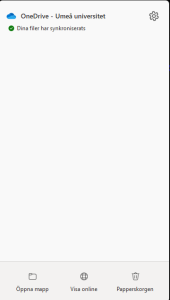
- Then go to Account and Choose folders, mark the folders you want to synchronize and then click OK.
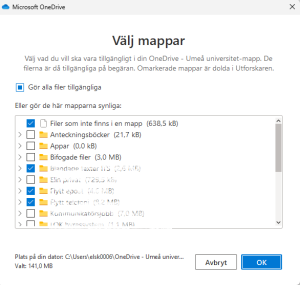
- Syncing from your OneDrive is now complete. A new tab is created in your Explorer/Finder – “OneDrive – Umeå University”. You can now work with these files from your computer. Note that these are the same files that are on OneDrive for the web. It’s just another way of working from the computer.
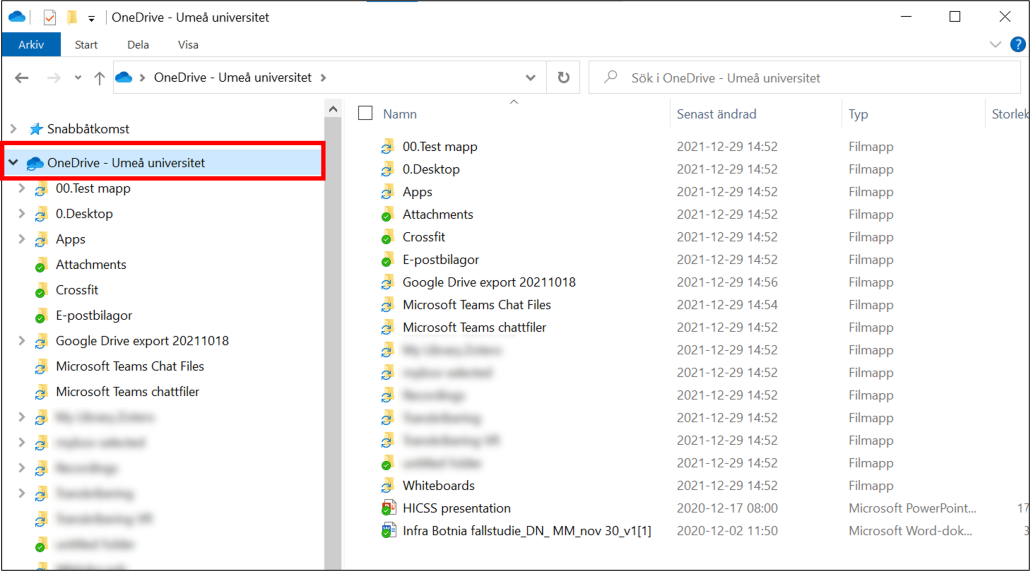
Sync files from an entire Team to your computer
- Select the Team you want to sync files from to your computer.
- Select a Team channel and click on Files

- Click on Document

- Now you will be able to access all files associated with the Team. Then click Sync.

- The OneDrive app starts. Make sure all folders and files are selected. When you’re done, click Start Sync.
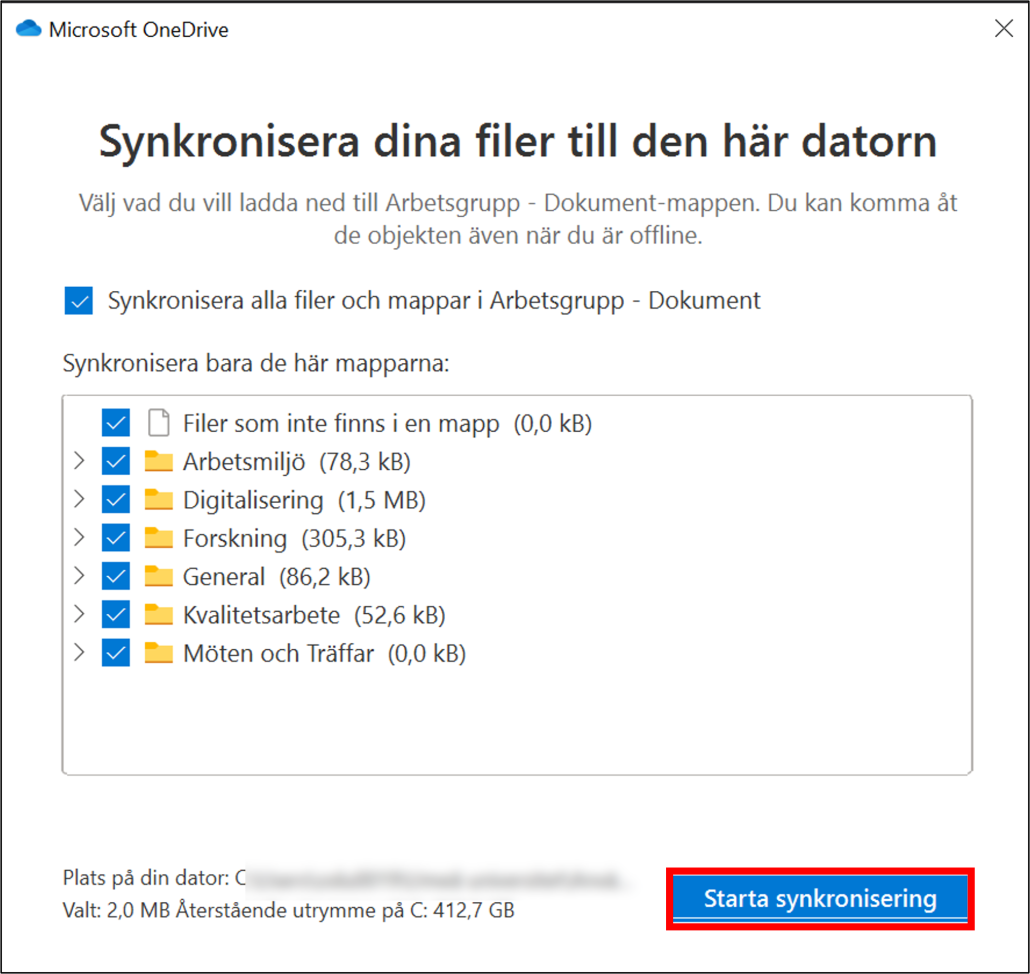
- Synchronization from an entire team is now complete. A new tab (with a “House”) is created in your Explorer/Finder. See selected locations in the image. You can now work with these files from your explorer. Note that these are the same files that are in the team. It’s just another way of working from the computer.

Sync files from a specific channel in a Team
- Choose the Team you want to sync files from to your computer.
- Click the channel from which you want to sync files to your computer. For example, the Education channel that the picture shows.
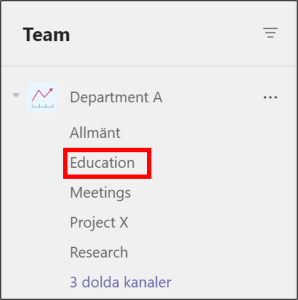
- Click on Files

- Click on Sync
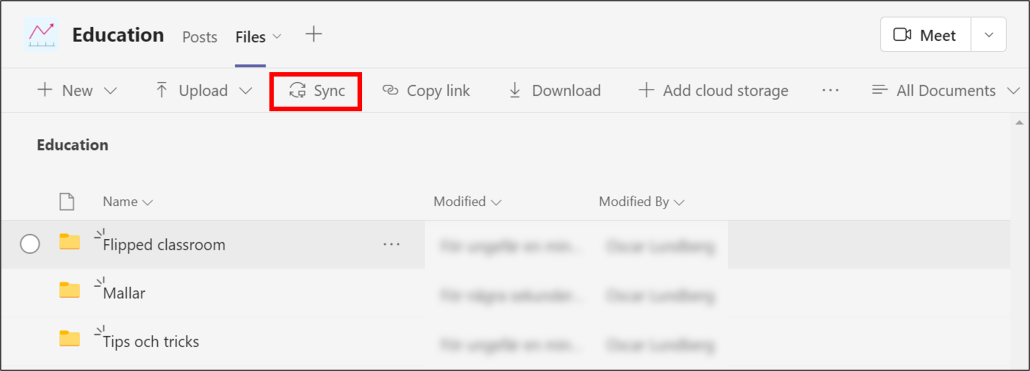
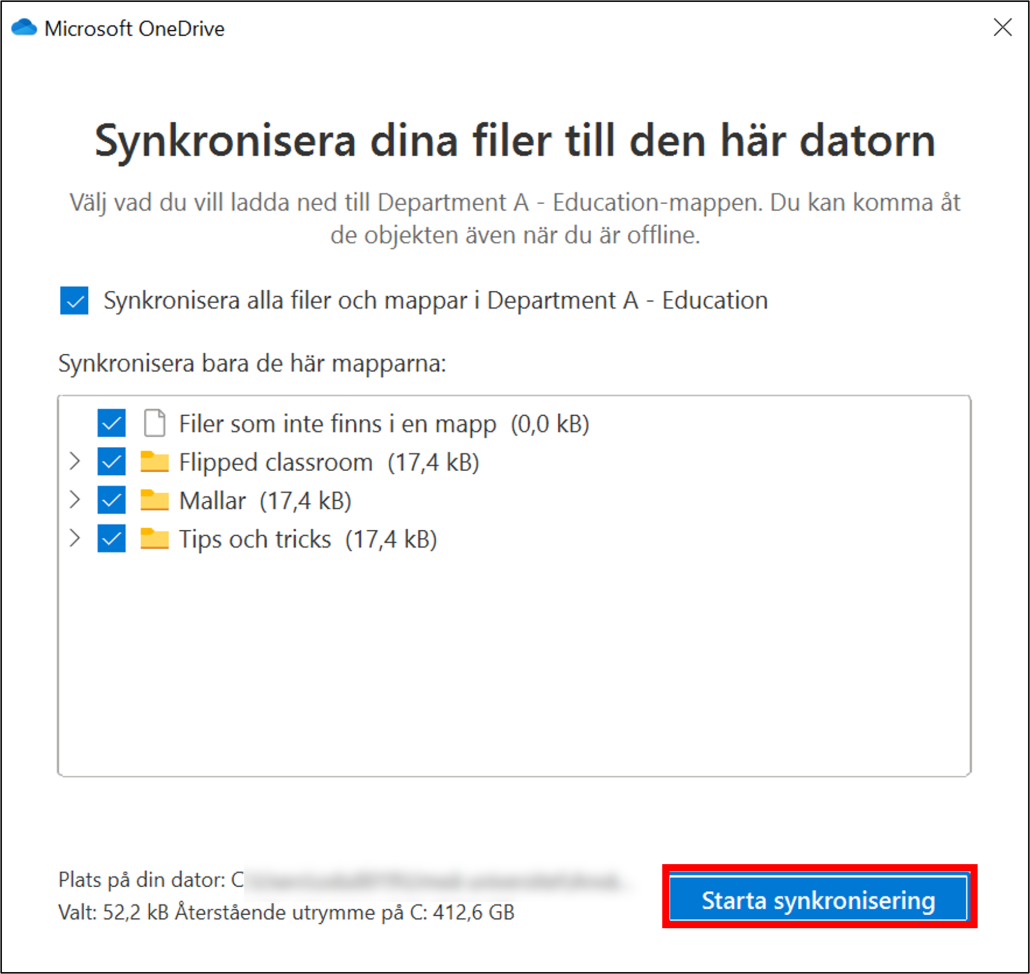
- OneDrive app starts. Make sure the correct files are selected (as you can see, these are the same folders as the image in step 4). When your are done, click Start Sync.
- Synchronization from a specific Team Channel is now complete. A new tab (with a “House”) is created in your Explorer/Finder. See selected locations in the image. You can now work with these files from your explorer. Note that these are the same files that are in the Team Channel. It’s just another way of working from the computer.

Sync your files from a shared SharePoint library
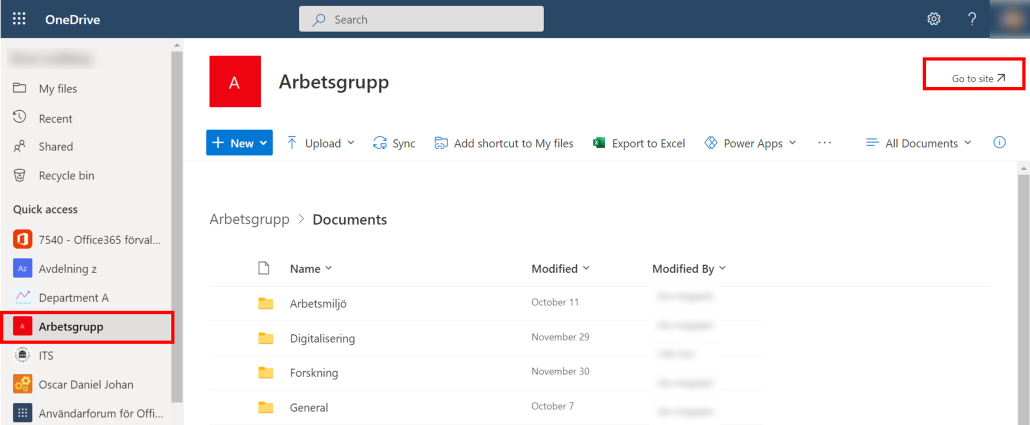
- Go to the shared library. The easiest way to do this is by using your OneDrive via: O365.
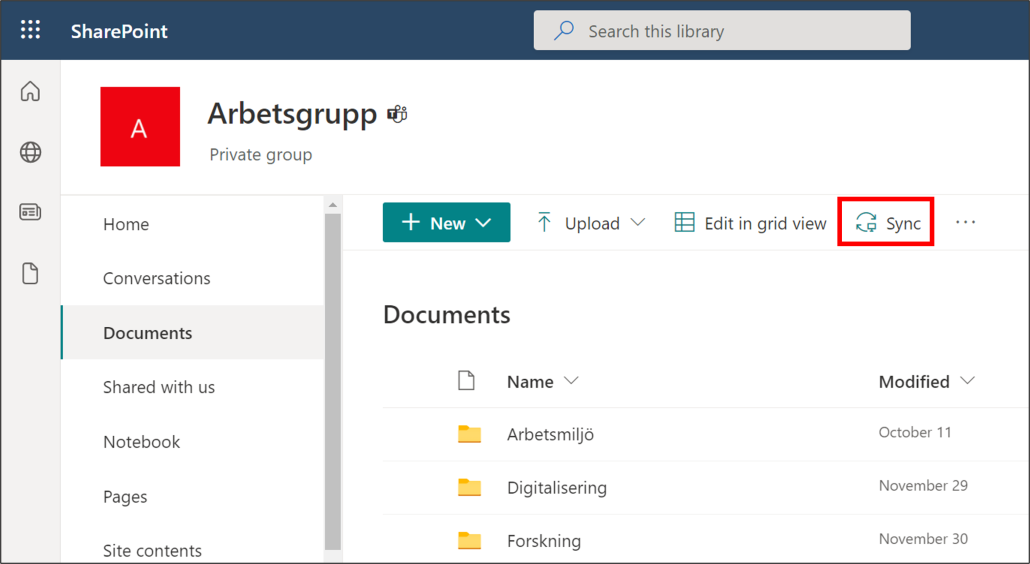
- Choose the shared library from the list that you want to sync (for example, as shown in the pircture – Team Arbetsgrupp).
- Select Go to Site.
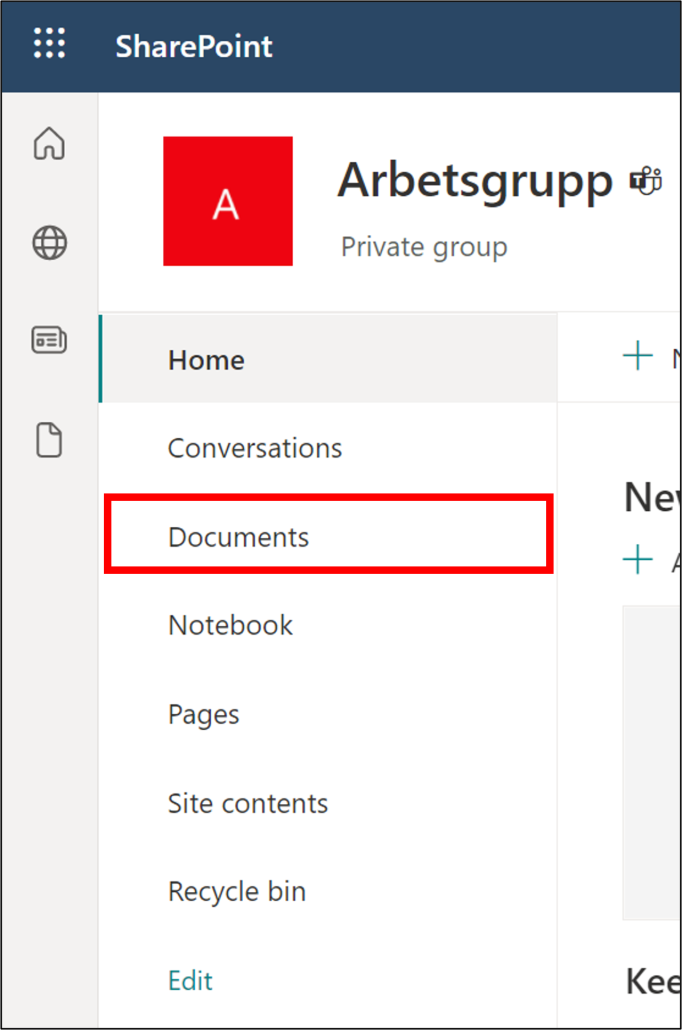
- In the menue on the left, click Documents.
- Click on Sync
- The OneDrive app starts. Make sure all folders and files are selected. When you’re done, click Start Sync.

- Synchronization from a shared document library is now complete. A new tab (with a “House”) is created in your Explorer/Finder. See selected locations in the image. You can now work with these files from your Computer. Note that these are the same files that are in SharePoint. It’s just another way of working from the explorer.

Find, create, and delete team sites in SharePoint
/in Employee, English, Okategoriserade, SharepointThis manual describes how to find, create and delete team sites in SharePoint. Note, if you have a Team in Microsoft Teams, you and your team members already have a team site in SharePoint. Team Site=Team
Find SharePoint teams sites
- Open your browser and go to the address www.m365.umu.se
- Find your way to the panel on the left with all applications. Click at the bottom More applications.
- Choose SharePoint
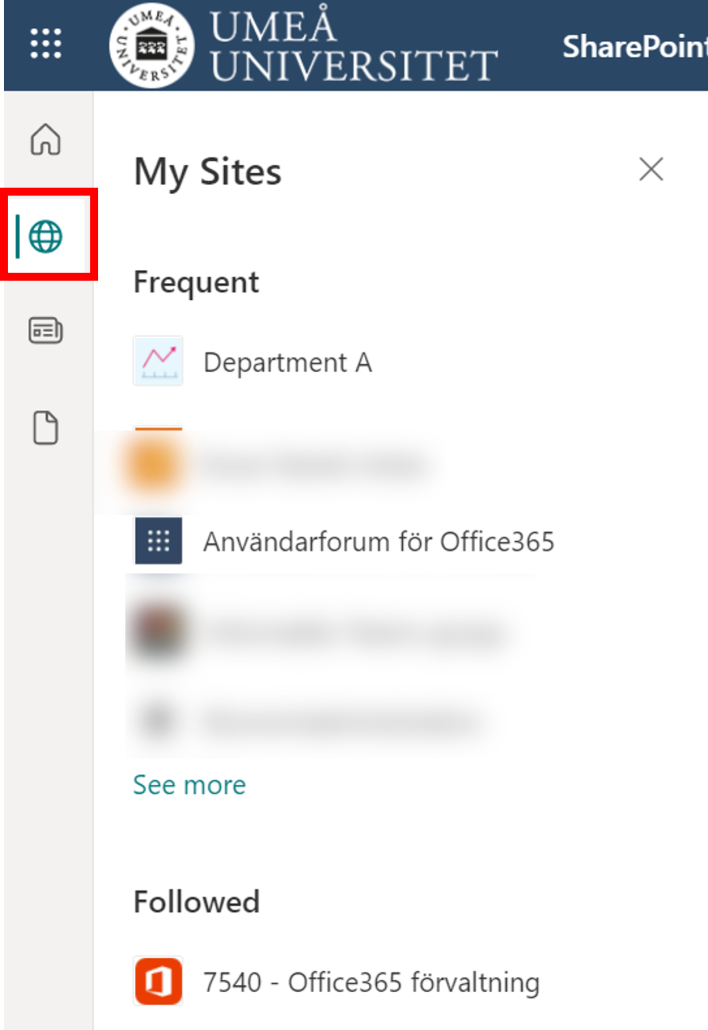
- In the menu on the left, click the globe (My Sites). In the list, you’ll see your Team sites.
Create Team site in SharePoint
- In the left upper-corner click on the house icon, and than click + Create Site.

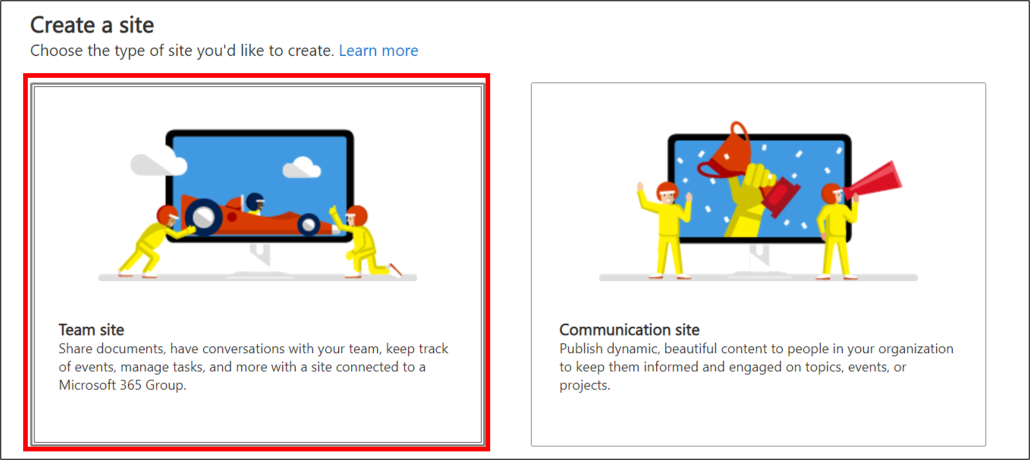
- There are two different types of websites you can create. If the purpose is to create a collaboration area for, for example, a workgroup or project, select Team Site.
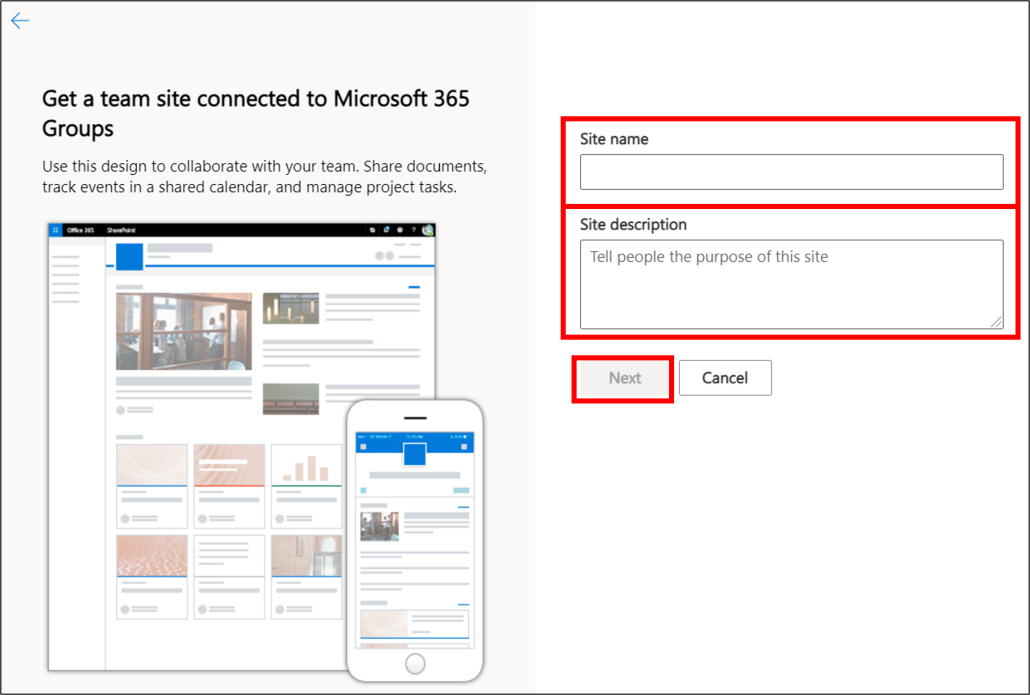
- Next, enter the name and description for the team site. Here you also choose whether the site should be private or public and at the bottom which language should be the primary.
- Please note that in a private group, you invite the people who will be involved in working on the site. In a public group, everyone at Umeå University can visit the document website. This means that all affiliates, employees and students can connect to public websites without invitation.
- Invite members and add any additional owners to your team site. You also have the option to do this later.
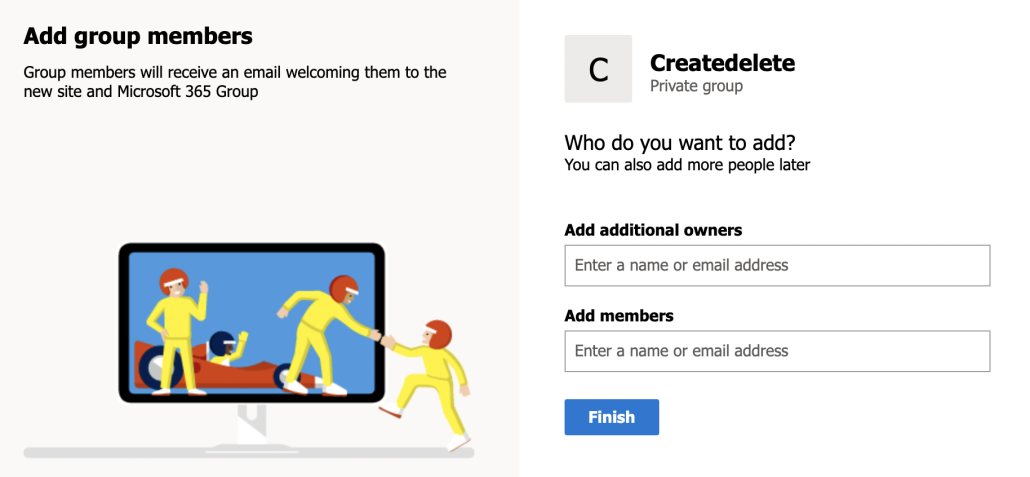
- Your Team site is created.
Delete team site
- Go to the site you want to delete. Click the gear wheel in the right corner and select Site information.
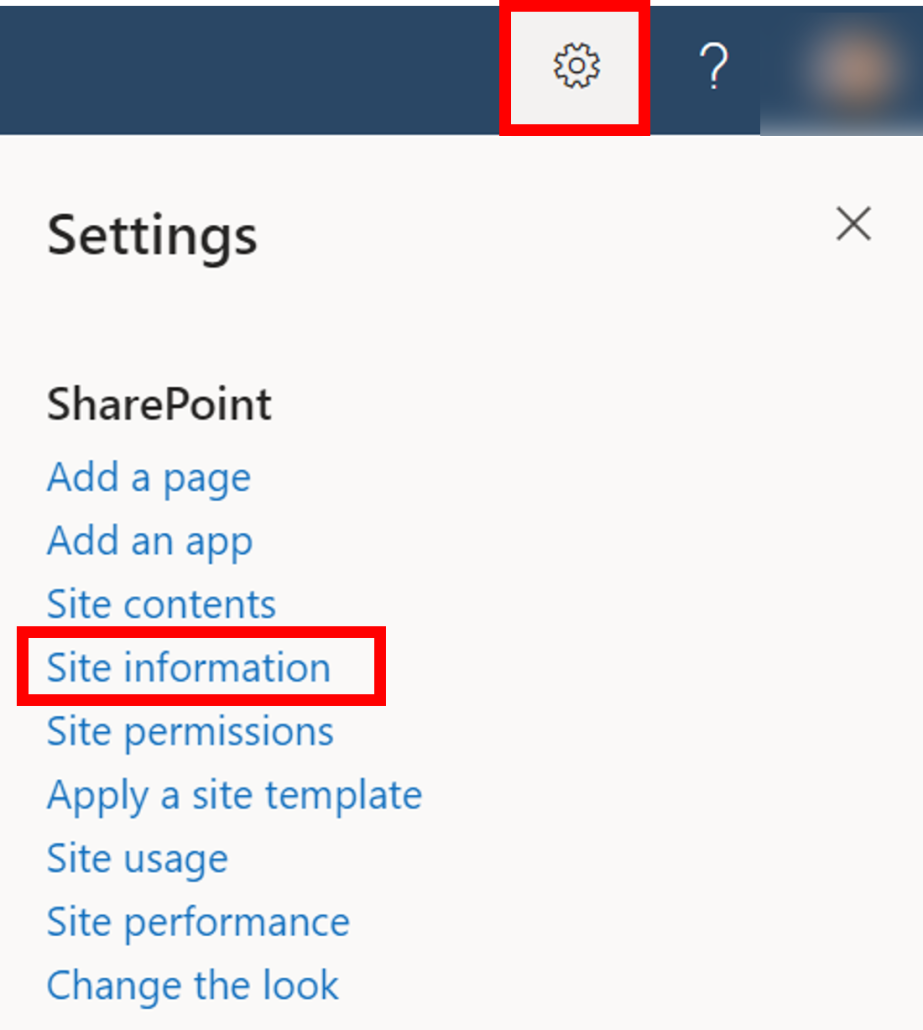
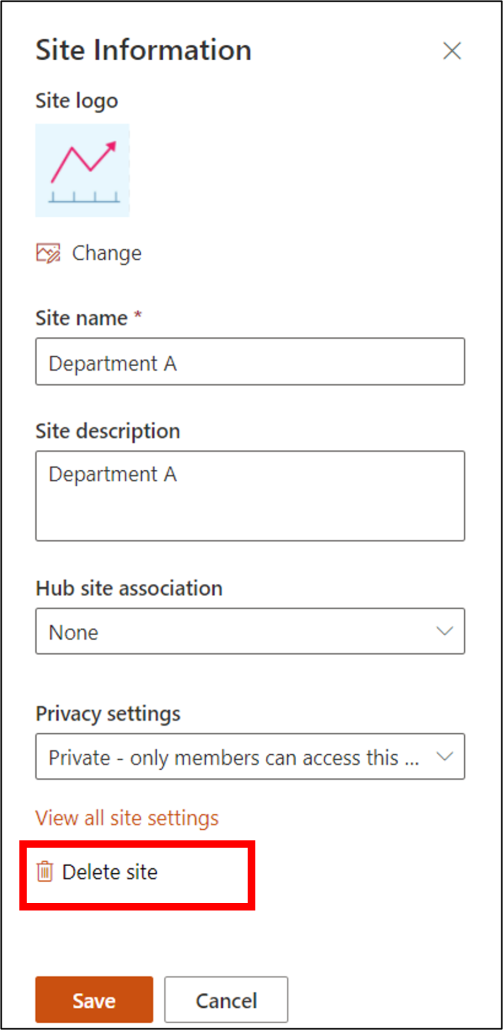
- A dialog box on the right appears. Select Delete Site.
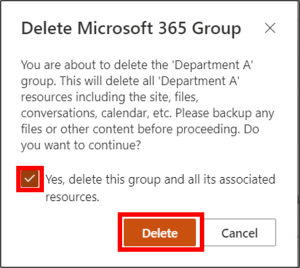
- A security box appears warning that you are about to delete a SharePoint page. Check the box under “Yes, delete this group and all associated resources” and than click Delete.
- The SharePoint team site has now been deleted.
Move or copy files in SharePoint
/in Employee, English, Microsoft 365, Sharepoint, StudentIn this manual, we decribe how to move and copy files within and between SharePoint websites.
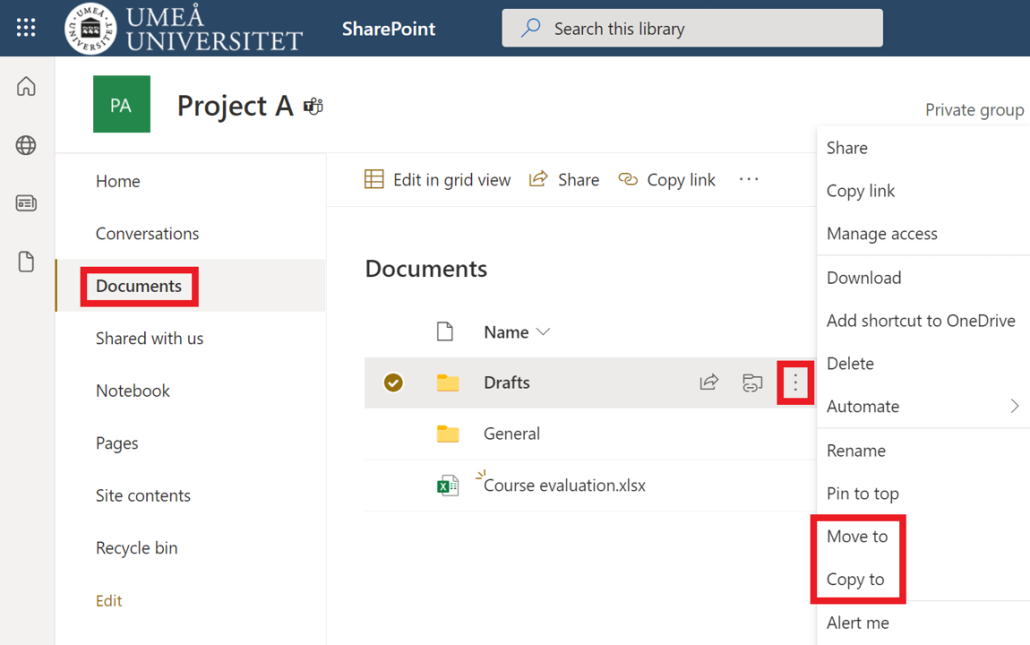
- Open the SharePoint website and select Documents in the left menu.
- Hover the pointer on the file/folder you want to move or copy to see a hidden menu.
- Select the three dots.
- Select Move to if you want to move the file to another place (the file will be deleted from existing place).
- Select Copy to if you want to move and copy the file to another place. (the file will remain on the existing place).
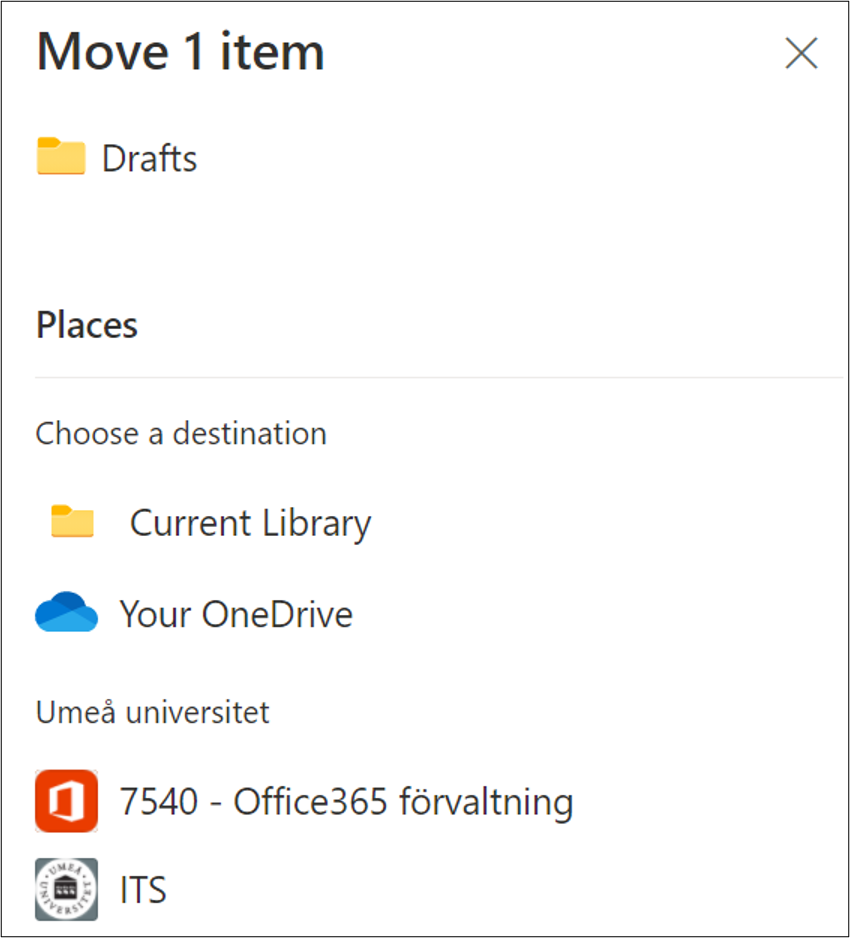
- A menu will open to the left of the screen, select where you want to move or copy the file/folder to and then click Move here.
Upload files and folders in SharePoint
/in Employee, English, Microsoft 365, Sharepoint, StudentIn this manual, we decribe how to upload files and folders in SharePoint document library. If you want to create a new document library see: Create a document library in SharePoint
- Open the SharePoint document library you want to upload files to.
- Select Upload.
- Select if you want to upload a file, folder, or template.
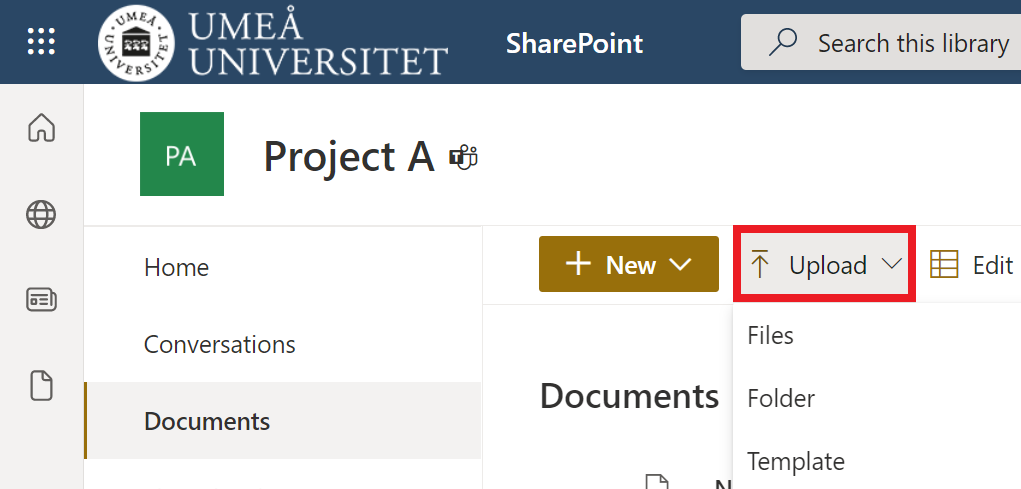
- Your File Explorer (Windows) or Finder (Apple) will open.
- Select a file or folder to upload.
Drag files to SharePoint
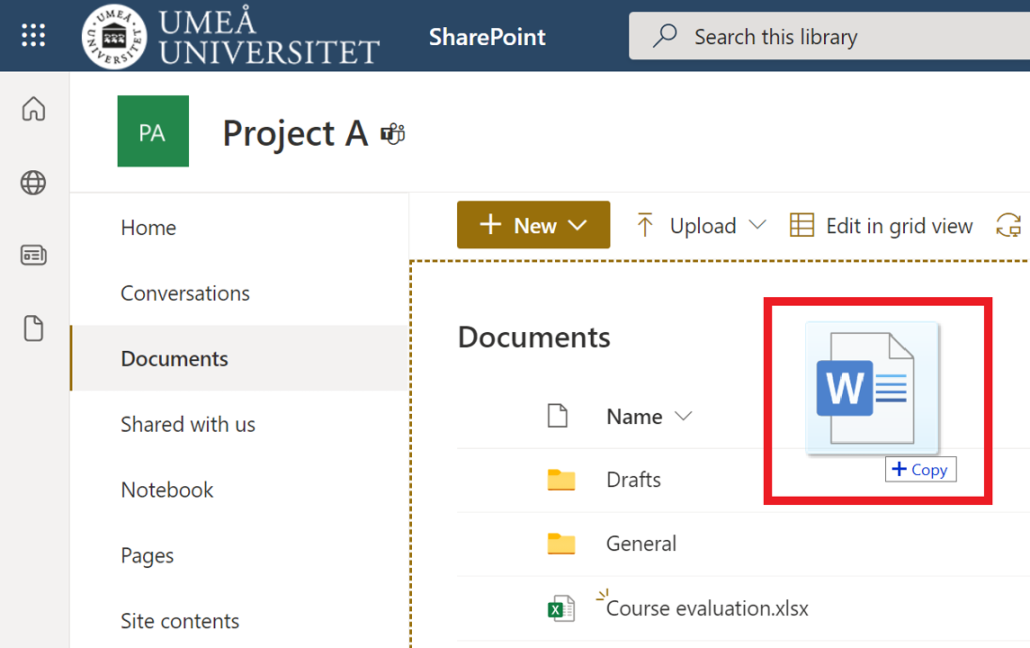
- Open a SharePoint document library you want to drag files to.
- Open your File Explorer (Windows) or Finder (Apple).
- Choose a file from your computer.
- Drag it from your File Explorer/Finder and drop it in SharePoint document library.
Change settings for shared files in Microsoft 365
/in Microsoft 365, SharepointTo share files/folders, change settings for sharing or stop sharing files/folders in Microsoft 365 you can use m365.umu.se. There you can choose if you want to share files/folders from SharePoint (i.e., Teams) or OneDrive. This manual shows you how to do it in SharePoint, but the same settings work for OneDrive as well.
- Open m365.umu.se and sign in using your Umu-id.
- Click on the icon for SharePoint in the left menu.
- Select the SharePoint team where the files/folders you want to change settings for are located.
- Select Documents in the left menu to view all existing folders and documents on the. SharePoint team. A channel in Teams is viewed as a folder in SharePoint.
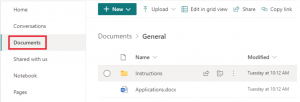
- Go to the folder or file you want to change settings for.
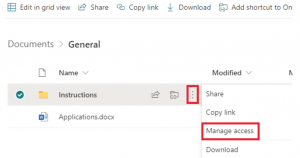
- Place the pointer on the file/folder to view a hidden menu.
- Click on the three dots and then Manage access.
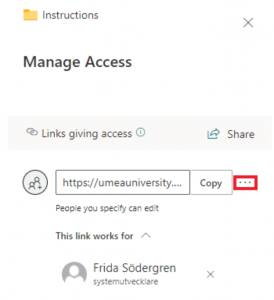
- Click on the three dots to change your settings.
- You can choose if the ones who have access should be able to only read or be able to edit. Click on the area in the picture below. (Note that this setting affects all the people you have shared the file/folder with)
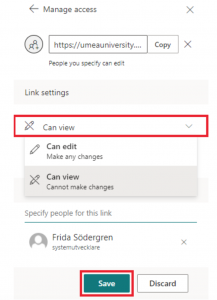
- Select Save when you’re done.
- You will now receive a control question. If you’re certain that you want to change the settings, select Change it, otherwise select Cancel. Done!
Add permission to external guests in SharePoint
/in English, Microsoft 365, SharepointIn this manual we describe how to invite external users from other organizations to a SharePoint site.
If you already have a team connected to your Sharepoint site, you can invite a member to a team or channel.
If you don’t have a team connected to your SharePoint site, you can add a team to your SharePoint site.
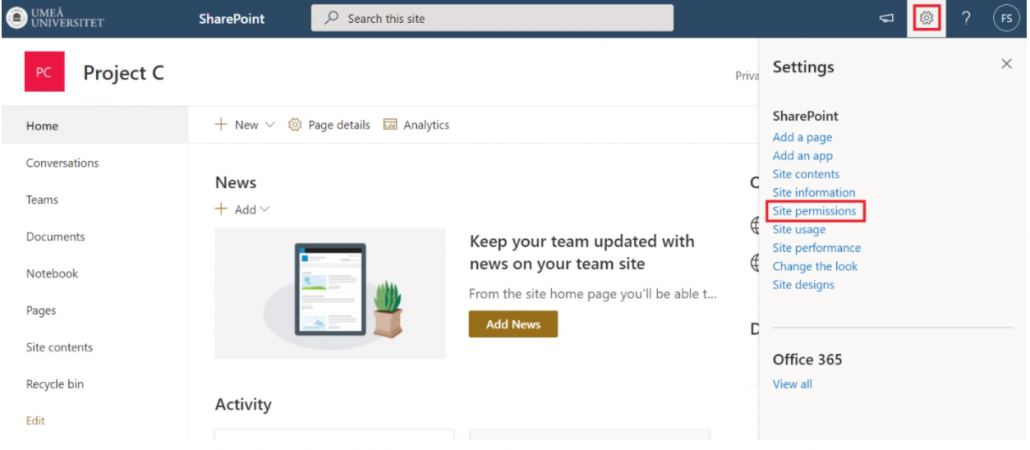
- Go to the homepage of the SharePoint site and select the settings icon in the upper right corner. Then select Site permission.
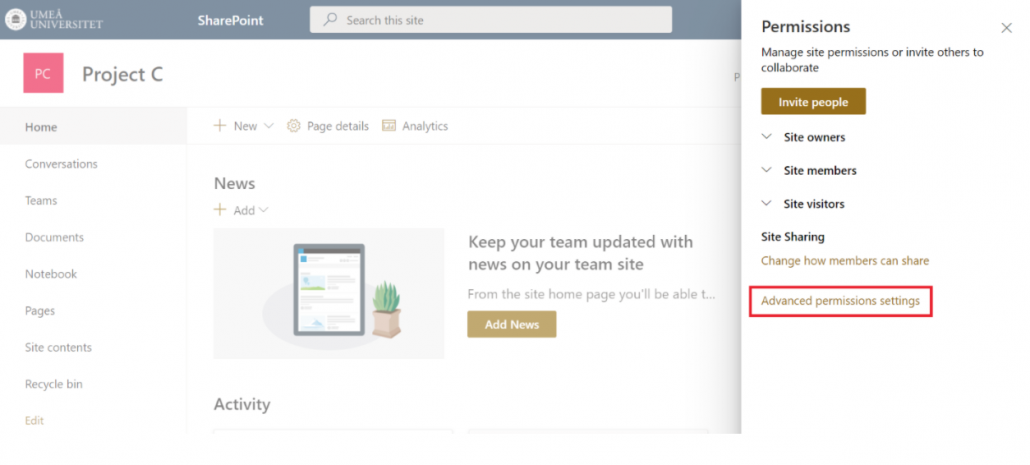
- Select Advanced permissions settings.
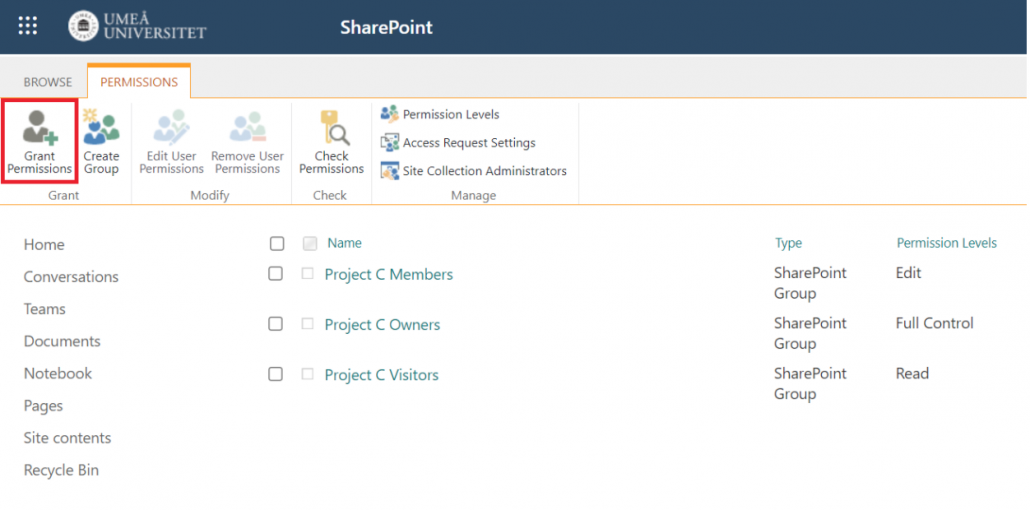
- You have now accessed the advanced permission interface. Here you can add external users from other organizations by selecting Grant permissions. Keep in mind that the external user will be able to access the entire SharePoint site.
- Enter the external users email address. You can also enter multiple email addresses.
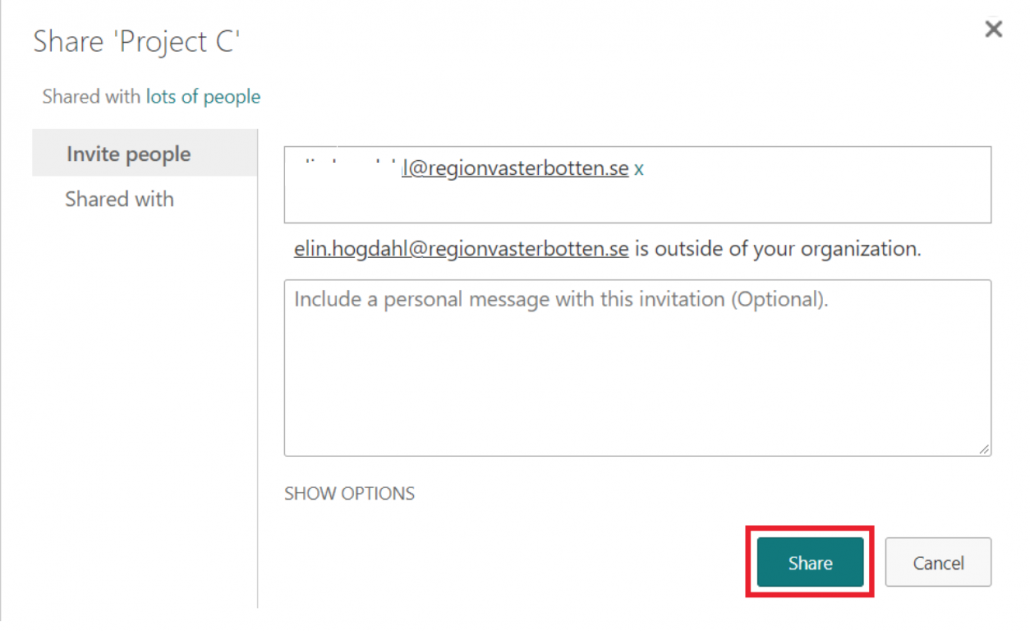
- Select Share. The people you have invited will now receive an email with the link to the SharePoint site.

