Before publicly posting your thesis, all parts (articles and manuscripts), and the comprehensive summary of the compilation thesis must be registered in DiVA. The registration includes filling in details of the thesis and of your defence or presentation of the thesis. You will also upload a full text version of the comprehensive summary and, for doctoral theses, the posting sheet (“spikblad” in Swedish).
1. Log in to DiVA
Log in to DiVA with your Umu-id.
2. Check all parts of your thesis
Check if your articles and papers have been registered in DiVA and that all details are correct. All parts of your project, both published articles and manuscripts, must be registered in DiVA and linked to the comprehensive summary (“kappa” in Swedish).
Search in DiVA
Published papers, including articles accepted for publication in a journal, are registered as journal articles. Unpublished works are registered as “Manuscript (preprint)”.
Published papers
Published papers can be manually registered, or imported from other databases. You can find instructions on the library website:
Publishing in DiVA
If you need to edit or add any details about your papers:
- Click “Edit/Delete record” and find your papers.
- Click on your publication, make your changes, and save the record.
Please contact the library if you cannot access the record to make changes.
Manuscripts
When registering a manuscript, fill in the following sections:
- all authors
- title
- national subject category.
You can leave other fields and sections blank. Please check that the title and author are consistent with the details of the appended manuscript in the thesis.
Feel free to upload the full text file of the manuscript for archiving. It will not be made publicly available.
Once all papers have been registered in DiVA, and all details are correct, please proceed to the next section.
3. Register your comprehensive summary (kappa)
When all the papers included in your thesis have been registered in DiVA, it is time to register the comprehensive summary (the introductory summary chapter) and link all papers to that. When registering your comprehensive summary, you must also include details on the defence or presentation of your thesis.
Go to ”Add publication/Upload files”.
Select publication type
- Select publication type. This manual describes the procedure for the following publication types:
- Doctoral thesis, comprehensive summary
- Licentiate thesis, comprehensive summary
- Click “Continue”.
List papers
Search for your papers and link them to the comprehensive summary. You can either find all your papers at once by searching for your name or Umu-id or one paper at a time by searching for the title. The papers you have added are listed under “List papers”.
- Enter your name, Umu-id or the title of the paper in the field “Search paper in DiVA” and click “Search”.
- Select your papers and click “Add”.
- Please verify that all parts of your project are listed.
- Sort the papers in the order they appear in the doctoral thesis. You can edit the order by using the arrows to the left of each paper. If you want to delete a paper, please click the red cross to the right of it.
- Click “Continue”.
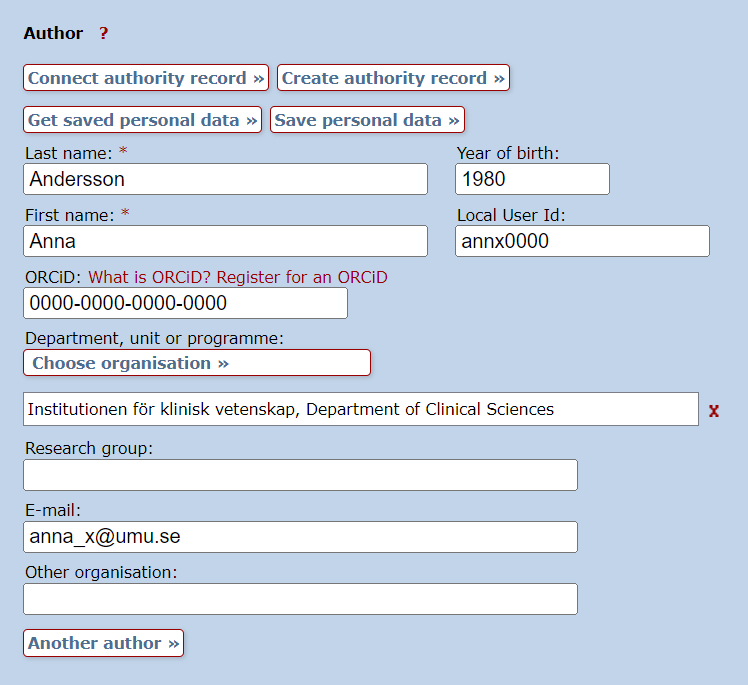
Author
Click “Connect authority record” and search for your Umu-id. Select your authority record by clicking your name.
If your name is not listed, you can create an authority record by closing the pop-up window, clicking the “Create authority record” button and filling in the mandatory details.
Fill in any missing mandatory details. The following details are mandatory:
- name
- year of birth
- umu-id
- department or section
- email address.
Title
Type the title of the thesis and any potential subtitle. Then, select the language of the title from the listed options.
If your thesis has a title in another language, this is to be entered in the field “Alternative title”, and the language must be selected from the listed options.
Other information
Enter the publishing year of the thesis and the number of pages. The number of pages should be the same as the final numbered page in the thesis. Appendices and papers are not included in the number of pages.
Series
If your thesis is part of a series, select the series from the listed options and fill in the number of your thesis in the series. If the series is not listed, please enter the details in the “Other series” section.
Publisher
Specify the place of publication and publisher. For theses published by Umeå University, type ”Umeå” as the place of publication and select ”Umeå University” in the field for publisher.
Identifiers
Enter the ISBN for the electronic version, and select “Electronic” from the listed options.
For the printed version, click “Another ISBN” and select “Print” from the listed options.
National subject category
Click “Choose national subject category” and select the category or categories that best describe the content of your thesis. Choose a category that is as specific as possible (navigate the list by clicking the plus symbol).
If you want to delete a selected category, please click the red cross to the right of the category.
Research subject
Select one or more research subjects (this is not mandatory but it increases the chances to search and find, and hence spread, the publication).
Keywords
Select the language from the listed options and type your keywords in the text field. Separate your keywords with commas.
Click “Keywords in another language” if you want to enter keywords in multiple languages.
Abstract
Enter the abstract of the thesis and select the language from the listed options.
Read through and make sure the text looks correct. Pay particular attention to spaces and paragraphing, and make sure no extra characters have been accidentally included. Paragraphing is correct if there is a space between paragraphs.
Click “Another abstract” if you want to add an abstract in another language.
Supervisor
Fill in details of your supervisors and assistant supervisors. Click “Another supervisor” to add additional supervisors or an assistant supervisor. The following details are mandatory:
- name
- academic title
- umu-id (for supervisors at Umeå University)
- department or section (if the supervisor works at another higher education institution, use the field “Other organisation”).
External examiner (opponent)
Fill in the details of the external examiner. For doctoral theses, the details must correspond with the details of the external reviewer specified on the posting sheet (spikblad). The following details are mandatory:
- name
- academic title
- department or section.
Public defence or presentation of your thesis
Fill in details of the public defence of your thesis. The details must correspond with the details of the public defence of the thesis specified on the posting sheet (spikblad). If you have written a licentiate thesis, fill in the details about your thesis presentation instead.
- Click the calendar icon to the right of the date field and enter the date and time of the event.
- Select language from the listed options.
- Specify the room for the event.
- Specify the city for the event.
- For doctoral theses, select the university for the public defence of your thesis from the listed options.
Degree
Select the degree from the listed options. For doctoral theses, the selected degree must correspond with the details specified on the posting sheet (spikbladet).
When you have entered all the details of the comprehensive summary (kappa), please click “Continue”.
4. Upload files
You must now upload the comprehensive summary (kappa). If you have written a doctoral thesis, you must also upload the posting sheet (spikbladet) in this step. If you wish – and there are no copyright issues to consider – you can also upload the front page of the thesis as a preview image in DiVA.
Upload the comprehensive summary
- Select “Make freely available later”.
- Click the calendar icon to the right of the date field, enter the date of the public posting of your doctoral thesis, and set the time for 07:00.
- Set the file type as “fulltext” and the format as “pdf” in each section. The file does not need to be named.
- Click “Bläddra” (browse) and upload your comprehensive summary.
Select “Make freely available now (open access)” if you have written a licentiate thesis.
Please note! You must only upload the comprehensive summary. No papers or manuscripts must be included in the uploaded file.
Upload the posting sheet
- Click “Upload more files”.
- Select “Make freely available later”.
- Click the calendar icon to the right of the date field, enter the date of the public posting of your doctoral thesis, and set the time for 07:00.
- Set the file type as “spikblad” and the format as “pdf” in each section.
- Click “Bläddra” (browse) and upload your posting sheet.
Upload a preview image
If you do not want to upload a preview image, proceed to the next step, “Accepting the publishing conditions”.
- Click “Upload more files”.
- Select “Make freely available later”.
- Click the calendar icon to the right of the date field, enter the date of the public posting of your doctoral thesis, and set the time for 07:00.
- Set the file type as “preview image” and the format as “jpeg” or “png” in each section.
- Click “Bläddra” (browse) and upload the front page of your thesis.
Select “Make freely available now (open access)” if you have written a licentiate thesis.
Accepting publishing in DiVA
When you have uploaded all files, you must approve that they will be published in DiVA.
- Click and read the publishing conditions.
- Check the box to accept the publishing conditions.
- Click “Continue” to review your details and submit the registration.
5. Review/publish
Before submitting your thesis, you must check your registration.
- Check that all details are correct. If you wish to edit anything, please click “Edit information” at the top left or click “Back” to return and make changes.
- Check that the comprehensive summary (kappan) and the potential posting sheet (spikblad) have been uploaded and that each file is openable (click the link for each file).
- Click “Submit”.
Please note that once you have submitted your thesis, you can no longer edit the record yourself. Please contact the library if you need to edit or add any details.
After registration
When you have submitted your thesis, you will receive confirmation of the registration in DiVA by email. This confirmation email also contains the permanent link to your thesis in DiVA (this is the link to use in a potential press release). Please note that the link will not become active until the thesis is published in DiVA.
The library will review your registration before publishing your thesis in DiVA. We will contact you if we have any questions or if any details need to be added.
Your doctoral thesis will be published and visible in DiVA on the day of the public posting of your thesis (spikning). If you have written a licentiate thesis, it will be published and visible directly after review.
Frequently asked questions and contact
Contact the library if you have any questions about your registration. Select “Publishing, theses and research data” as the subject area.
Contact the library
Frequently asked questions about theses and posting