To simplify registration in DiVA, you can import information about publications from other databases (such as Pubmed and Scopus). You can also import publication lists from ORCID into DiVA, and vice versa.
Search by title before you import
Imports sometimes result in duplicate records in DiVA. Therefore, you must first check if your publications are already registered in DiVA by searching in DiVA for the publication title or your name.
Search in DiVA
Edit existing records in DiVA
You can edit an already registered record if you want to change something (for example, add your Umu-id). If the record is locked for editing, you should contact a DiVA administrator at your department in the first instance. Secondly, you can contact the library.
Importing many publications at the same time
If you are going to import many publications, you can check for duplicates during and after the import. See step 5 and the end of this manual for how to do this.
Import to DiVA
1. Search and export your publications
Start by searching and exporting your publications from a suitable database. When exporting information from databases, you will need to select the format for the export. The following reference file formats can be used in DiVA:
- BibLaTex
- BibTex
- EndNote XML
- ISI
- MODS
- RIS
Here you can read about how it works in some of the most common databases:
DiVA of another institution
- Do a search and select the records you want to import. You can also change the number of hits or click “all on page”. It is also possible to select “250 forward”.
- Select Export, and from the list, select MODS.
Endnote
Endnote Desktop
- Open Endnote and select all the references you want to import.
- Select File > Export…
- Select XML as a file format and Output style = Show all fields. The file is saved on your computer.
Endnote Online
If you are using Endnote Online, it is not possible to export to the XML file format. Instead, do the following:
- Select the references you want to export from your library and save them to the Quick List or a folder.
- Go to Format > Export references.
- Under References, select Quick List or the folder of references you want to export.
- Select either BibTex Export or RefMan (RIS) Export as the export style.
IEEE Xplore
- Do a search and select the records you want to import.
- Click on Export and then Citations above the list of results.
- Select Format: RIS and Include: Citation & Abstract.
- Click on Export.
ORCID
From your ORCID profile you can export publications to DiVA. You can choose to either export all records or select the records you want to export. Here is how you import to DiVA:
- Click on the Actions button under the “Works” heading.
- Click on Export (all) works when you have selected records and then on Export selected works to BibTex.
- Save the file (file extension .bib).
Pubmed
a) Import single publications
You can import individual publications from Pubmed into DiVA using the Pubmed ID (PMID). Search for your publications in Pubmed so that you have the PMID at hand for the import in step 3.
b) Import multiple publications
You can import multiple publications from Pubmed into DiVA using a reference management software:
- Select Send to in the hit list and then Citation manager.
- Open the downloaded file in the reference management software of your choice.
- Export the references in the BibTex or RIS format.
- Import the file into DiVA, as usual. See step 3.
Scopus
- Do a search and select the records you want to import.
- Click on Export above the list of results.
- Select RIS Format. Check Citation information, Bibliographical information and Abstract & keywords (all boxes below should be ticked).
- Click on Export.
Web of Science
- Do a search and select the desired records. You can choose to either mark all hits, mark the entries on the page displayed or select entries within a specific number range (via the “Add to marked list” button).
- Click on the Export button above the hit list. Select the format Plain text file.
- You will see the box “Export Records to Plain Text File”. Here you select Full record.
- Click on Export.
2. Save the file
If you don’t get a question about where to save the exported file, it is usually found in the Downloaded files folder on your computer.
3. Import
Before performing the import to DiVA, you need to log in to the DiVA Administration interface.
- Log in to DiVA with your Umu-id.
- Select the Import references entry.
- Click on the Import from external databases button (top right).
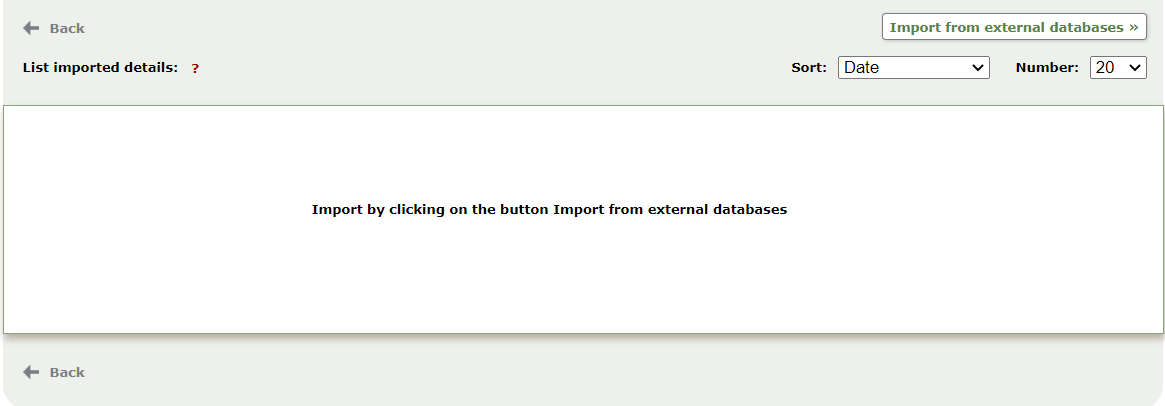
a) Import single Pubmed records with PMID
To import single publications from Pubmed, enter the publication’s PMID in the PubMedID field and click Import. You can only import one publication at a time using this feature.
b) Importing with an exported file
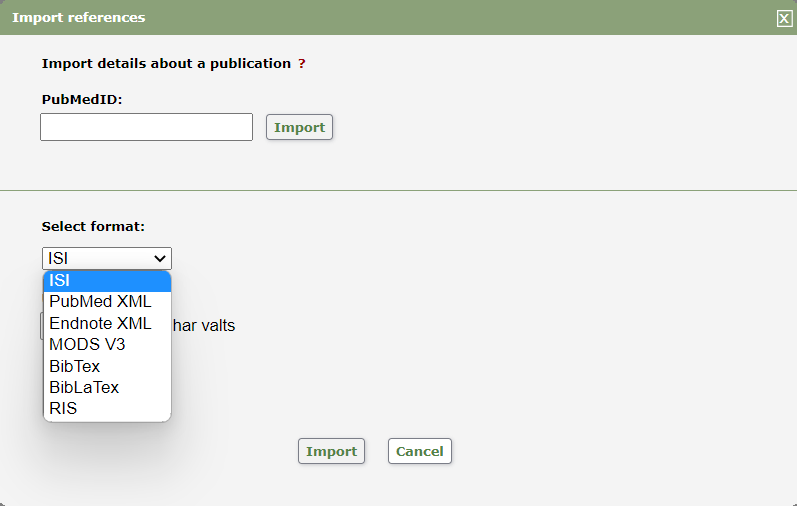
Select the format from the list before importing it if you have exported a file. For the databases described in step 1, select the following format:
- DiVA of another institution: MODS V3
- Endnote: Endnote XML
- Endnote Online: RIS or BibTex
- IEEE: RIS
- ORCID: BibTex
- Other reference management software: RIS or BibTex
- Scopus: RIS
- Web of Science: ISI
Then select the saved export file to upload it to DiVA.
4. Confirm the import
When the file is uploaded in DiVA, you will get a message that the file upload was successful. Click on Import.
5. Review the imported records
The imported records are listed. If you have imported a publication already registered in DiVA with a DOI or any other identifier, it will appear as a duplicate in the list. You can delete the duplicate from the import list (the already registered record remains in DiVA).
Click on a record to go to the registration form. Check the data for each publication carefully. Please use the manual on how to register a scholarly publication:
Register scholarly publication in DiVA
In particular, check the following:
- Publication type, and Subcategory if applicable.
- Author information – connect to authority record or enter Umu-id for Umu-affiliated authors. Enter the affiliation stated in the publication.
- Content type (Refereed, Other academic, Other).
- National subject category – browse from the subject tree or use the “Suggestion for national subject category” function.
- Abstract. Please check that paragraphing, etc., looks as in the publication.
On the next page, you can choose to upload a full text of the publication. Then click on Continue.
6. Submit
- On the last page of the registration form, you will get an overview of the information for that publication. You can go back and edit the form if you want to add or change anything.
- Once you have checked the information, click on Submit.
- If you have imported several publications, you will now return to the import list and can review the next entry.
A registered publication will be visible in DiVA within a few minutes. However, it can take up to 24 hours for new publications to appear on the staff and department pages.
Check for duplicate records
Did you check if the publications were registered in DiVA before importing them? If not, you need to ensure that your import did not cause duplicate records. The automatic duplicate check described in step 5 only catches records with the same identifiers, which are sometimes missing. Contact the library if you are unsure.
Here’s how to check for duplicate records:
- Go to “Edit / Delete record” in DiVA administration.
- Search for either a name or Umu-id.
- Sort the publications by title.
- If you have accidentally registered a duplicate, you can delete it yourself by clicking on the checkbox on the right.
Publication lists in ORCID
ORCID is a unique identifier that distinguishes you from other researchers. Your ORCID profile allows you to collect your publications as well as other information, such as awards, funding, and other research outputs (e.g. research data or code). If you do not already have an ORCID account, you can register for one by going to Create your ORCID iD.
Importing records from DiVA to ORCID
You can easily import records from DiVA into ORCID to keep your ORCID profile up to date. Keep in mind that you may need to adjust the type and other details of each record afterwards.
How to import from DiVA to ORCID:
- Go to Create feeds in DiVA.
- Enter your Umu-id in the search field “Person, id”.
- At the bottom of the page is “Select format and sort”. Here you select the format BibTex.
- Choose how many records you want to export under “Number of hits”. It is pre-set to 50 records, but you can choose up to 9,999 records.
- Click on Create link and copy the link generated under “Search link”.
- Paste the link in a new tab in the browser address bar and press Enter. A BibTex file will be created.
- Save the file created.
- Log in to your ORCID account.
- Click on Add under the heading “Works”. Select Add BibTex.
- Click on Choose BibTex file to import and select the saved BibTex file. Note that if the file you saved has the extension “.txt”, you must select “All files” in the drop-down list for it to be displayed.
- Select Select all to import all records, or select the records you want to import. Click on Import works to your record.
- You can edit the information about the imported records and complete it if anything is missing. In addition, you can choose whether the records should be available to everyone, only to selected people, or only to you.
Contact the library
Contact the library if you have any questions about DiVA. Select Publishing, theses and research data as the subject area.
Contact the library
