Send from alias in your e-mail in Microsoft 365

  1. Create new mail
    Image showing how to create a new mail
  2. Choose Options.
    Image showing how to choose "options"
  3. Choose Show from, this field is then added.
    Image showing "Show from"
  4. Click on From in the mail.If it is your first time doing this, you need to state you student e-mail adress. Choose From, and then choose another e-mail adress and state your studentmail in the format: umuid@student.umu.se.Next time the mail adress is going to be avaliable as an option when clicking on From.
    image showing where the email is from
    Image showing the email adress

Create a vote in your e-mail in Outlook with Microsoft Forms

In this guide we describe, with the help of Forms, how to create a vote directly in you email from Outlook. 

  1. Start by creating a new e-mail. You do this by clicking on New Email.
    Image of "new email" icon
  2. Write you email as usual.
  3. Go to Insert, and then choose Poll.
    Image showing how to start the poll in Outlook
  4. To the right in your window, a field is now inserted where you write your question, and the options the receiver can choose between. Choose Multiple answers if they are allowed to choose multiple options.
  5. When you are happy with your question, you click on Next.
    Image showing how you insert your question
  6. In this step you see how the vote will look in the email. If you are ready, you choose Add to email. If you want to make changes, choose Edit.
    Image showing how it looks when previewing your question
  7. When you have added the vote to the email, the question, and a link to the form is going to show. Now you can send your vote in the email.
  8. When the receiver has gotten your email, they can answer the question directly in the email. The result can easily be found with your other forms in Microsoft Forms (forms.office.com) or directly in Outlook if you put yourself as a copy. Then choose View result.
    Image showing how to view the result of your question

Create a board view in Microsoft Lists

Lists is a tool in Microsoft 365 where you can create, share, and track lists. In this manual we describe how you create a board view.

Observe that the appearance can differ whether you are using Mac or Windows.

Create board view

  1. Go to your chosen list in Microsoft Lists you want to create a board view in.
  2. Choose All objects in the menu bar and then Create new view.
    Image showing how to choose "All items" i Microsoft lists
  3. Now you see the window where you can edit and create you new view:
    1. Add the name you want for your board view.
    2. Then choose Board
    3. Choose how you want to organize your board by clicking the arrow to the right in this field. If you don’t already have any completed columns, it will automatically create a column that is named choice1. If you have completed columns, choose the column you want to organize you board view by (Example: by location, status, or date). Your board view will then be sorted and structured by how you have organized your board.
    4. If you want your list to be public for others, you tic this box. If you want it to be private, you keep this box empty. If you choose to make it private, you are the only one who can see and edit the board.
    5. When you are ready, click Create.
    Image showing how to create and edit your board view
  4. Now your Board view is showing, and here you can Add new buckets and manage your current buckets. You can place your objects to the bucket they belong to and add more object by clicking the Plus-sign in the right corner of each bucket.
    Image showing your board view

Download and install Microsoft 365

Information on how to download and install the Microsoft 365 desktop suite.

Outlook 365 email forwarding

Guides users on how to forward emails from Outlook 365.

Email for students FAQ

An FAQ about the student email.

Delete groups in Microsoft 365

Delete groups in the tool 

You can delete groups in the respective tools where the group is located, such as Planner, SharePoint, and Teams. Note that if you delete a group, you delete everything that belongs to the group. For example, if you delete a group in Planner, you delete the SharePoint site and possibly the Team that belongs to the group. 

Delete group in Planner

  1. Go to Hubben – Planner (office.com), it lists all planners you have authorization to. 
  2. To delete, go under the three dots and select Plan settings.
  3. At the bottom of the Plan Settings dialog window, you can find the button to delete the group.

Delete group in SharePoint

  1. It’s not easy to find all of your SharePoint sites. That’s why you need to search for them, and you can do so with the following link that includes a search query: SharePoint
  2. Select the site you want to administrate. If you are an owner, then under the gear you will receive website information. At the bottom of that window is the Delete option.

Skärmdump site information Sharepoint

Delete group in Teams 

  1. Go to your Teams client and select Team on the menu to the left.
  2. In the listing of teams, you can click on the three dots of the desired team. If you are the owner, you have the option of clicking on Delete team at the bottom of the menu.

Delete one specific team in Teams

Administrate groups through Outlook (Office 365)

If you’ve moved your email to Office 365, you can easily administer the groups you belong to or own through Outlook.

  1. Open Outlook and go to your email box.
  2. Select Groups on the menu to the left.
  3. It lists the groups that you have permission to and that are configured to be visible in Outlook.
  4. Select Group, then open Group Settings in the top menu. In the menu presented, you can administer your group.

Skärmdump som visar Gruppinställningar i Outlook

Find your shared files in OneDrive

In this manual, we’ll show you how to find the files you share with others through OneDrive, as well as which files are shared to you to your OneDrive.

  1. Go to www.O365.umu.se and log in with your UmU ID.
  2. In the search box, type OneDrive and klick on OneDrive.
    Office portalen sök onedrive välj onedrive
  3. In the left menu, click Shared.
  4. At first you are in the Shared with you – Here you will see files/folders that others share with you.
    Find your shared files in onedrive - shared tab choose shared with you
  5. Select Shared by you – Here you will see files/folders that you share with others.
    Find your shared files in onedrive - shared tab choose shared by you

Syncronize files from OneDrive, Teams or SharePoint to your computer

You can sync folders, files, and entire libraries from Microsoft 365 to your computer. This means that you can work with the same files you have in Teams, SharePoint or OneDrive. In this manual, we will show you how to sync files from your OneDrive, Team, Team Channel, and a shared SharePoint library. Our recommendation is that you do not sync too many files.

Sync my own files from OneDrive to your computer

  1. Select Start on your computer and find the OneDrive app.
  2. Log in to OneDrive with your account, umuid@ad.umu.se.
  3. When you are logged in, the blue cloud appears down to the right.
  4. You can set which folders you want to sync by clicking on the OneDrive cloud and then the gear at the top right
  5. Then go to Account and Choose folders, mark the folders you want to synchronize and then click OK. 
  6. Syncing from your OneDrive is now complete. A new tab is created in your Explorer/Finder – “OneDrive – Umeå University”. You can now work with these files from your computer. Note that these are the same files that are on OneDrive for the web. It’s just another way of working from the computer.
    sync files from onedrive to your computer - Explorer view

Sync files from an entire Team to your computer

  1. Select the Team you want to sync files from to your computer.
  2. Select a Team channel and click on Files
    sync files from Team to computer - select files
  3. Click on Document
    sync files from Team to computer - select documents
  4. Now you will be able to access all files associated with the Team. Then click Sync.
    sync files from Team to computer - select sync
  5. The OneDrive app starts. Make sure all folders and files are selected. When you’re done, click Start Sync.
    sync files from Team to computer - OneDrive app opens - select files to sync - click start sync
  6. Synchronization from an entire team is now complete. A new tab (with a “House”) is created in your Explorer/Finder. See selected locations in the image. You can now work with these files from your explorer. Note that these are the same files that are in the team. It’s just another way of working from the computer.
    sync files from entire Team to computer - explorer view

Sync files from a specific channel in a Team

  1. Choose the Team you want to sync files from to your computer.
  2. Click the channel from which you want to sync files to your computer. For example, the Education channel that the picture shows.
    sync files from specific Team channel to computer - choose team channel
  3. Click on Files
    sync files from specific Team channel to computer - select files tab
  4. Click on Sync
    sync files from specific Team channel to computer - click sync
  5. OneDrive app starts. Make sure the correct files are selected (as you can see, these are the same folders as the image in step 4). When your are done, click Start Sync.
    sync files from specific Team channel to computer - OneDrive app opens - control if right folders are included in the sync - click sync
  6. Synchronization from a specific Team Channel is now complete. A new tab (with a “House”) is created in your Explorer/Finder. See selected locations in the image. You can now work with these files from your explorer. Note that these are the same files that are in the Team Channel. It’s just another way of working from the computer.
    sync files from specific team channel to computer - Explorer view

Sync your files from a shared SharePoint library

  1. Go to the shared library. The easiest way to do this is by using your OneDrive via: O365.
  2. Choose the shared library from the list that you want to sync (for example, as shown in the pircture – Team Arbetsgrupp).
  3. Select Go to Site.
    sync files from shareed sharepoint liberar - select team - click go to site
  4. In the menue on the left, click Documents.
    sync files from shareed sharepoint liberar - select documents
  5. Click on Sync
    sync files from shareed sharepoint liberar - click on sync
  6. The OneDrive app starts. Make sure all folders and files are selected. When you’re done, click Start Sync.
    sync files from Team to computer - OneDrive app opens - select files to sync - click start sync
  7. Synchronization from a shared document library is now complete. A new tab (with a “House”) is created in your Explorer/Finder. See selected locations in the image. You can now work with these files from your Computer. Note that these are the same files that are in SharePoint. It’s just another way of working from the explorer.
    sync files from entire Team to computer - explorer view


Log in with multifactor authentication, Freja eID+ and Microsoft Authenticator

This manual shows how to log in with multifactor authentication at Umeå Universitys system.

Multi-factor authentication (MFA) is a service that gives you increased protection when logging in to some of the university’s systems. With multi-factor authentication, you log in in two steps, which gives you extra layer of protection on top of your Umu-id and password. Umeå university uses both Microsoft Authenticator and Freja eID+ as multifactor. This means that the log-in site can look different depending on which system you’re logging in to.

Freja eID+

Freja eID plus is a free, government approved digital ID card that helps you login in some systems at Umeå university. You can prove your identity in an application on your phone instead of showing a physical legitimation card.

Follow this manual to log in with Freja eID+.

Microsoft Authenticator

The app Microsoft Authenticator means that you log in on some services with your Umu-id and password, and then you approve the log in on your app Microsoft Authenticator on your phone or hardware token.

Follow this manual to log in with Microsoft Authenticator.

The difference of how to log in with either Freja eID+ or Microsoft Authenticator

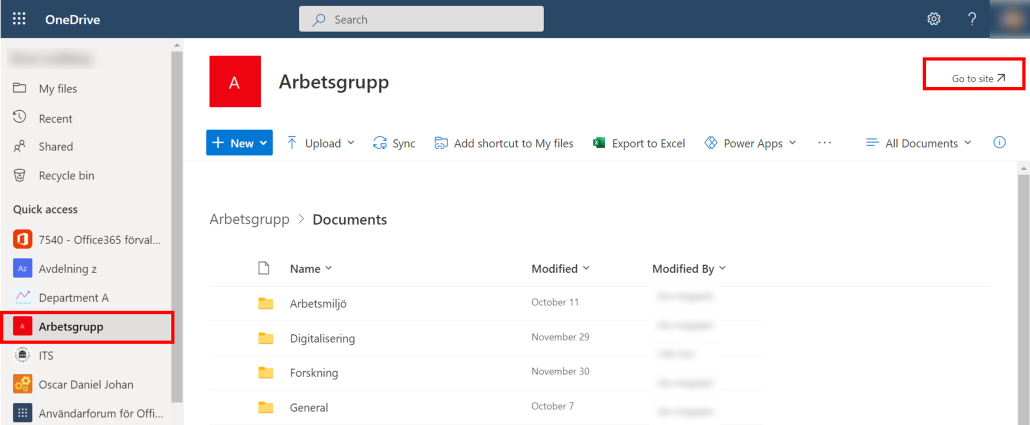
When you log in on some of the University’s system, for example Skyddade dokument, you need to choose wether you want to log in with Freja eID+ or Microsoft Authenticator. It will look like this after you’ve typed your Umu-id and password:

Choose the alternative Sign in with Microsoft authenticator if you log in with a hardware token. You also choose this alternative if you use the Microsoft authenticator app on you mobile unit.

The only alternative for log in at Microsoft 365 is Microsoft Authenticator. After you’ve typed your Umu-id and password you will directly be asked to accept the login in your Microsoft Authenticator-app. You don’t have to choose which method you want to log in with.