Work with multiple organizations in Teams

If you work in multiple organizations that use Teams (for example Umeå University and Region Västerbotten) and want to use Teams for each organization, these are instructions that may facilitate your work.

One way to make it easier when you’re a member of multiple organizations is to use different interfaces for different organizations. For example, you can use the Teams app on your computer when you work in the organization Umeå University and the web interface for Teams when you work in the organization Region Västerbotten. This will make it easier to keep the two organizations separated. You need to be signed in to both of your accounts at the samt time for this to work.

Sign in to the organization Umeå University on your computer.

  1. Open Teams on your computer. If you haven’t installed Teams yes, go to o365.umu.se to install it.
  2. Sign in with your Umu-id (umu-id@ad.umu.se) and password.
  3. You can now work in Umeå Universitys organization in your desktop app.

Sign in to another organization in the web interface

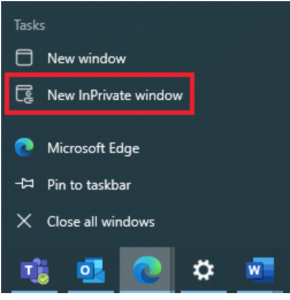
  1. Open a new incognito/InPrivate window in your browser by clicking on your browser and select New InPrivate window or New Incognito window (depending on which browser you use).
  2. Go to www.office.com and sign in with your e-mail and your password.
  3. Select Teams and use it via the bowser when working on your secondary account.

Work as a guest of a team in an external organization

If you’ve been invited as a guest to a team that belongs to an external organization, for example Region Västerbotten, you will not see these teams among your teams that belong to the organization Umeå University. You need to switch between the different organizations to work with teams that belong to an external organization.

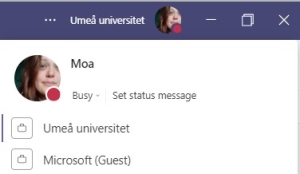
  1. Click on your profile picture in the upper right corner.
  2. You will now see a list of the organizations you’ve been invited to. In the example below you can see what it looks like if you’re a member in both Umeå University and Microsoft.

Move or copy files in SharePoint

In this manual, we decribe how to move and copy files within and between SharePoint websites. 

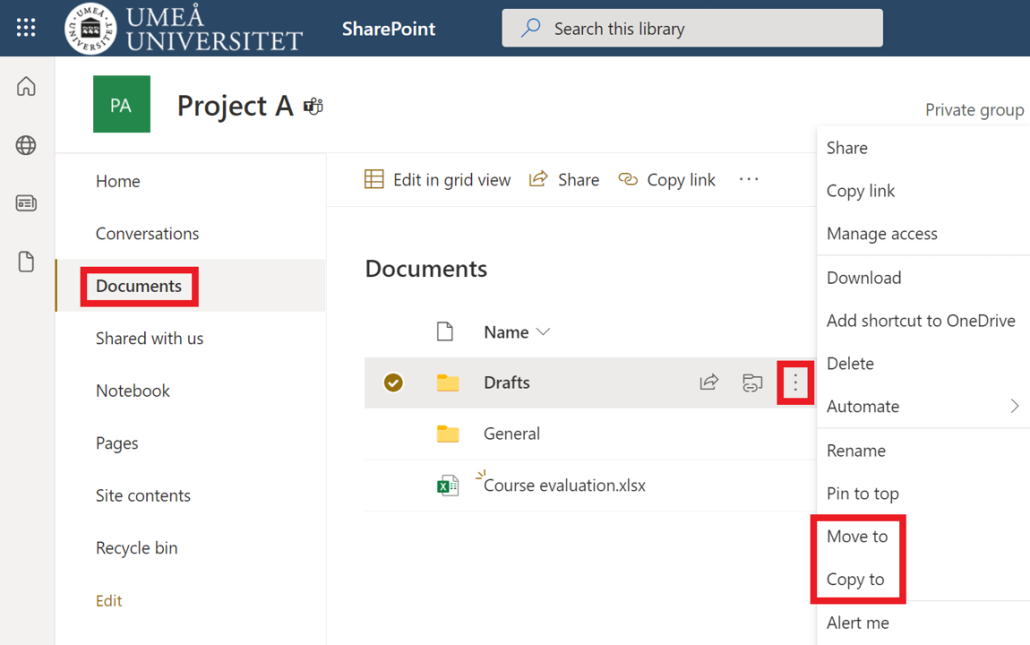
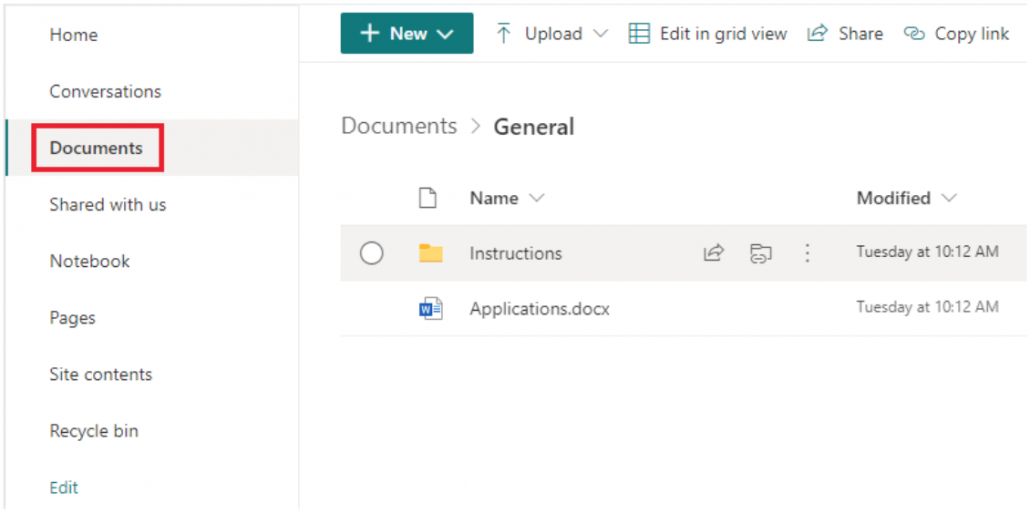
  1. Open the SharePoint website and select Documents in the left menu.
  2. Hover the pointer on the file/folder you want to move or copy to see a hidden menu.
  3. Select the three dots.
  4. Select Move to if you want to move the file to another place (the file will be deleted from existing place).
  5. Select Copy to if you want to move and copy the file to another place. (the file will remain on the existing place).
    Move or copy files in SharePoint
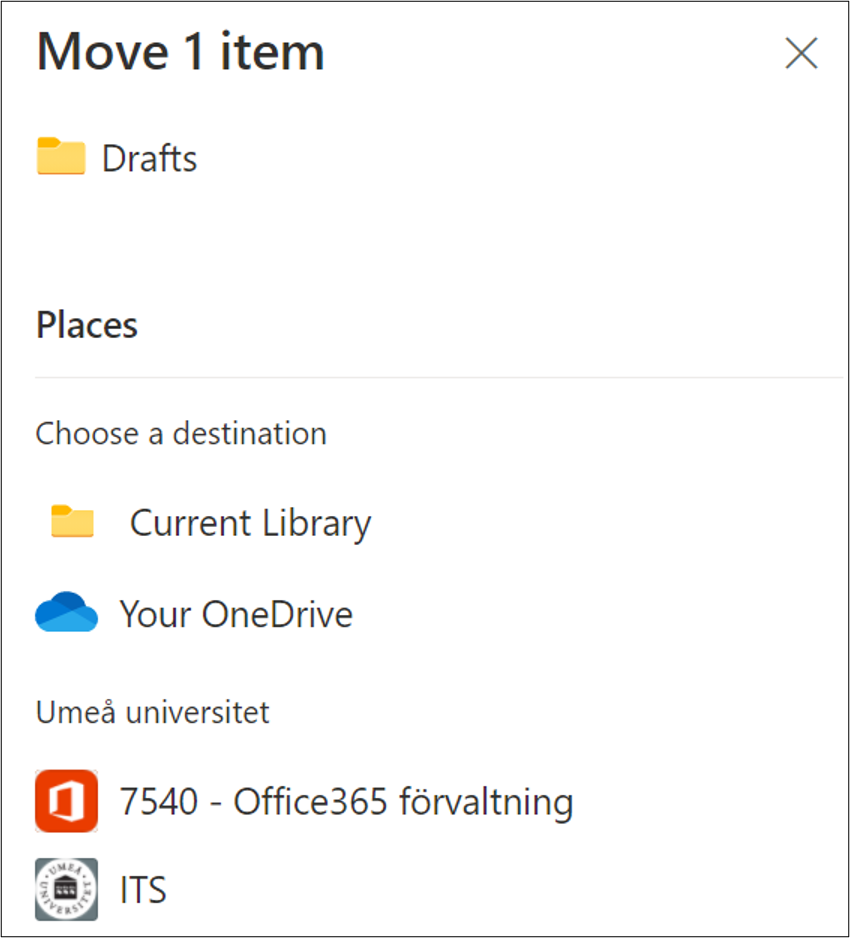
  6. A menu will open to the left of the screen, select where you want to move or copy the file/folder to and then click Move here.
    Move or copy files in SharePoint - select place

Upload files and folders in SharePoint

In this manual, we decribe how to upload files and folders in SharePoint document library. If you want to create a new document library see: Create a document library in SharePoint

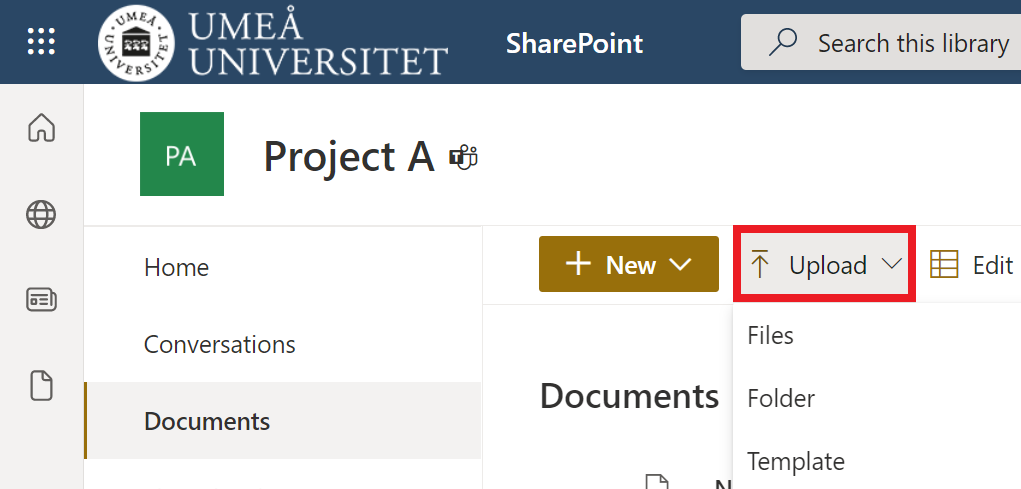
  1. Open the SharePoint document library you want to upload files to.
  2. Select Upload.
  3. Select if you want to upload a file, folder, or template.
    upload files in sharepoint - upload - select files folder template
  4. Your File Explorer (Windows) or Finder (Apple) will open.
  5. Select a file or folder to upload.

Drag files to SharePoint

  1. Open a SharePoint document library you want to drag files to.
  2. Open your File Explorer (Windows) or Finder (Apple).
  3. Choose a file from your computer.
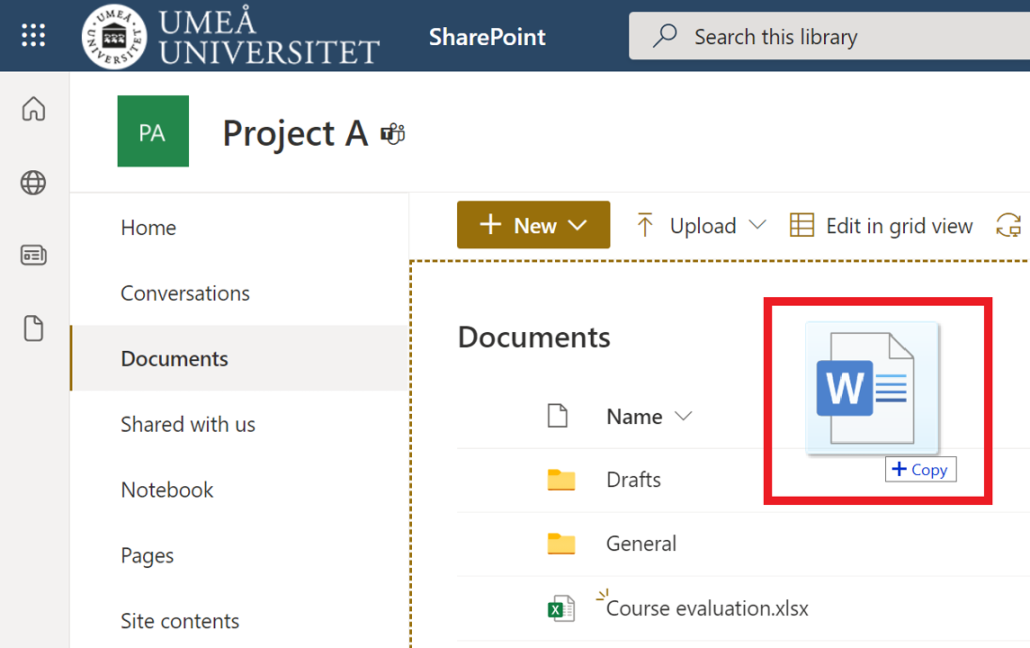
  4. Drag it from your File Explorer/Finder and drop it in SharePoint document library.
    drag and drop files in sharepoint

Calendar view in Microsoft Lists

Use Microsoft Lists to create a simple list of events, and then add the calendar view.

Create a new list

Create a new list as a blank list and create all columns from scratch. You can save it to a SharePoint site that you have access to.

  1. From the List app, select +New list. If you’re on a SharePoint page, Select +New and then List.
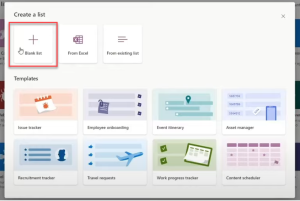
  2. Under Create a list, select Blank List.

Rename a column

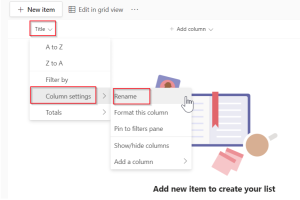
  1. Click on Title.
  2. Select Column settings in the accordion menu.
  3. Click Rename.
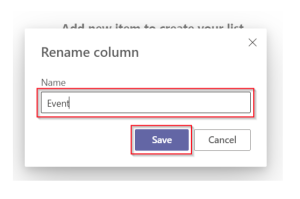
  4. Type in the name you want and select Save.

Add date column and other columns you need

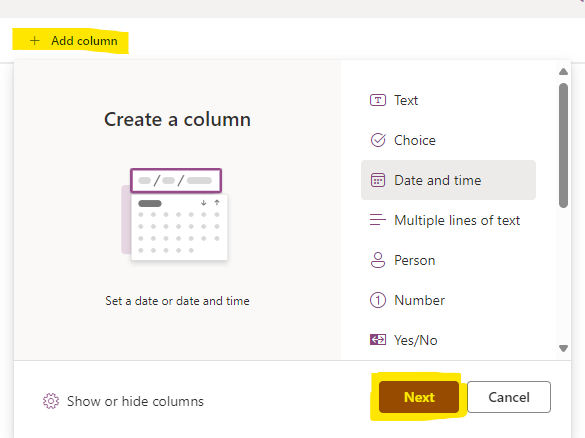
  1. Press +Add column.
  2. Select the type of column you want in the accordion menu. At least you need one column for date and time.
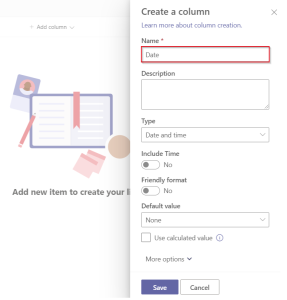
    Image showing how to add new column
  3. In the Create a column panel, enter a title under Name.
  4. Fill in information about the type of column you’ve selected.
  5. Repeat these steps until you have all of the columns that you want.

Create new content

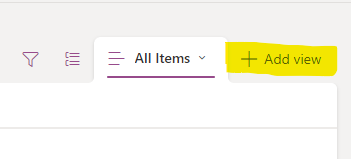
  1. To create the calendar view: Click on Add view.
    Image showing where to add a new view
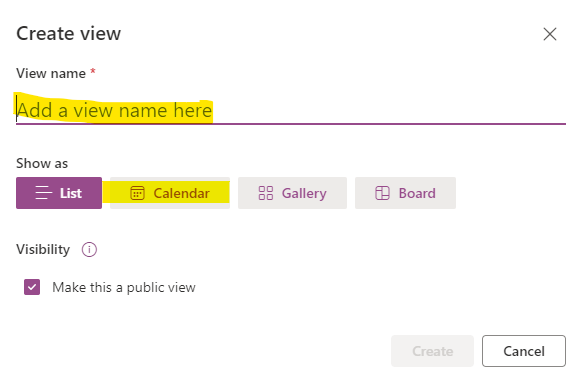
  2. Name the view.
    Image showing where to create a calender view
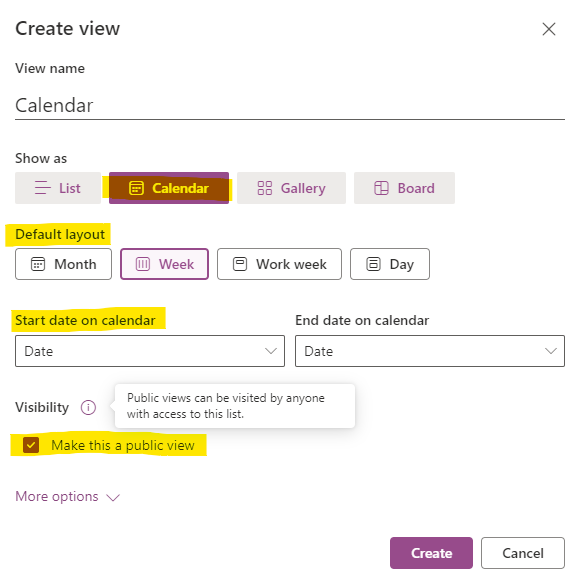
  3. Where is says Show as, select Calendar.
  4. Choose your Default layout.
  5. Start and end dates must be set by the date in your column list, make sure that date are chosen for both.
  6. Click on Makes this a public view to make sure that everyone using the list can see that view.
  7. Click Create.
    Image showing how to create a calendar view

Overview of calendar view

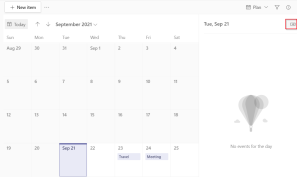
The calendar is to the left and the event pane is to the right, and that’s all the events you’ve selected for the day. The pane will change if you click on different days in the calendar. The pane to the right is foldable, you can hide it if you’d like.

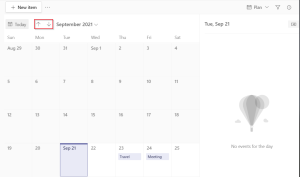
Use the arrows to move forwards and backwards, or the monthly calendar next to the arrows to switch month.

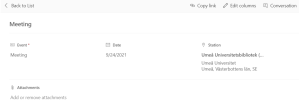
You can open up events and see more detail by clicking on them. You can choose to edit all, edit one och just add a comment if you’d like.

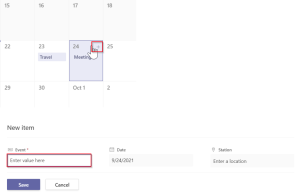
You can also add new items straight from your calendar.

You can switch back to the list view. Just go to the view menu and select All items the accordion menu again.

Make calendar view the default view of the list

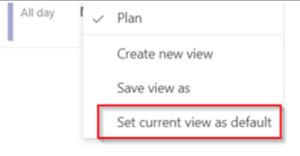
To set the calendar view by default so that it appears each time you open it, select the schedule view, and then Set the current view by default.


How to use Microsoft Lists

This manual describes the different uses for Microsoft Lists and how to create your lists.

Microsoft List is an app in Microsoft 365 that helps you sort your information and organize your work. In Lists you can see favorites, recently worked lists, search all your lists, create new lists, customize colors and icons for the lists titels as well as add comments.

Access Lists through Microsoft 365

You can get started with Microsoft 365, Microsoft Teams or SharePoint. When you’re signed in to office.com, click on the app window. If you can’t find Lists, you can search for Lists in the search-bar. Now you have access to Lists. You can see your existing lists and your favorites, select and uncheck, and create new lists.

Create a list

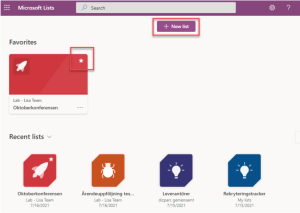
  1. Click +New List in the middle of the screen.
  2. You can choose to start with a template, an Excel file or from scratch. If you start with a template you can choose among a lot of different ones. If you start with an excel file you can easily convert an existing file. And if you start from scratch, choose Blank list.
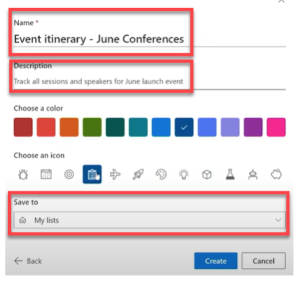
  3. If you clicked Blank list, you can write a title, describe what the list is for and select an appropriate color and icon.
  4. Under Save to, you can choose where you want to save the list. Select My lists to either keep the list private or just share it with a few people. To automatically save the list to a team or SharePoint-site, you can select it here and the list will then be saved in that team or site.
  5. Click Create when you’re done with the settings.

To create a new favorite list:

  1. Hold the mouse over the list.
  2. Click on the star in the right corner.

New item to list

Your list has been created and you want to fill the list with items.

  1. Go to the list you just created.
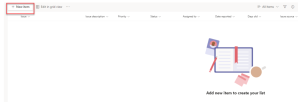
  2. Select a new item in the left corner to create an item for the list.
  3. Fill in the title of the issue (mandatory). You can formulate a problem description, choose to set a priority, assign a person or team, add images and so on. When you’re feeling done, click Save.

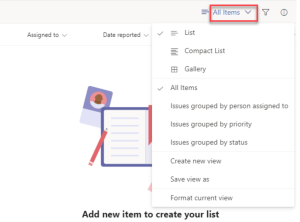
    Inside the list, you can get different views by clicking All items. Here you can filter problems grouped by the person that’s assigned, by priority or by date.

Assign content to attendees

How to create the content before you share it.

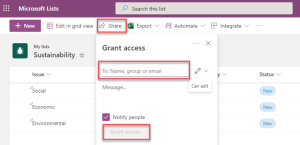
  1. Click Share in the meny for your list.
  2. Fill in the email adress or name of the ones you want to share the list with, and choose if they will be able to edit or just view.
  3. Choose if they should receive a notification about the sharing in the box Notify people.
  4. Click grant access to share the list.

Add rules

You can create rules for automating processes based on your list data to simplify your work. You can divide yourself of others when something changes in the list by creating a rule. You can choose to send an alert as e-mail to you or others when a column changes, or when a new item is created or deleted.

  1. Open your list.
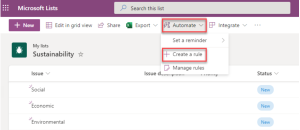
  2. Click Automate on the right of your list.
  3. Click Create a rule.
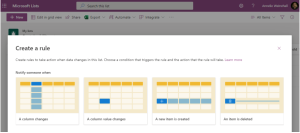
  4. A new box opens with different options for rules. You can choose to have a notification sent to you or others when changing a column, when a column value changes, when a new object is created or when an abject is deleted. Click on the type of rule you want to create.
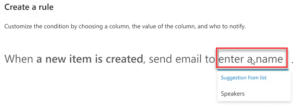
  5. Select a condition that triggers the rule and what action to perform in the rule. You will get different options depending on the type of rule you’ve chosen. For example you can customize the condition bu selecting a column, the value in the column, and who to notify. Click Create when done.

Templates

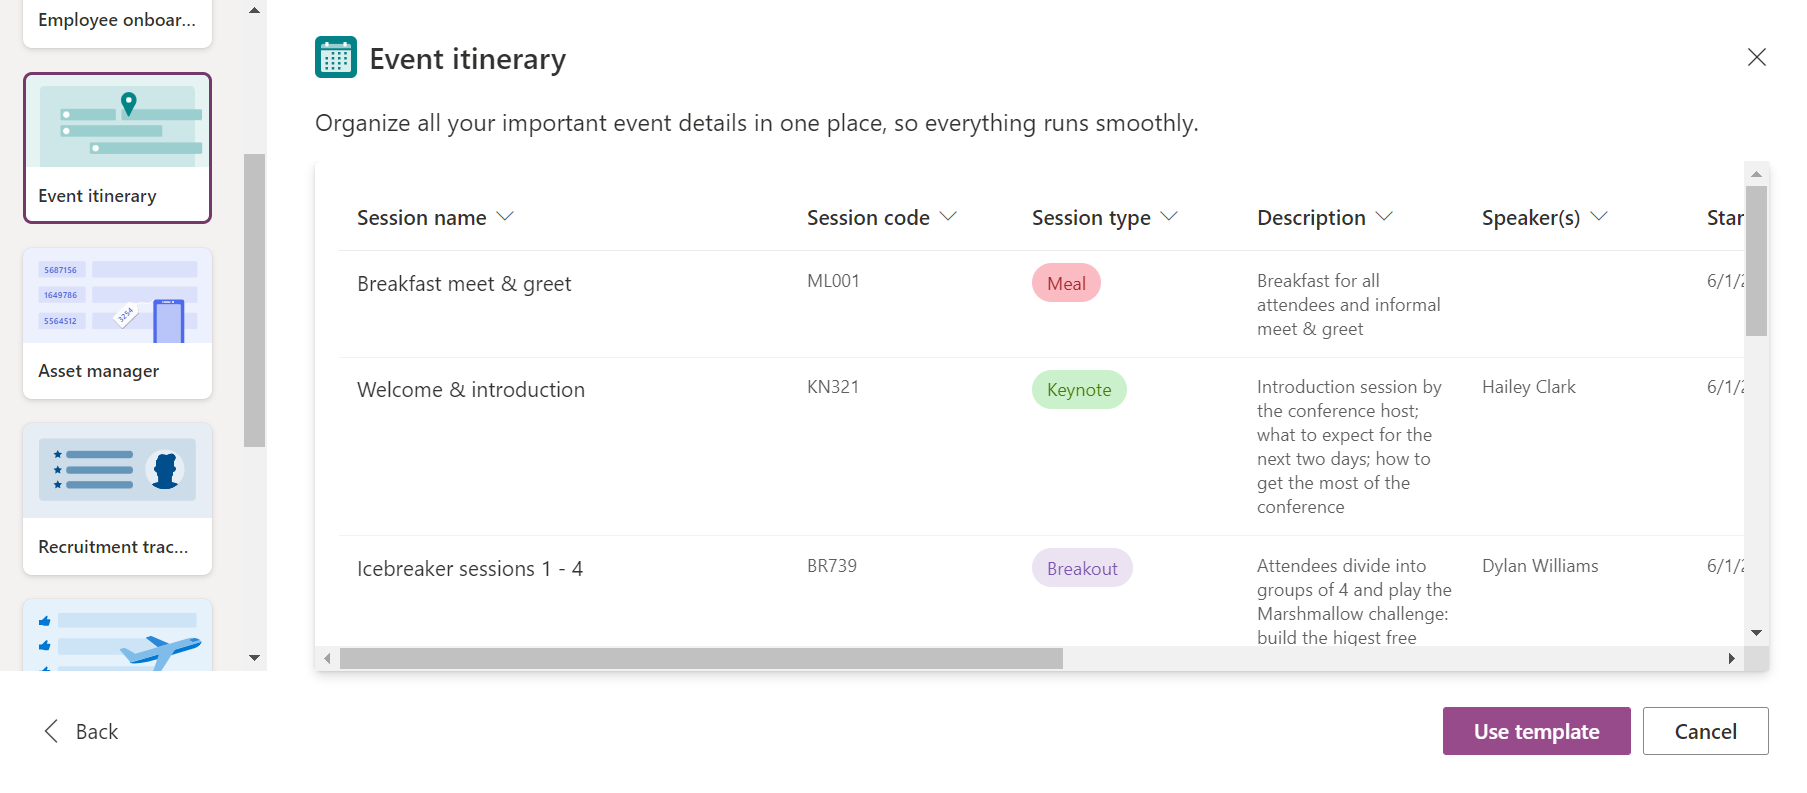
When you use templates in Lists, you get lists of predefined formats that you can customize to your work. To see what the templates till be used for and which headings/columns are in the template – click on one of the templates to create a new list.

Desciption of some of the templates:

  1. Issue tracker: With this template, you can follow up, manage and close cases. Set the priority and keep track of the progress of a case in the status column. Keep your team’s productivity going by sending notifications when they’re assigned cases.

2. Event itinerary: Gather all important event information in a single place for successful event planning. Track speaker names and email addresses, start and end times, room capacity, and more.

3. Employee onboarding: The checklist helps manage the onboarding of new employees and helps them succeed during their first few weeks at work. New employees can get tips on relevant contacts and resources.

Change settings for shared files in Microsoft 365

To share files/folders, change settings for sharing or stop sharing files/folders in Microsoft 365 you can use m365.umu.se. There you can choose if you want to share files/folders from SharePoint (i.e., Teams) or OneDrive. This manual shows you how to do it in SharePoint, but the same settings work for OneDrive as well. 

  1. Open m365.umu.se and sign in using your Umu-id.
  2. Click on the icon for SharePoint in the left menu.
  3. Select the SharePoint team where the files/folders you want to change settings for are located.
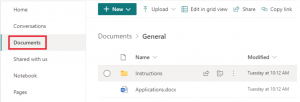
  4. Select Documents in the left menu to view all existing folders and documents on the. SharePoint team. A channel in Teams is viewed as a folder in SharePoint.
  5. Go to the folder or file you want to change settings for.
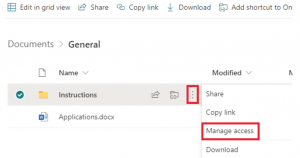
  6. Place the pointer on the file/folder to view a hidden menu.
  7. Click on the three dots and then Manage access.
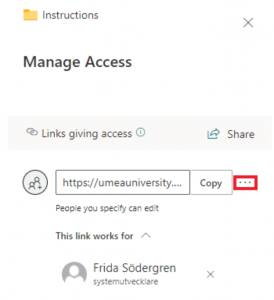
  8. Click on the three dots to change your settings.
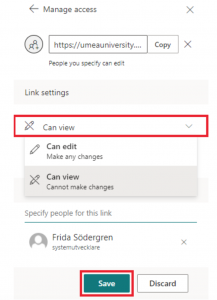
  9. You can choose if the ones who have access should be able to only read or be able to edit. Click on the area in the picture below. (Note that this setting affects all the people you have shared the file/folder with)
  10. Select Save when you’re done.
  11. You will now receive a control question. If you’re certain that you want to change the settings, select Change it, otherwise select Cancel. Done!

Share files in Microsoft 365

To share files/folders, change settings for sharing, or stop sharing files/folders in Microsoft 365 you can use m365.umu.se. There you can choose if you want to share files/folders from SharePoint (i.e., Teams) or OneDrive. This manual shows how you do it in SharePoint, but the same settings work for OneDrive as well. 

Recommendation storage and sharing

  • Use the tools in Microsoft 365 to store and share files.
  • Use OneDrive to store your own files, this service automatically backs up everything you save there.
  • Use SharePoint or Teams to store common files for collaborations.
  • Be careful not to store files containing sensitive personal data or confidential information in these tools.

Share file or folder

  1. Open m365.umu.se and sign in using your Umu-id.
  2. Click on the icon for SharePoint in the left menu.
  3. Select the SharePoint team where the files/folders you want to share are located.
  4. Select Documents in the left menu to view all existing folders and document on the SharePoint team. A channel in Teams is viewed as a folder in SharePoint.
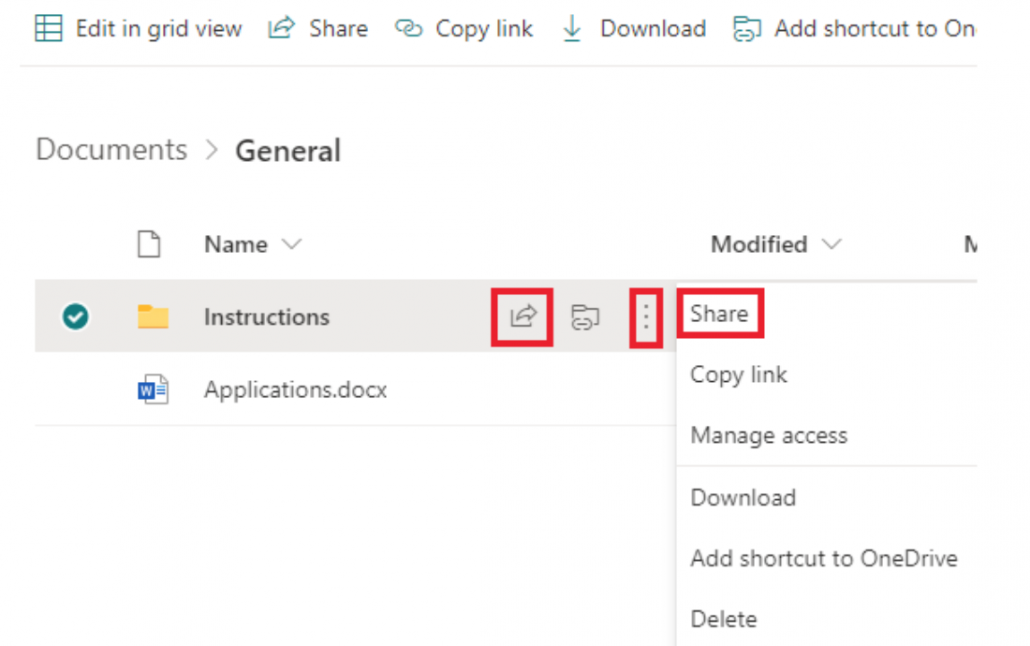
  5. Go to the folder or file you want to share. Place your pointer on the file/folder to view a hidden menu.
  6. Click on the three dots and select Share in the menu. You can also click on the icon with the arrow to go directly to share.
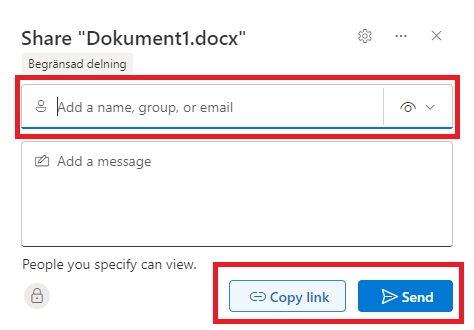
  7. Here you will find settings for sharing the file/folders. Begin by clicking within the area showed below to manage who will have access to the file/folders.
    Image showing how to share a file
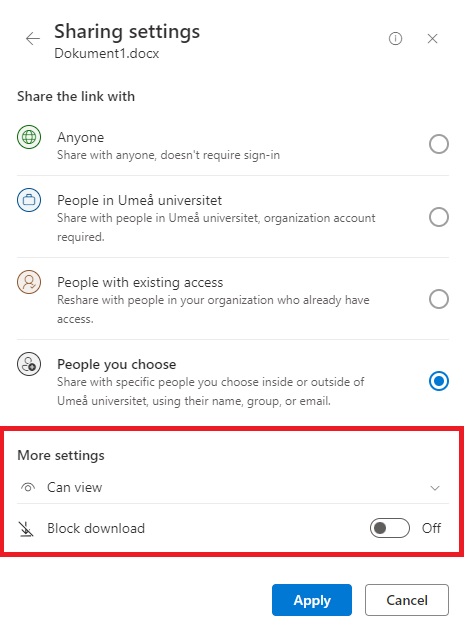
  8. There are three options on how to share the file/folders:
    • People in Umeå University with the link – everyone within the organization who has the link can access the file, regardless of whether the link was distributed by you or someone else.
    • People with existing access – the file can only be accessed by those with current access. Only use this option when you want to send a link to someone who already has accessed to the file.
    • Specific people – the file can only be accessed by the people you choose, even if others may already have access.
  9. Below More settings you can choose whether it should be possible to only read the file or be able to edit is as well. Click on the pen to the left if you want the receiver to be able to edit the file. This setting does not affect those that you’ve allowed to edit previously. You can also change if you want the receiver to be able to download the file.
    Image showing how to share a file
  10. Select Apply when your done with the settings.
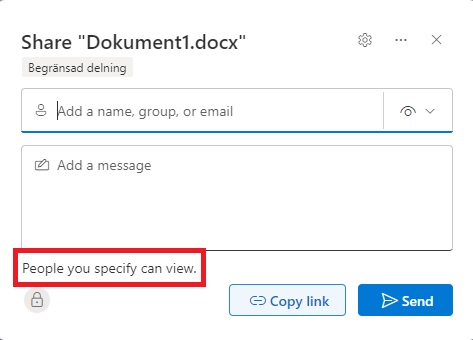
  11. Enter the name of the person, group or email address you want to share your file/folder with. The options will appear automatically when you start typing. You can choose to share the file/folder with several people at the samt time.
    Image showing how to share a file
  12. When you’ve chosen who you want to send the link to, there are two options for how to share the file/folder.
    Send – The recipient will then receive an email that gives them access to the file/folder. You will also receive a confirmation via email.
    Copy – you get a link that you can send via email or chat.
  13. Done! You have now shared your file/folder.

Frequently asked question about Microsoft Lists

Microsoft Lists is a Microsoft 365 app that helps you track information and organize your work. Here you can see favorites, recently worked lists, add comments, search worked lists or create lists with customized colors and icons.

What is the difference between Microsoft To do and Lists?

To Do is more adapted for your day-to-day personal task management. Microsoft Lists is better for larger-scale teams projects, process or workflow management.

How can I access Microsoft Lists?

You get access to Lists with Microsoft 356, Microsoft Teams or SharePoint. When you’re signed in on office.com, click on the app window. If you can’t find Lists among all the office apps, you can search for it in the search bar.

From teams, even before you enter a team, you can search for Lists from apps, click on the icon and select Add to a team. Type a team or the name of the channel.

If you’re already in a team, you can add a List to the teams channel by clicking + inside the team channel. Click on the icon att then Save.

Select already existing lists or create a new list. You can choose this both from Teams or directly in Lists, the app.

How do I create a list in Microsoft teams?

Follow these steps if you want to create a list in Teams based on an already existing list.

  1. Select from existing list.
  2. Select a team, a list and klick next.
  3. Enter a name for your List. And if you like, enter a description and choose a color and icon.
  4. Select create.

How do I delete a column in a list in Microsoft?

  1. Go to the list or library that you want to delete a column from.
  2. Select the column header for the column that you want to delete. Click right and Select Column settings and then Edit.
  3. At the bottom of the edit column pane, select Delete.

How do I share a list?

You can share a list from the Lists homepage.

  1. Click on the list on your homescreen, select Open action and then Share.
  2. Enter who you want to share the list with. It can be to one person or an entire group.
  3. Select what permissions you want the person/group to have.
  4. Select Grant access.

You can also share the list that’s currently open.

  1. Select Share in the toolbar att the top.
  2. Enter who you want to share the list with.
  3. Select what permissions you want to the person to have.
  4. Select Apply and then Send.

The receiver will get an email with a link to the list.

How do I assign tasks in Microsoft lists?

You can assign tasks to any member of a shared list, including yourself. To assign a task within a shared list, open the tasks detail view and select Assign to. Select the member of the shared list you’d like to assign the task to.

How do I delete a list in Microsoft teams?

Go to the channel i teams that contains the list you want to remove. Tap More at the top of the screen. Then click Delete to the right of the list name.

Can i link Microsoft lists?

To share a list, open the sharing menu by selecting the sharing icon on the top right of any of the list you’ve created. Select Create Invitation Link and then Copy link. Paste the sharing link in your email-app or a chatt of some kind to send the link.


Set up quiet hours for Teams on mobile phone

If you use Teams on your mobile phone you can set up quiet hours. This means that you can turn off all notifications for Teams during certain times, for example during evenings and weekends. 

Set up and activate quiet hours

  1. Open the Teams application on your phone.
  2. Select the menu in the upper left corner by clicking on your profile picture.
  3. Select Notifications.
  4. Select During quiet time.
  5. Here you can choose if you want quiet hours, quiet days or both. If you have an Android, you can also set exceptions if you want some type of content to always be visible regardless of quiet hours, for example if someone makes a mention.

Switch between public and private team

You can choose between two privacy settings in Teams – public or private team. This setting controls who can view and join your team. This instructions will show you how to change a public team to a private, or the other way around.  
Two types of privacy for teams

Public team
A public team is available to everyone at Umeå University. This means that when someone searches for teams, they can find your team in a list and join it without your approval. All files and content in a team is searchable for members of a team.
 Both students and staff can see and join public teams.

Private team
A private team is only available to the people you invite or approve. In most cases, you should choose a private team.


How to do:

  1. Go to your team and click on the three dots to the right of the teams name. Select Edit team.
  2. To switch between public and private – use the menu that says Privacy.
  3. Click on the arrow to the right and select a new option.
  4. Select Update.